- Merchant Integration Guide Introduction
- Supported Countries
- Supported Currencies
- Key Features
- Customer Checkout Flow
- User Experience
- Integration Options
- Security and Card Lifecycle Management
- Benefits for Merchants
- Merchant Registration
- REST 2.0
- REST 1.0
- Web SDK
- Simply Connect
- User Scenarios Provided by Paze
Merchant Integration Guide Introduction
Paze is an online payment method designed to simplify and secure payments for both merchants and customers. Functioning as a digital wallet, Paze allows customers to pay online without exposing their actual card numbers to merchants. The user experience is seamless—there is no separate app for customers to download and integration is straightforward for merchants.
Supported Countries
United States
Supported Currencies
USD
Key Features
- Digital Wallet Experience – Paze enables online payments by tokenizing customer card information, thereby significantly reducing risk and PCI compliance burdens.
- No App Required – A customer interacts with a ‘Paze’ button displayed on your checkout page or on the Nuvei Simply Connect integration to initiate a checkout using a bank-associated email address.
- Automatic Card Enrollment – Each participating bank automatically adds eligible card(s) to the customer’s Paze wallet. No manual enrollment is required.
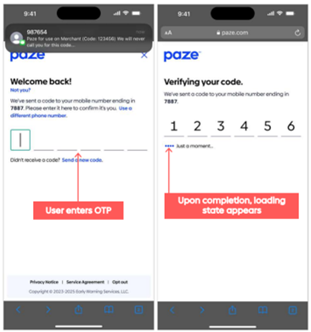
- Strong Authentication – A customer receives a one-time passcode (OTP) via SMS to verify identity at checkout. Passkey is supported.
- Network Tokens – Paze replaces sensitive card details with network tokens, enhancing security and making card updates seamless even if a card is reissued.
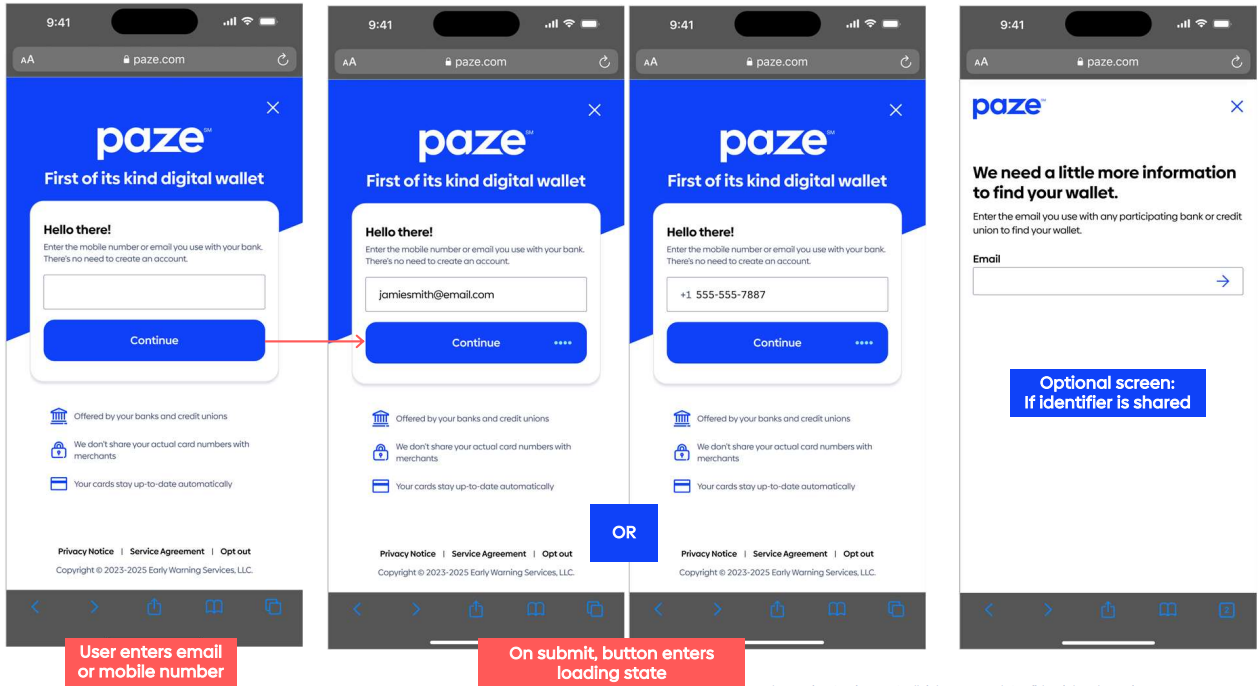
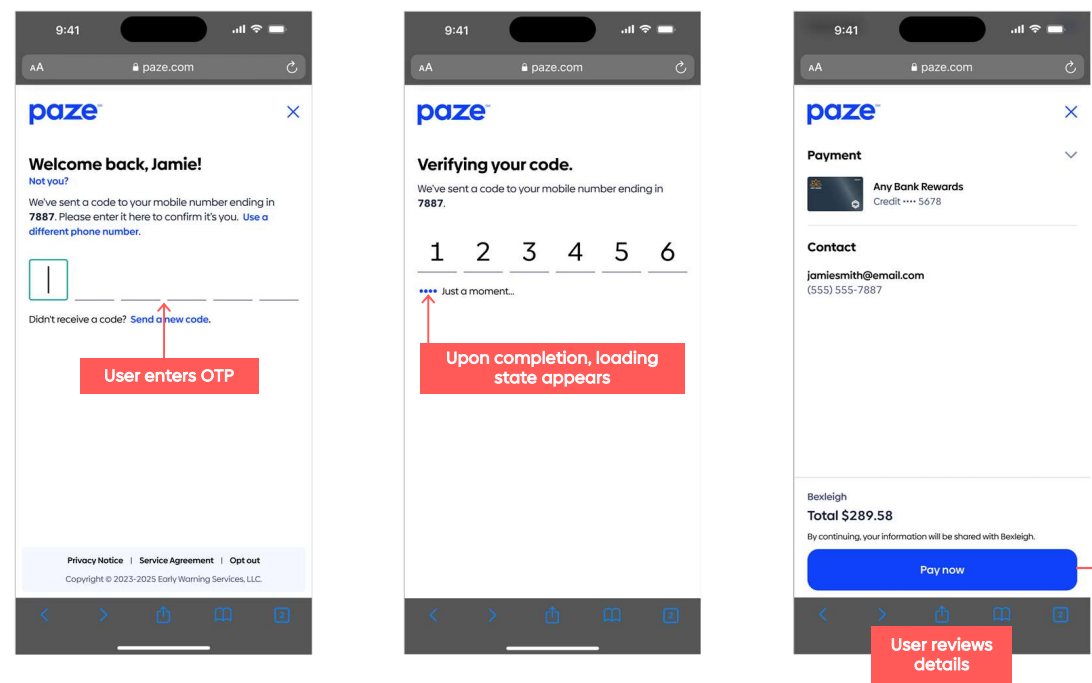
Customer Checkout Flow
- To initiate payment, the customer clicks the ‘Paze’ button or enters a bank-associated email at checkout.
- The customer authenticates via a one-time password (OTP) or passkey.
- Upon successful authentication, eligible cards (automatically added by participating banks) are displayed for selection.
- The customer selects a card and confirms the payment.
- Paze transmits a network token to the merchant, never exposing the real card number of the customer.
- The purchase is either approved, declined, or failed due to an error.
User Experience
Integration Options
The merchant chooses the integration method that best fits the merchant’s existing payment infrastructure and technical resources. Paze is supported by the following integrations:
- REST 2.0 API
- Web SDK 2.0
- Simply Connect 2.0
- REST 1.0
Security and Card Lifecycle Management
- Paze leverages tokenization to enhance transaction security. Each merchant receives a unique token which prevents exposure of actual card numbers.
- If a customer’s card is reissued or updated network tokens are updated automatically, ensuring uninterrupted service and reducing administrative overhead for both the merchant and the customer.
Benefits for Merchants
- Reduced PCI scope by handling tokenized card data.
- Lower fraud risk due to advanced authentication and tokenization.
- Streamlined user experience with no additional apps or manual card entry.
- Automatic card updates for reissued cards, reducing failed transactions.
Merchant Registration
REST 2.0
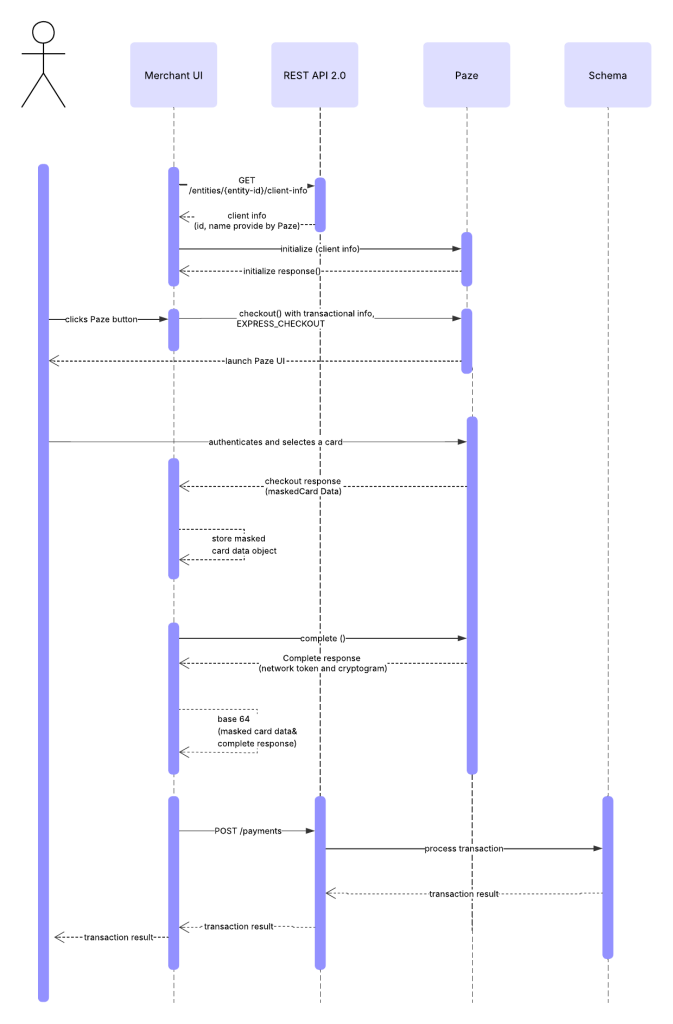
REST 2.0 Integration Flow
This section provides a detailed integration flow and integration flow diagram.
- The merchant calls
GET /entities/{entity-id}/client-infoto get the customeridvalue andnamevalue from Paze. - The merchant UI calls the
initialize()function, using the customeridandnamevalues in the call. - To initiate a checkout session, the customer clicks the ‘Paze’ button.
- The merchant UI calls the
checkout()function, using transactional information (email,phone,amount,currency) in the call. - The Paze UI launches.
- If the email and phone number are not provided by the merchant, the customer authenticates using email and phone number.
- The
checkout ()function returns, among other details, themaskedCardDataobject that should be stored by the merchant. - The merchant UI calls the
complete()function to obtain thecompleteResponseas returned from thecomplete()function. ThecompleteResponsereturns, among other details, the actual network token that is used for processing and the cryptogram. - From
completeResponse, the merchant adds the maskedCardData property to create apazeToken. - From the
checkout() response, the merchant assigns the value of the storedmaskedCardData. - The merchant encodes the
pazeTokenwith Base64 and provides the encoded result as the value of the token property in the payment request. - The merchant UI sends via REST 2.0 a POST /payments endpoint request.
- Schemes respond to REST 2.0 with the transaction status.
- REST 2.0 returns a response to the merchant UI.
REST 2.0 Integration Flow Diagram
Testing the Paze User-interface – Retrieving Checkout and Secure Payload Responses
This section provides a simplified walkthrough for testing the Paze user-interface, and for retrieving both the checkout response and the secure payload complete response.
This section explains how merchants can test the Paze user-interface and extract the values required to construct the Paze token that must be included in a REST payment request. A merchant can test the complete Paze checkout and secure payload flow using the public demo environment provided by Early Warning Services.
1. Accessing the Paze Demo
The merchant accesses the interactive Paze demo at: https://checkout.wallet.uat.earlywarning.io/demo
The demo environment simulates the full Paze wallet experience, including user-interface flow, masked card details, and secure payload generation.
2. Providing Client Information:
Before launching the user-interface, on the configuration tab the merchant must complete the following configuration fields:
- id – Internal client identifier
- name – Client display name
- profileId – Paze profile Id associated with the merchant
To obtain the values for the configuration fields, the merchant must perform a GET request to: https://api-sandbox.nuvei.com/paze-api/entities/{processing-entity-id}/client-info
After entering the values, the merchant must click ‘Call initialize’.
3. Running Paze Checkout User-interface
To launch the Paze user-interface, the merchant clicks ‘Call checkout’.
Test credentials:
- Email: [email protected]
- Phone: Not required
- OTP: 758595
- CVV: 022
Follow the flow until the confirmation step.
Paze returns the checkout response, which includes masked card data (PAN, expiry, card type).
4. Retrieving the Secure Payload
After reviewing the checkout response, the merchant must click ‘Call complete’.
The merchant receives the secure payload, which contains:
- Cryptographically protected payment instrument data
- Metadata required for constructing the external token
REST 2.0 Implementation
Example Response
{
    "client": {
        "id": "paze id",
        "name": "merchant name"
    },
    "result": {
        "status": "success"
    }
}
If the Merchant invokes the POST /payments or POST /orders/payments endpoints, the merchant should provide the data in the request as shown in the following example.
Example Request
{
..............

  "paymentOption": {
    "networkToken": {
      "provider": "Paze",
      "token": "Paze token"
.............

    }
  }
}
Nuvei supports the following operations with Paze: payments, payouts, settlements, refunds, and voids.
Example Response
{
  "paymentId": "2c71acd502c64413b8edab7340097d02",
  "transactionId": "2110000000021949102",
  "externalTransactionId": "526805192182",
  "amount": 19.64,
  "currency": "USD",
  "transactionType": "Sale",
  "result": {
    "status": "approved"
  },
  "authCode": "070630",
  "partialApproval": {
    "requestedAmount": 19.64,
    "requestedCurrency": "USD"
  },
  "paymentOption": {
    "networkToken": {
      "provider": "Paze",
      "eciIndicator": "07",
      "expirationMonth": "05",
      "expirationYear": "32",
      "bin": "455955",
      "last4Digits": "2906",
      "acquirerId": "103",
      "cardType": "Debit",
      "cardBrand": "VISA"
    }
  }
}
REST 1.0
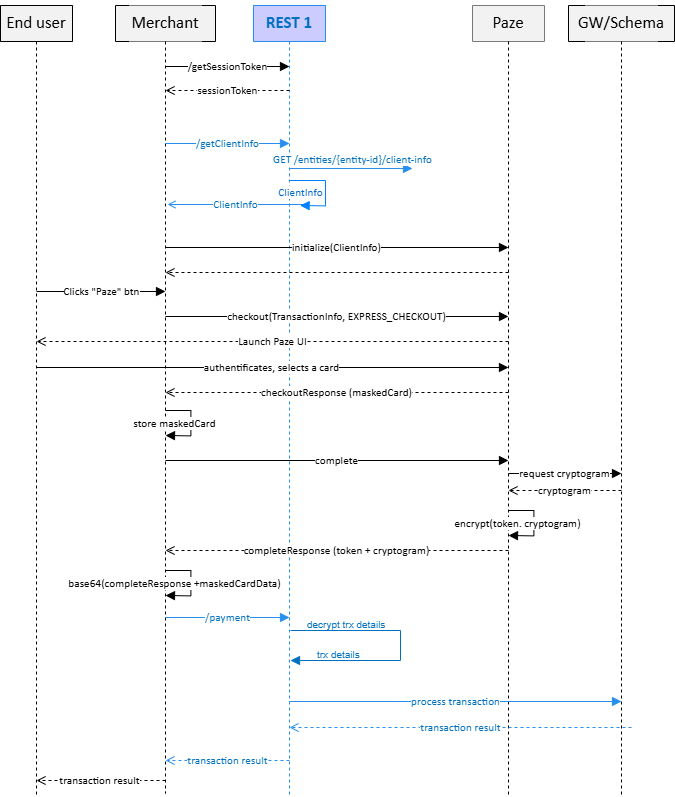
REST 1.0 Integration Flow
This section provides a detailed integration flow and integration flow diagram.
- The merchant calls
getClientInfoto get the customeridvalue andnamevalue from Paze. - The merchant UI calls the
initialize()function, using the customeridandnamevalues in the call. - To initiate a checkout session, the customer clicks the ‘Paze’ button.
- The merchant UI calls the
checkout()function, using transactional information (email,phone,amount,currency) in the call. - The Paze UI launches.
- If the email and phone number are not provided by the merchant, the customer authenticates using email and phone number.
- The
checkout ()function returns, among other details, themaskedCardDataobject that should be stored by the merchant. - The merchant UI calls the
complete()function to obtain thecompleteResponseas returned from thecomplete()function. ThecompleteResponsereturns, among other details, the actual network token that is used for processing and the cryptogram. - From
completeResponse, the merchant adds the maskedCardData property to create apazeToken. - From the
checkout() response, the merchant assigns the value of the storedmaskedCardData. - The merchant encodes the
pazeTokenwith Base64 and provides the encoded result as the value of the token property in the payment request. - The merchant UI sends via REST 1.0 a POST /payments endpoint request.
- Schemes respond to REST 1.0 with the transaction status.
- REST 1.0 returns a response to the merchant UI.
REST 1.0 Integration Flow Diagram
REST 1.0 Implementation
Example Request
{
"sessionToken": "<<your session token>>",
"merchantId": "<<your merchantId>>",
"merchantSiteId": "<<your merchantSiteId>>"
}
Example Response
{
"internalRequestId": 1760598204598,
"status": "SUCCESS",
"errCode": 0,
"merchantId": "<<your merchantId>>",
"merchantSiteId": "<<your merchantSiteId>>",
"version": "1.0",
"sessionToken": "<<your session token>>",
"paze": {
"id": "F5XKSMPIY2IO6GLDSHEK13JZ2lOl_wajs5oO7FBT5zXrTUX7E",
"name": "Nuvei",
"profileId": "Nuvei"
}
}
Example POST Request to /payment.do with Decrypted Card Token
[...]
"paymentOption": {
"card": {
"cardNumber": "5****5377",
"cardHolderName": "FL-BRW1",
"expirationMonth": "02",
"expirationYear": "2032",
"brand": "Mastercard",
"last4Digits": "5208",
"externalToken": {
"externalTokenProvider": "Paze",
"eciProvider": "7",
"cryptogram": "AwAAAAAAUjULbRAAAAAAgQIAAAA=",
}
[...]
Example Response for Decrypted Card Token
"paymentOption": {
"card": {
[...]
"externalTokenProvider": "Paze",
[...]
}
}
Example POST Request to /payment do with Encrypted Card Token
[...]
"paymentOption": {
"card": {
"externalToken": {
"externalTokenProvider": "Paze",
"mobileToken": "ICB7C***XQ3ciCiAgfQ==",
},
},
}
[...]
Example Response for Encrypted Card Token
"paymentOption": {
"card": {
[...]
"externalTokenProvider": "Paze",
[...]
}
}
Web SDK
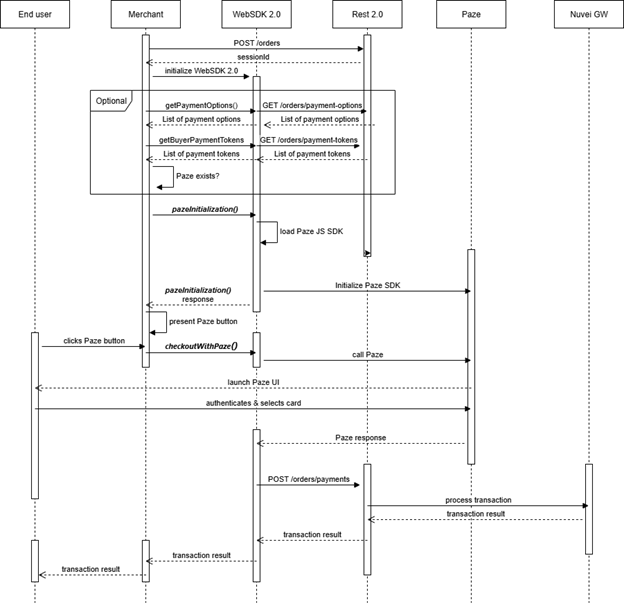
Web SDK 2.0 Implementation Flow
- The merchant must first initialize the Nuvei WebSDK 2.0 using the regular flow.
- The merchant can get the account payment methods list and the payment tokens list. This enables the merchant to check if the Paze payment method is one of the supported methods for the merchant location and is in the merchant configuration with Nuvei.
- If the Paze payment method is one of the supported methods for the merchant location and is in the merchant configuration with Nuvei, then merchant should initialize the Paze payment method by evoking a dedicated
pazeInitialization()method for WebSDK 2.0. - The WebSDK 2.0
pazeInitialization()method returns a response that includes the state indicating if the Paze SDK is initialized successfully or not.
Request/Response Example:sdkInstance.pazeInitialization().then(console.log)The method
initializePazereturns{initializedPaze: true}. - Based on the response, the merchant is responsible of displaying the ‘Paze’ button in the merchant user-interface.

Example CSS
{ "paze-button": { "padding": "30px 65px", "background-color": "#0f42f8", "color": "white", "border": "none", "border-radius": "4px", "cursor": "pointer" } } - If an end-user presses the ‘Paze’ button in the merchant UI, the merchant must call a second dedicated WebSDK 2.0 method:
checkoutWithPaze() - If evoked, WebSDK 2.0 is notified that a Paze payment is requested and then notifies Paze.
- Paze automatically redirects the end-user to an authentication page where the end-user selects a card within the Paze profile. See User Experience.
- If end-user authentication is successful, WebSDK 2.0 automatically ensures that Paze handles the payment request.
- WebSDK 2.0 informs the merchant of the outcome of the transaction request by making available the back-end response object copy in the console.
- The merchant must verify the outcome of the transaction according to the WebSDK 2.0 transaction verification flow.
Web SDK Paze Flow Diagram
Simply Connect
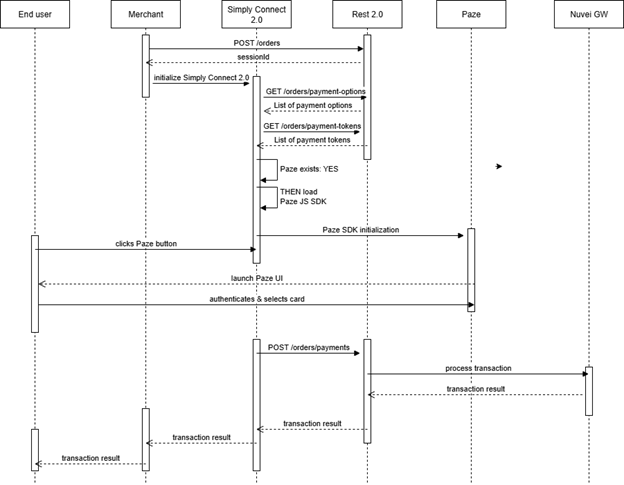
Simply Connect 2.0 Integration Flow
-
- The merchant initializes Simply Connect 2.0.
- Simply Connect 2.0 checks if the Paze payment method is configured for your
processingEntityId. - If Paze is configured, on loading of the payment page at the end of the regular initialization step Simply Connect 2.0 displays the Paze button in the user-interface.
- On initialization of Simply Connect 2.0, a merchant can control the display of the Paze button within payment pages using
apmConfigsettings. - Using the property and value
buttonLocation: onTop, within theapmConfigblock a merchant renders the Paze button above of the card fields, nested within the card fields block.
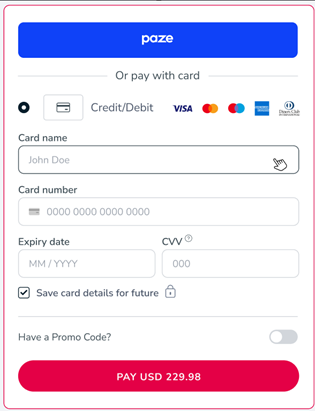
Example Code
simplyConnect({
    uiConfig: {
        apmConfig: {
            paze: {
                buttonLocation: 'onTop',
            }
        }
    }
});
- Using the property and value
buttonLocation: gallerywithin theapmConfigblock, a merchant renders the Paze button within the available payment methods list as a separate payment method in its own frame.
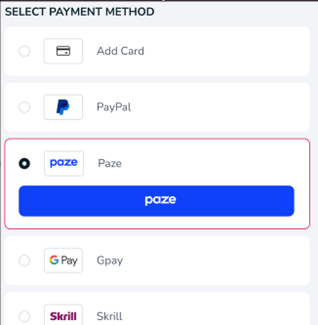 Example Code
simplyConnect({
    uiConfig: {
        apmConfig: {
            paze: {
                buttonLocation: 'gallery',
            }
            ,
        }
        ,
    }
    ,
});
- When an end user presses the Paze button on the payment page, the Paze authentication user-interface is displayed for the end-user.
-
- If the merchants sends user detail parameters (
emailand/orphone number) within thePOST /ordersrequest, then the end-user is automatically recognized by the Paze system.
- If the user detail parameters are not provided in the
POST /ordersrequest by the merchant, then the Paze login uesr-interface is displayed for the end-user.
- If the merchants sends user detail parameters (
-
- After successful authentication, the end-user selects a card in the Paze profile. See User Experience.
- Simply Connect 2.0 and Paze automatically handle the payment request.
- The payment status is returned to Simply Connect 2.0 via the usual payment response from the back-end and displays a status message for the end-user.
- Simply Connect 2.0 informs the merchant of the status of the transaction request via the back-end response object copy in the console.
- The merchant must verify the status of the transaction as per the Simply Connect 2.0 transaction verification flow.
Simply Connect 2.0 Paze Payment Flow
User Scenarios Provided by Paze
First Time User Experience – https://developer.paze.com/public/docs/user-scenarios
Recognized Returning User Experience – https://developer.paze.com/public/docs/user-scenarios-copy
Implementing Paze Button (for a merchant with a merchant UI) – https://developer.paze.com/public/docs/merchant-integration-guide
 Last modified February 2026