- Card Expiration Date
- Credit Card Installments
- Currency Conversion
- Currency Display Format
- Decline Recovery
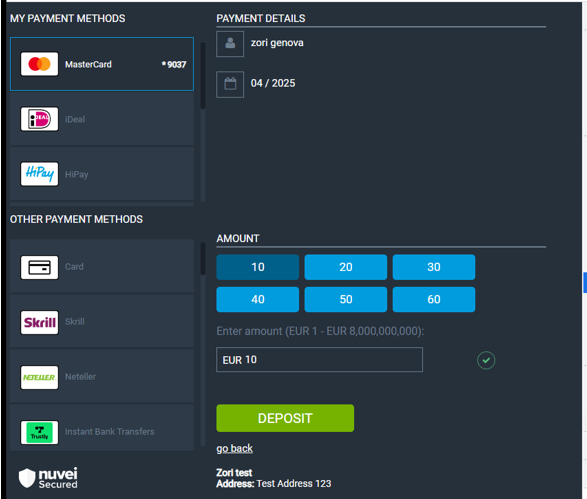
- Displaying Merchant Name and Address
- Exposing the Acquirer Bank Name in an APM DMN
- Expose Message Keys
- External Subscription Support
- Fees
- Filtering APMs
- Grouped Payment Method Presentation
- Mastercard ABU and Visa Account Updater
- No CVV Required
- Pending Withdrawal
- Quick Deposit
- Scan Card
- Stored Card Credentials
- Theme Type
- UPO Removal
- Visual Promotion for Selected APM by the Merchant
This page presents additional features that you can perform with Nuvei’s Payment Page.
Card Expiration Date
This feature allows the customer to change the expiration date of their credit/debit cards according to the merchant configuration in the Payment Page.
There are six configuration options from which the merchant can choose:
- Default – The customer is able to edit the card expiration date after the card expires.
- Current Month – The customer can edit the card expiration date at the beginning of the month in which the card expires.
- Previous Month – The customer can edit the card expiration date one month before the card expires.
- Two Months Back – The customer can edit the card expiration date two months before the card expires.
- Three Months back – The customer can edit the card expiration date three months before the card expires.
- Always Editable – The expiration date for the card is always editable so the customer can have full control over the card stored on our Payment Page.
For each of these configuration options, the customer does not need to add a new card because the card issuer simply sends the same card with an updated expiration date.
Example of Always Editable

Credit Card Installments
This feature allows the customer to pay in installments using a credit card. The number of installments is determined by the merchant’s request to the Payment Page open URL, based on the merchant’s financial requirements.
The merchant’s acquirer bank must support processing a payment using installments; otherwise, this feature is not available.
The merchant can control the implementation of payment installments and their presentation by sending the following parameters to the Payment Page open URL:
- allow_installments =1 (whether to allow payment installments to be used)
- allow_special_debit=1 (whether to support credit installment for the Israeli market)
- max_num_installments
- max_num_debit_installments
Example of Installments in the Payment Page

Currency Conversion
Currency conversion allows the merchant to offer the user the option to deposit with their local currency and convert it to the desired currency.
There are three types of currency conversion that can be applied on the payment page:
| Type | Description |
|---|---|
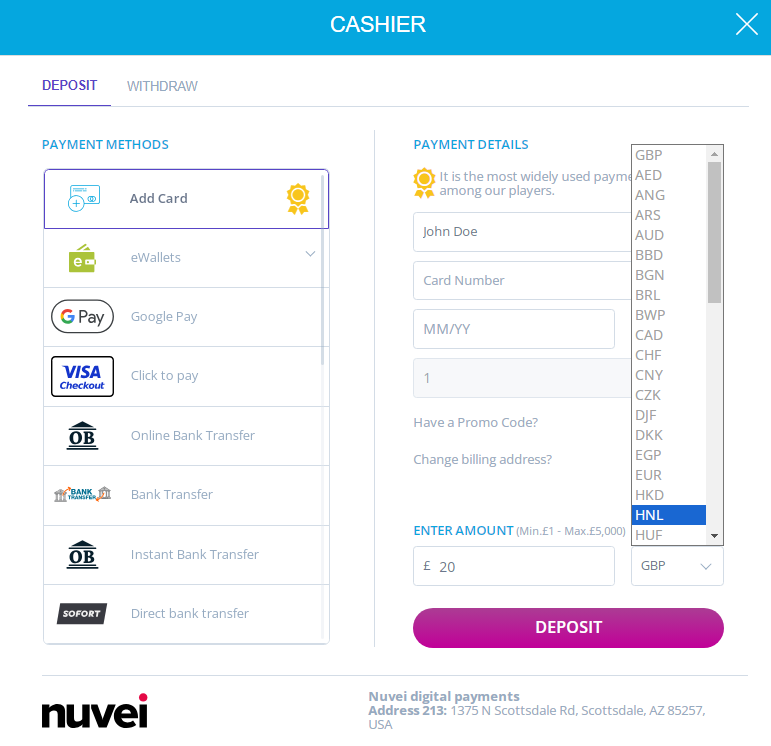
| Enabled | Allows the user to convert their amount’s currency to any currency that the payment method allows for processing. |
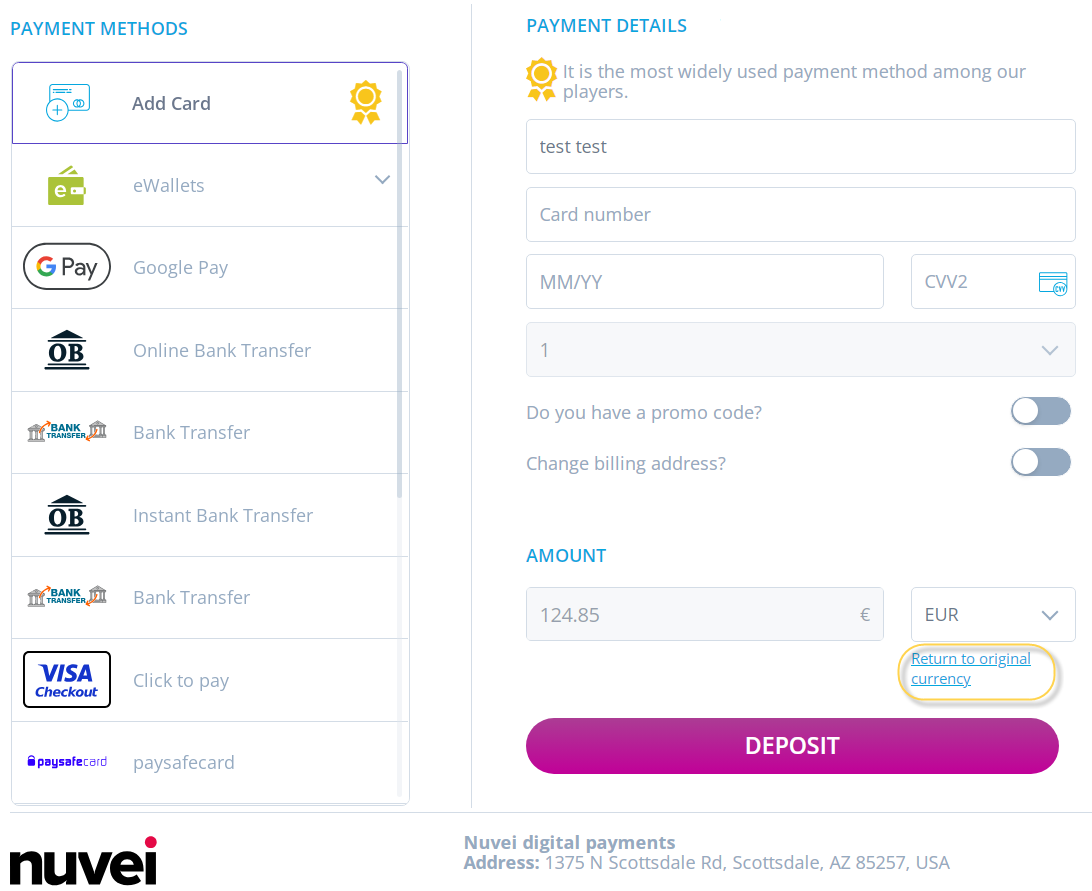
| Auto-convert | The payment page displays the amount automatically converted to the user’s local currency, but the user still has the option to roll back to their original deposit purchase currency or to choose a different currency for conversion from the dropdown list. |
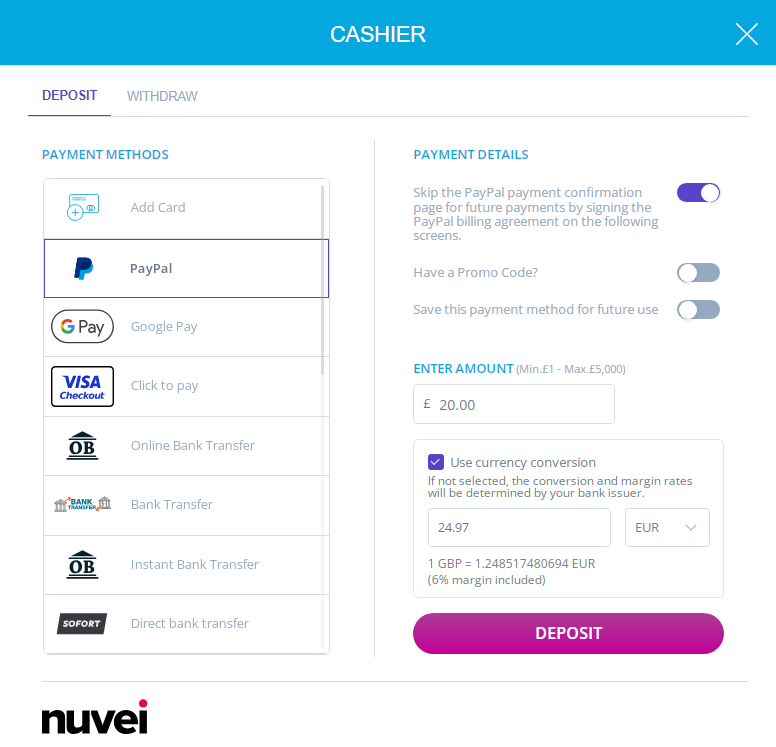
| DCC | Works according to the Visa/Mastercard mandate to present to the user the original deposit purchase amount, conversion rate, and fees that the user is charged when they actively consent to convert the purchase amount and currency to their local currency. |
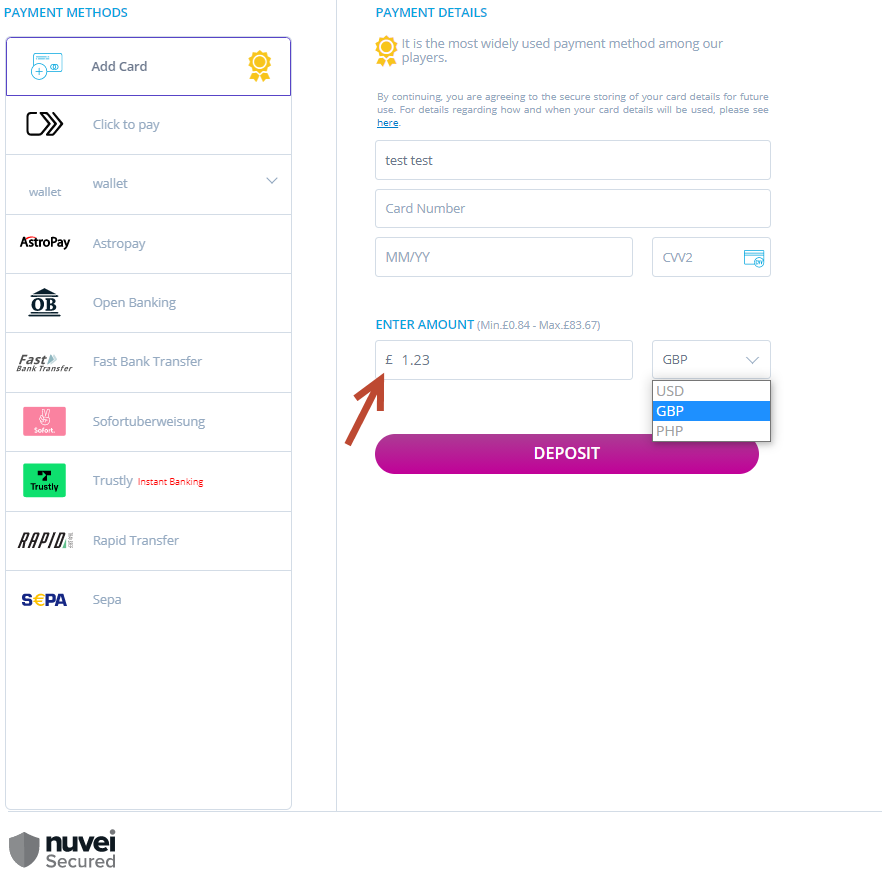
Currency Conversion in the Payment Page
Enabled
Auto-convert
When the user presses “Return to original currency”, the amount returns to the original amount that was sent in the Payment Page request without conversion.
DCC
Override Automatic Currency Conversion
The merchant can override the automatic currency conversion by adding “disableAutoConvert=1” in the URL call.
The override action displays the currency according to the original call.
Example Without Parameter “disableAutoConvert=1”
In this example, the customer is from the UK and is paying in USD. When the automatic currency conversion is enabled, the Payment Page presents the currency according to the customer’s geolocation (UK).
Example With Parameter “disableAutoConvert=1”
This value disables the automatic conversion so the Payment Page presents the original currency from the call (USD) and not in GBP when Auto-convert is enabled.
Currency Display Format
This feature allows the currency to be displayed according to the customer’s local formatting conventions as follows:
- The relevant currency symbol is displayed for the local ISO Currency.
- The currency symbol is displayed on the left or right side of the transaction amount value.
- The decimal separator for a transaction amount is either a point or a comma. Similarly, the separator for thousands is either a point or a comma.
The merchant theme must support this feature.
Examples
If the customer is from Spain, the Euro symbol is shown on the right side and a decimal point is used:

For a customer from the United Kingdom, the British Pound symbol appears on the left side and a decimal comma is used:
Code Examples
Country: UK
Currency GBP


Country: UK
Currency: BGN


Decline Recovery
A certain percentage of payment requests are declined leading to the loss of those potential sales and transactions. This feature enables you to recover as many of these potential sales and transactions as possible.
When the customer receives a decline, a pop-up or dialog offers other payment options:
- Select another payment option.
- Contact the merchant for support.
- For the gaming industry, you have the option to suggest a new amount.
Displaying Merchant Name and Address
As a part of Visa regulations, the merchant name and address must be displayed on the Payment Page.
Nuvei now displays the required information at the bottom of the Payment Page and provides a way to set and/or update this information using our Control Panel.
Merchants simply need to provide Nuvei with their merchant name and merchant address including any translated versions to whatever different languages they require, and Nuvei sets up the information on the Payment Page.
Desktop Example
Mobile Example

Exposing the Acquirer Bank Name in an APM DMN
The name of the acquirer bank handling a transaction is included in each DMN sent for that transaction.
This makes Nuvei more transparent to the merchant as the payment service provider.
Example Deposit DMN
...'ppp_status=OK&Status=APPROVED&ExErrCode=0&ErrCode=0&errApmCode=0&errApmDescription=&errScCode=0&errScDescription=&Reason=&ReasonCode=0&PPP_TransactionID=37595011&userid=ScMigrationTest3&merchant_unique_id=97c10831-d399-48d7-8ea5-41f89619d2fa6&customData=NovoES&productId=test_name_1&first_name=John&last_name=Doe&email=john.doe%40gmail.com¤cy=GBP&customField1=meccabingo.com&customField2=a2db82db-8186-44bb-a6d9-cb9f8f7ea25e&customField3=&customField4=&customField5=&customField6=&customField7=&customField8=&customField9=&customField10=&customField11=&customField12=&customField13=&customField14=&customField15=rnk_pr01&invoice_id=&address1=Test+Address&address2=2992&country=United+Kingdom&state=&city=San+Diego&zip=12345&phone1=13094526617&phone2=&phone3=&client_ip=127.0.0.1&nameOnCard=&cardNumber=&bin=&noCVV=&acquirerId=&acquirerBank=TokenIO-PI&expMonth=&expYear=&Token=&tokenId=&AuthCode=700001&AvsCode=&Cvv2Reply=&shippingCountry=&shippingState=&shippingCity=&shippingAddress=&shippingZip=&shippingFirstName=&shippingLastName=&shippingPhone=&shippingCell=&shippingMail=&total_discount=0.00&total_handling=0.00&total_shipping=0.00&total_tax=0.00&buyButtonProductBundleId=&merchant_site_id=178906&merchant_status=&action=&requestVersion=&message=APPROVED&merchantLocale=en_US&unknownParameters=&payment_method=apmgw_Open_Banking&ID=&merchant_id=4526724817460808257&responseTimeStamp=2022-06-27.07%3A56%3A18&buyButtonProductId=&webMasterId=&appliedPromotions=&uniqueCC=&transactionType=Sale&externalEmail=&cardCompany=&eci=&user_token_id=chochoRank1grtvtsenti4vb84848jdss&user_token=auto&userPaymentOptionId=8198651&TransactionID=2110000000006453941&externalTransactionId=t%3A9AAnpwXQkEqnGLoby6m1aGivHEvNRcHU6Vz3A9ypGE37%3A3VMczyq7r7b6HwC&APMReferenceID=ED214428912B213798B2CDD4B75BF9D7&orderTransactionId=18810451&totalAmount=10.00&dynamicDescriptor=Chocho_Descriptor&item_name_1=test_name_1&item_number_1=&item_amount_1=10.00&item_quantity_1=1&item_discount_1=0.00&item_handling_1=0.00&item_shipping_1=0.00&feeAmount=&amountWithoutFee=&houseNumber=&customCurrency=&upoRegistrationDate=20220627&type=DEPOSIT&clientRequestId=&relatedTransactionId=&apmPayerInfo=%7B%22bankDetails%22%3A%7B%22account%22%3A%7B%22iban%22%3Anull%2C%22gbDomestic%22%3A%7B%22sortCode%22%3A%22700001%22%2C%22accountNumber%22%3A%2270000001%22%7D%7D%2C%22name%22%3A%22Mr.+Roberto+Rastapopoulos+%26+Mr.+Mitsuhirato%22%7D%2C%22refId%22%3A%222110000000135218%22%7D&accountVerificationStatus=not_verified&sessionId=42479acfb7d9c0254d71bac29f38&responsechecksum=f45080cfb70ce776ed40439c593d35e3&advanceResponseChecksum=2af18915b8810de01235cb6fb47651ee',
Example Withdrawal DMN
...'wdOrderId=5047841&wdRequestId=6341421&gwTrxId=2110000000006455713&lifeCycleId=null¬ificationType=WITHDRAW_ORDER_NOTIFICATION&merchantSiteId=191171&merchantGwId=7563627728732665274&merchantLocale=en_US&wdRequestState=Closed&wdRequestStatus=Approved&wdOrderStatus=Settled&settlementType=WITHDRAWAL&gwErrCode=0&gwExtendedErrorCode=0&apmTrxId=2110000000135355&apmReferenceId=F32F57161C60F1F3FC0CCFAEF70E2B4D&apmErrorCode=0&firstName=Fname&lastName=Lname&userTokenId=13395012AcquirerBank1&zip=123456&city=Madrid&country=CA&phone1=0987654321&email=test%40mymail.com&address=Guakamele+el+boss+15&amount=100.00&approvedAmount=100.00¤cy=EUR&userId=Lorem&userPMId=8199421&paymentMethod=apmgw_Neteller&version=1.0&pmDisplayName=guyp%40nuvei.com&customField1=enracha.es&client_ip=127.0.0.1&wdOrderAmount=100.00&wdOrderCurrency=EUR&responseTimeStamp=2022-06-27.13%3A31%3A03&ExternalaccountID=guyp%40nuvei.com&externalAccountDescription=nettelerAccount%3Aguyp%40nuvei.com&feeAmount=0.0&transactionAmount=100.0&merchantUniqueId=merchuniqueid&upoRegistrationDate=20220627&acquirerBank=Neteller+Direct&checksum=790f0305c0b251e46b1aa88bf4d582f81ea6de614af735fa1de6d87f8393f927',
Expose Message Keys
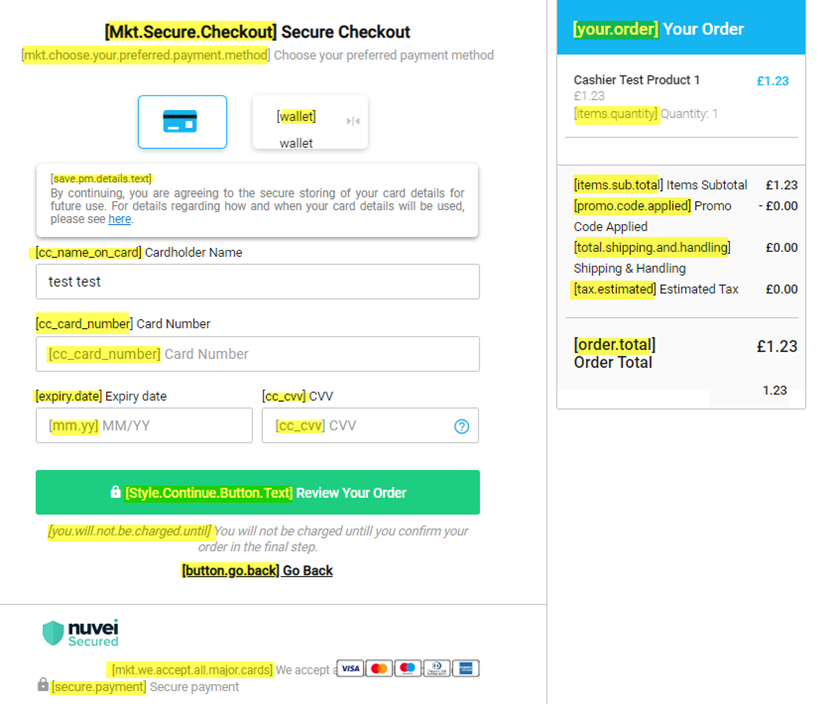
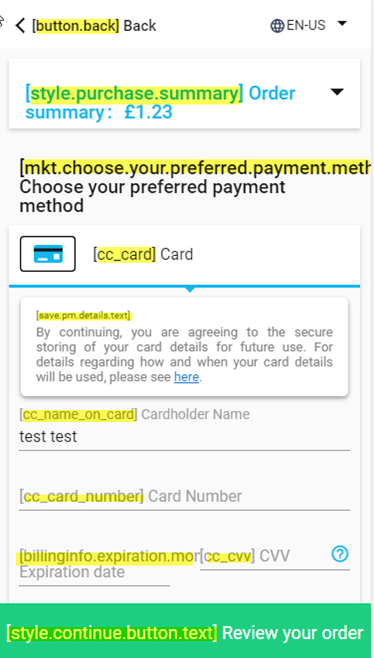
To help merchants determine which message keys to define and modify when using the Control Panel Text & Translations page, you can expose message keys on the Payment Page by manually adding &showMessageKeys=true to the Payment Page URL.
To expose message keys on the Payment Page:
- Open the Payment Page as an IFrame in Google Chrome, right-click on an empty area of the page, and then select View frame source.
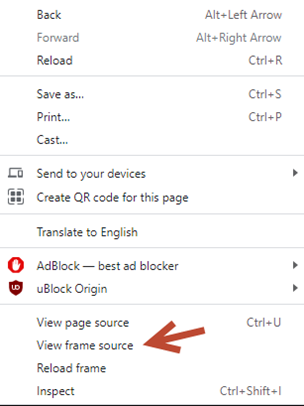 A new tab opens in Chrome.
 - In the address bar of the new tab, remove view-source: from the beginning of the URL and add &showMessageKeys=true.
- Open the modified URL.
Example of a Modified URL with &showMessageKeys=true
Example of a Desktop Payment Page with &showMessageKeys=true – Message Keys Highlighted in Yellow
Example of a Mobile Payment Page with &showMessageKeys=true – Message Keys Highlighted in Yellow
External Subscription Support
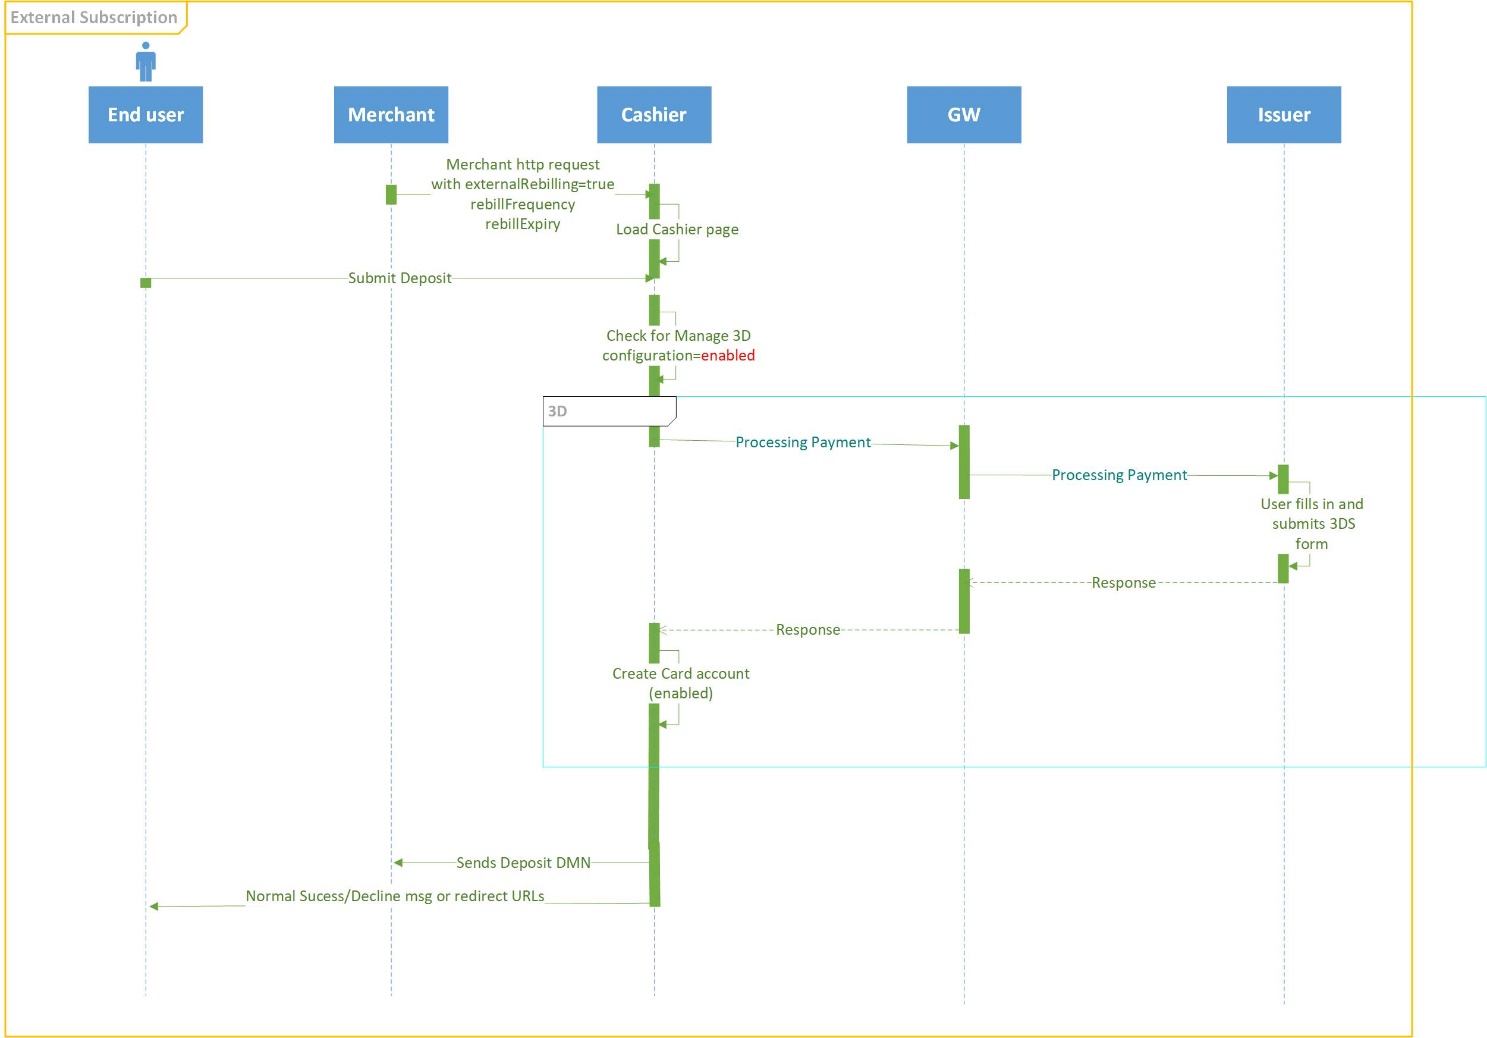
This solution allows you to use your own (“external”) subscriptions (recurring payment systems) to keep track of your customer subscriptions, use Nuvei Payment Page to perform the initial subscription payment, and send all subsequent (recurring) transactions using Nuvei REST API methods.
Initial Charge
For the initial charge, use the Nuvei Payment Page to perform the initial subscription card payment. If 3D Secure (3DS) is applicable in your region, then this “first” transaction may include the relevant 3DS challenge functionality (which complies with the SCA (Strong Customer Authentication) mandate and the 3DS protocol).
All Subsequent (Recurring) Charges
You can send all the subsequent (recurring) transactions using Nuvei REST API methods.
For details see the Submit Subsequent MIT Payments – For Payments Originally Initiated by Nuvei topic.
Prerequisites
The merchant should include the following additional parameters in the Payment Page HTTP request:
externalRebilling=truerebillFrequencyvaluerebillExpiryvalue
Payment Page HTTP Request Example
Flow Diagram
Fees
Fees can be applied to each payment method and can be triggered by the customer’s country of origin, currency, and amount when the deposit is made.
You can decide to apply the fees in the following two ways:
- Reduce or add the fees from their transaction by taking some percentage from the deposit/withdrawal.
- Reduce or add the fees from their transaction by taking a fixed price from the deposit/withdrawal.
You can configure the system to:
- Trigger the fees based on a specific amount used by the customer.
- Or, define a specific amount that does not trigger the fees at all.
Example

Filtering APMs
The Payment Page solutions allow you to filter which alternative payment methods (APMs) are displayed in the payment method gallery, as described below:
- Including the
countryandcurrencyparameters in your HTTPS request to Payment Page, limits the APMs displayed in the payment method gallery, to those that support that country and currency. In such a case, sendingcountry=”CN” (China) andcurrency=”CNY” (Yuan) displays all available APMs that support “China” and “Yuan”, such as UnionPay, in the gallery along with the other APMs and traditional payment methods. - You can use the
payment_methodparameter in the HTTPS request to specify the payment method to display instead of the default credit card options, in the payment method gallery as the Payment Page loads in the customer’s browser. The customer can then enter their APM credentials without searching for the payment method from the gallery and proceed to make their deposit.
For a list of the possiblepayment_methodvalues, see APM Input Parameters.
Grouped Payment Method Presentation
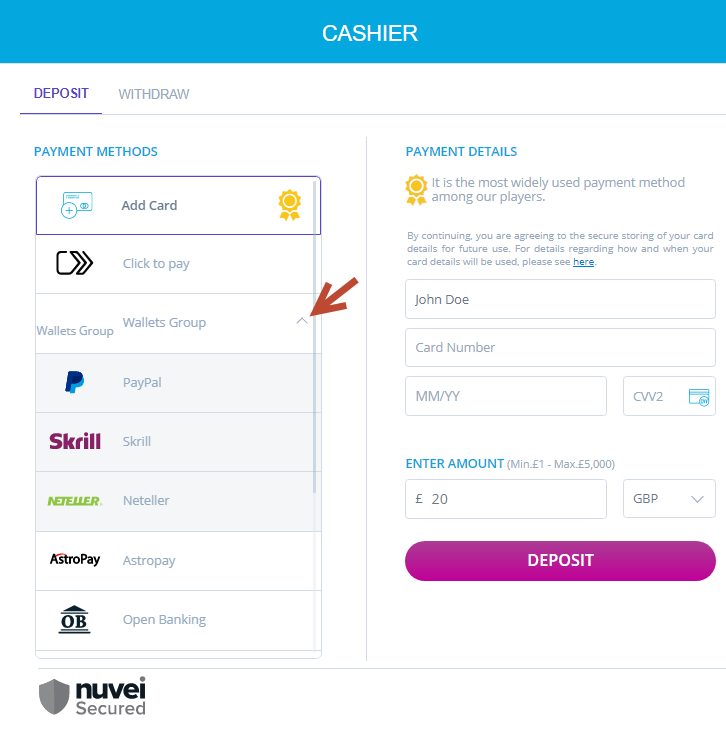
This feature enables the merchant to present specific payment methods under a single group item on the Payment Page, making it easier to find their desired payment method(s).
This is how payment method groups look like in the Payment Page:
Lucky Day
Desktop Examples
Closed Group
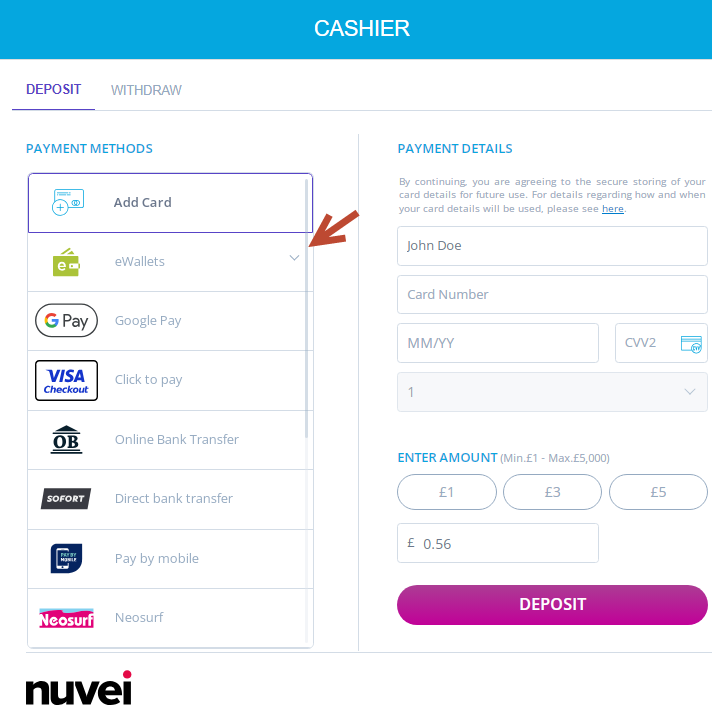
Opened Group
Mobile Examples
Closed Group

Hot Ice
Desktop Examples
Closed Group

Opened Group

Mobile Examples
Closed Group
Opened Group

Hot Ice V2
Desktop Examples
Closed Group

Opened Group

Mobile Examples
Closed Group

Opened Group

Novo
Desktop Examples
Closed Group
Opened Group
Mobile Examples
Closed Group

Opened Group

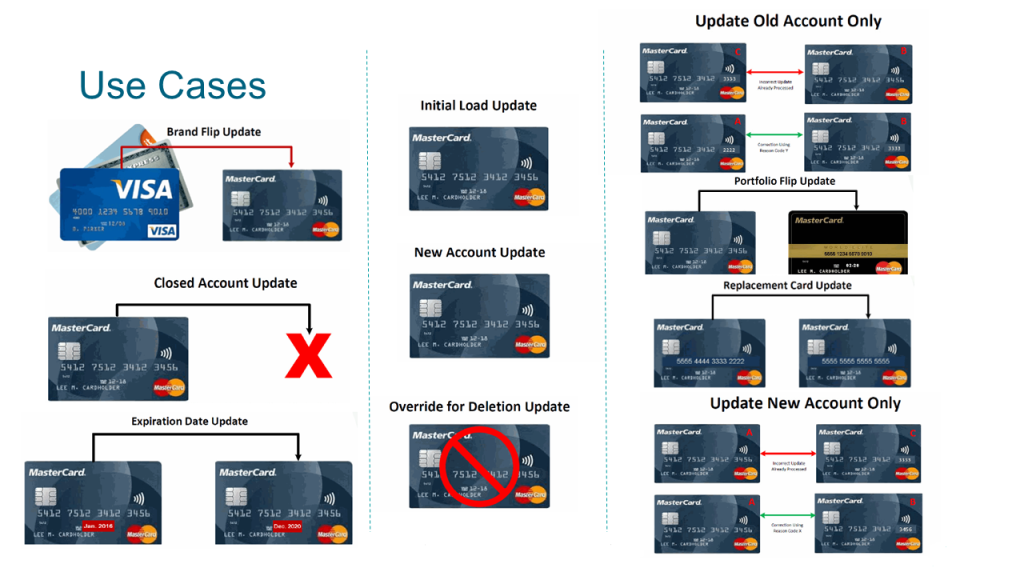
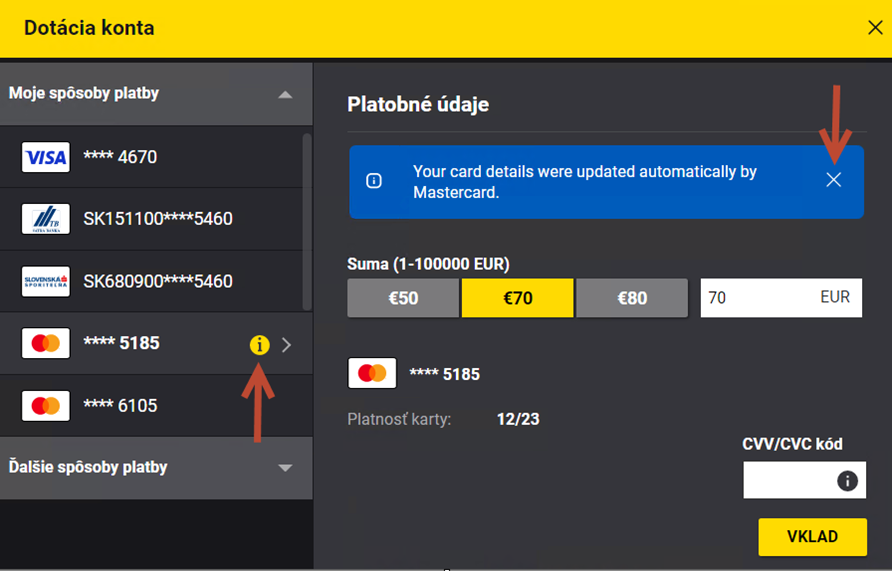
Mastercard ABU and Visa Account Updater
The Mastercard Account Billing Updater (ABU) and Visa Account Updater (VAU) services allow the payment provider to seamlessly update the stored Card-on-File details.
The Mastercard ABU and Visa Account Updater provide information about lost and stolen cards, non-activated cards, and closed card accounts. This ensures that merchants always have the correct Card-on-File, so payments remain uninterrupted, and the customers enjoy consistent service.
The services also help to reduce declines of card-not-present (CNP) transactions caused by changed account numbers and expiration dates, resulting in an improved customer experience.
Mastercard ABU and VAU facilitate the secure transmission of issuer-reported account updates to card-on-file and recurring payment merchants. This increases approvals of CNP transactions while reducing processing and customer service costs through operational efficiencies, and thus reducing the risk of customer attrition.
Key countries where Mastercard ABU and VAU have mandated issuers to participate in UBU include the United Kingdom, Italy, Ireland, Germany, Switzerland, and Brazil, with more countries added every quarter.
Use Cases
This is how it looks in the Payment Page for Mastercard:
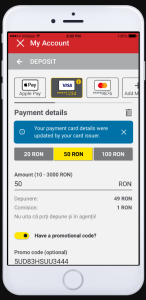
This is how it looks in the Payment Page for Visa:
No CVV Required
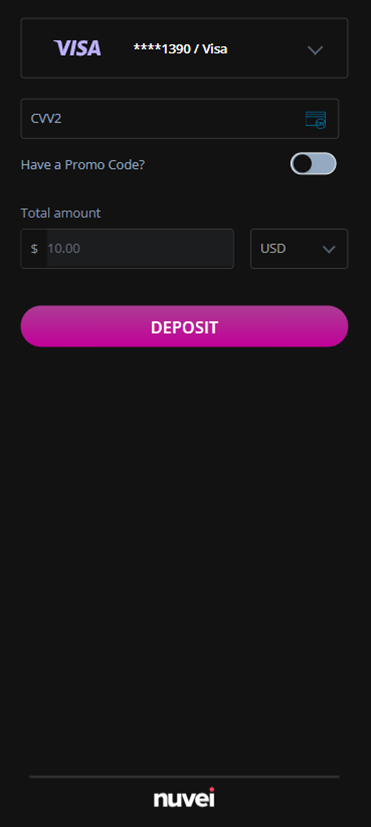
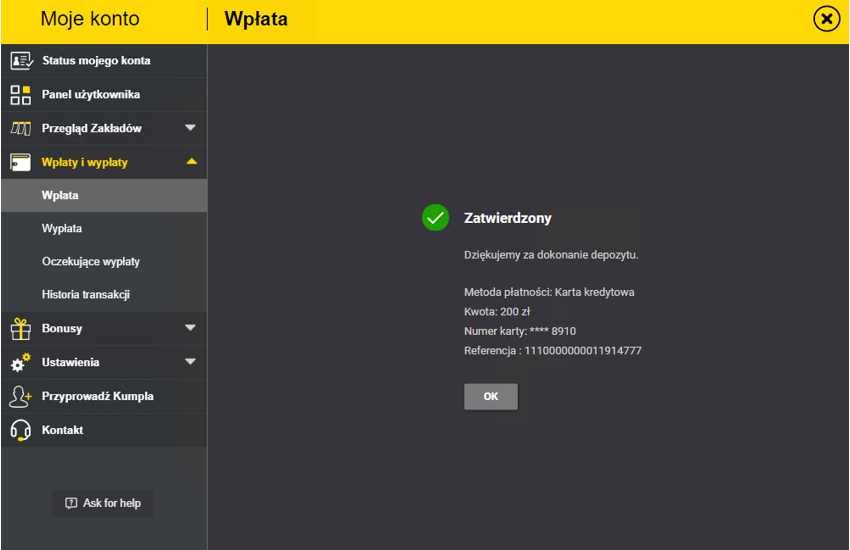
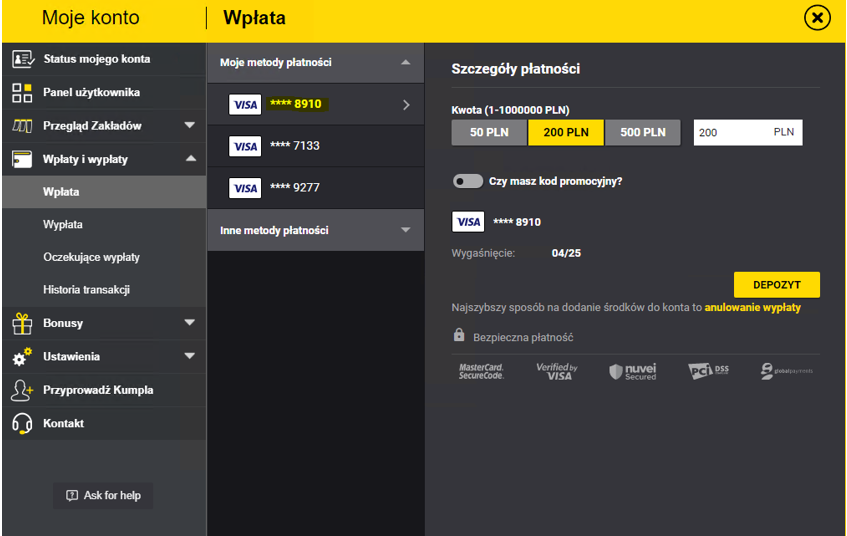
The No CVV Required feature allows the merchant to disable the CVV field after the customer’s first successful deposit. The customer then benefits from a faster process when making payments with the same credit card.
This page describes the three scenarios of the No CVV Required feature behavior on Nuvei’s Payment Page:
On the Payment Page
User Experience
- The user registers a new valid credit card and makes a successful first deposit.
- After a successful deposit, the user selects the approved credit card account to perform a second deposit.
- The
CVVfield does not appear when re-entering the deposit page for the second time.
First Deposit
First Deposit Approve Message
Second Deposit
On the Payment Page per the Device
To reduce fraud options when the user opens the Payment Page deposit page on a new device (desktop, tablet, mobile), the CVV field is presented even though the user has selected a registered card, which was used for an approved deposit in the past.
User Experience
- The user registers a new valid credit card and makes a successful first deposit.
- After a successful deposit, the user selects the approved credit card account from another device to perform a second deposit. The CVV field appears when entering the credit card deposit page from this new device.
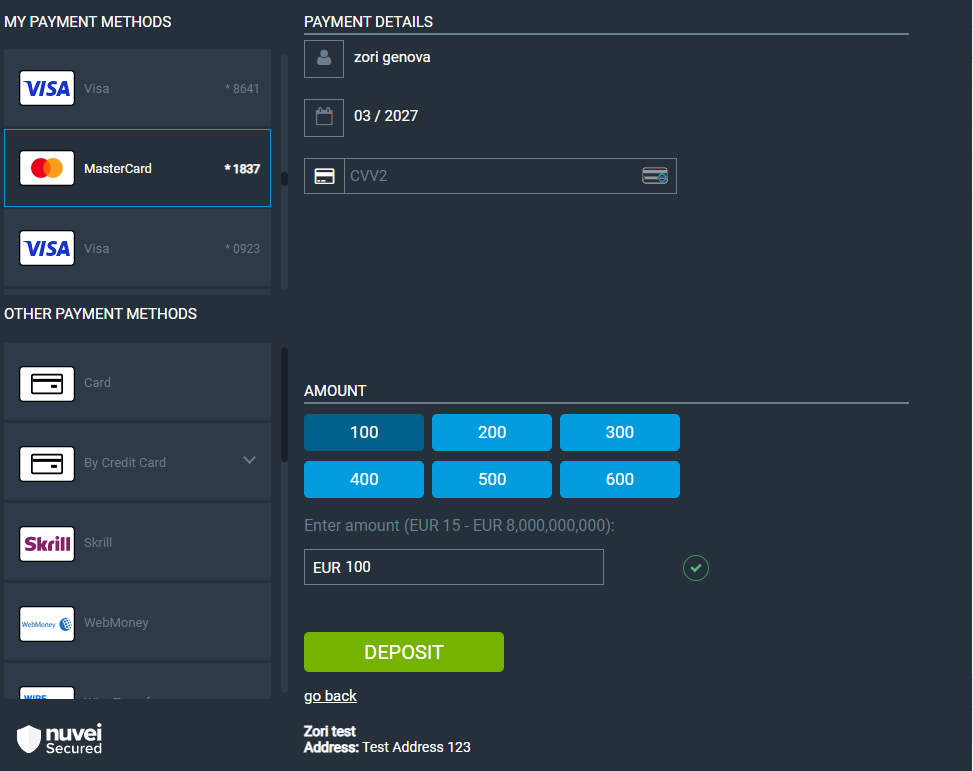
- After a successful deposit, using the same device, the user chooses the same credit card account. The CVV field does not appear when re-entering the credit card deposit page.
On the Payment Page per the Card Scheme
Mastercard and Visa’s mandates determine different conditions for skipping a CVV when paying within the European Union:
- Visa allows deposits without the
CVVfield on the deposit page after the user has made their first deposit using CVV. - Mastercard allows you to process a deposit only if the
CVVfield appears on the deposit page.
Pending Withdrawal
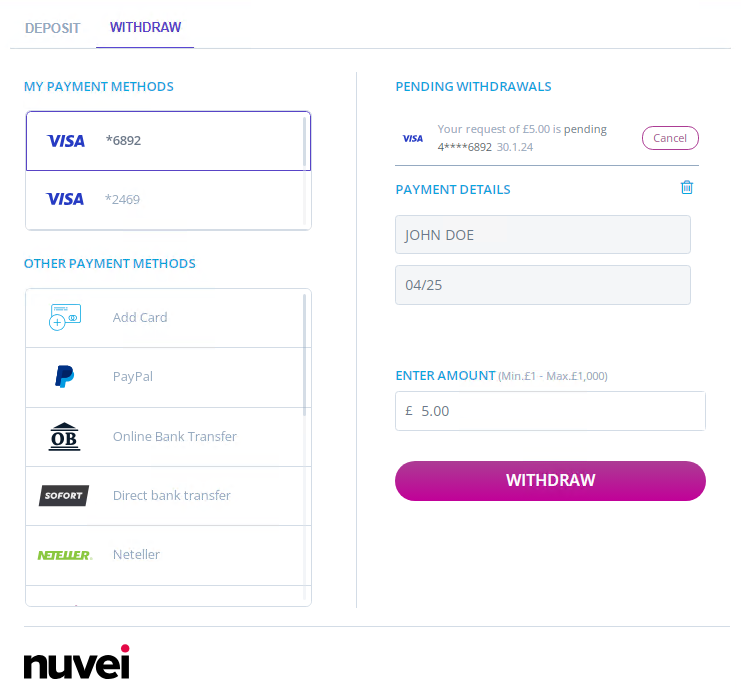
Enabling a Pending Withdrawal on the Withdrawal Page
This feature allows the merchant to show their users if there are any pending withdrawal requests on the Payment Page that they can cancel instead of continuing with these deposits. This helps the user to top up their balance.
This feature allows the user to control their withdrawal transactions and reduces redundant transactions that carry fees and operational efforts.
The Pending Withdrawal section is presented on the withdrawal page by default on our Payment Page:
The merchant can control the behavior of the pending withdrawal section by adding a different parameter to the Payment Page URL call:
Layout=x Logic
Layout=0 – The withdrawal page does not show the pending withdrawals section as part of the withdrawal page.
Layout=1 – The withdrawal page shows only the pending withdrawals section.
Layout=2 – The withdrawal page shows the pending withdrawals section as part of the withdrawal page.
Layout=3 – The withdrawal page shows the pending withdrawals section as part of the withdrawal page; in this option, the pending withdrawal is displayed in collapsed mode. The user can hide or show the pending withdrawal section by pressing “show”.
button.Layout=empty – Payment Page controls the layout and presents the default value (show section).
showCancelButton Logic
showCancelButton=true/empty – Presents cancel withdrawal button.
showCancelButton=false/0 – Hides cancel withdrawal button.
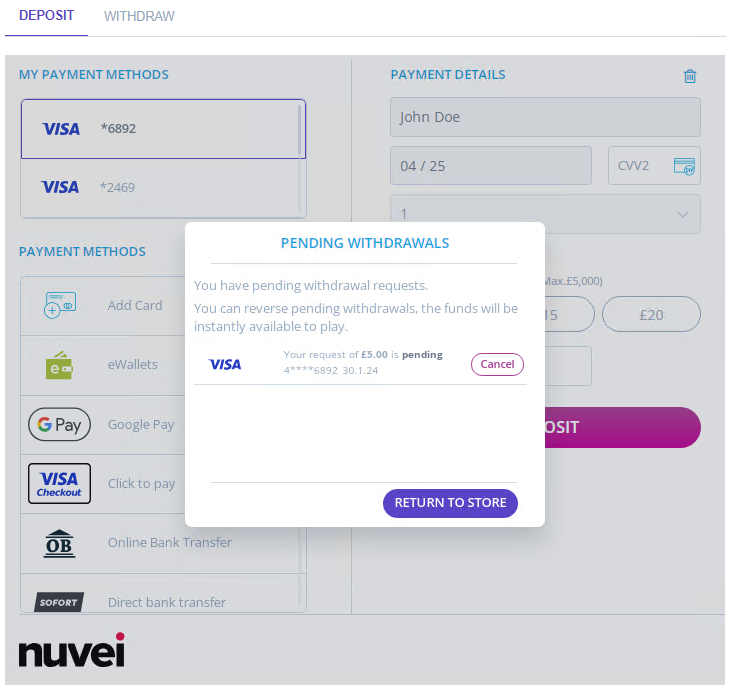
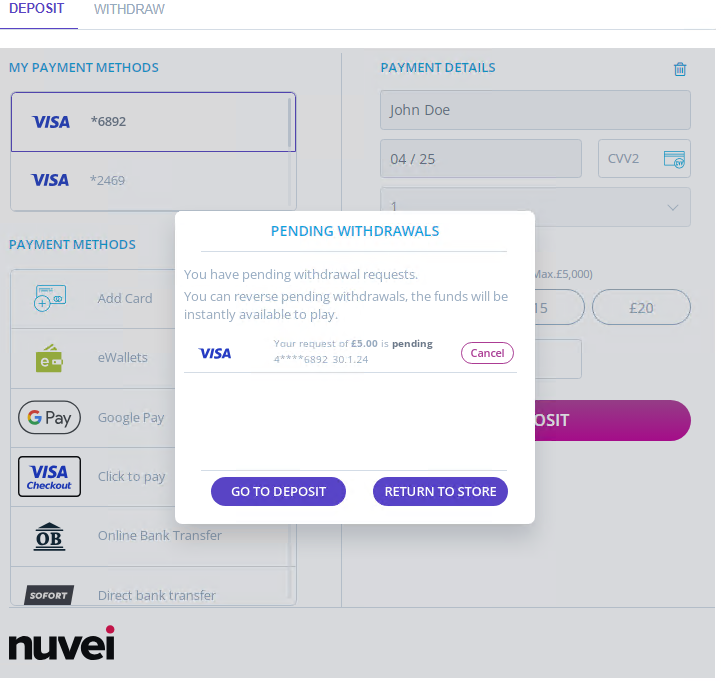
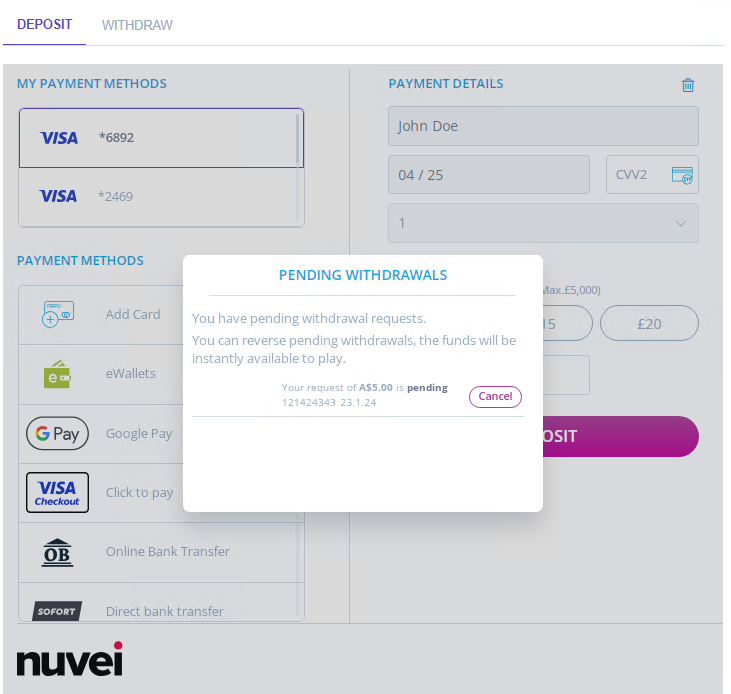
In addition, the merchant can present the pending withdrawal on their deposit page.
Enabling a Pending Withdrawal on the Deposit Page
There are three options that can be enabled when showing the pending withdrawals section on the deposit page:
Allow the User to Skip the Pending Withdrawals Section
If this option is enabled, the Payment Page allows the user to either cancel the withdrawal request or to skip the pending withdrawals light box and continue to the deposit.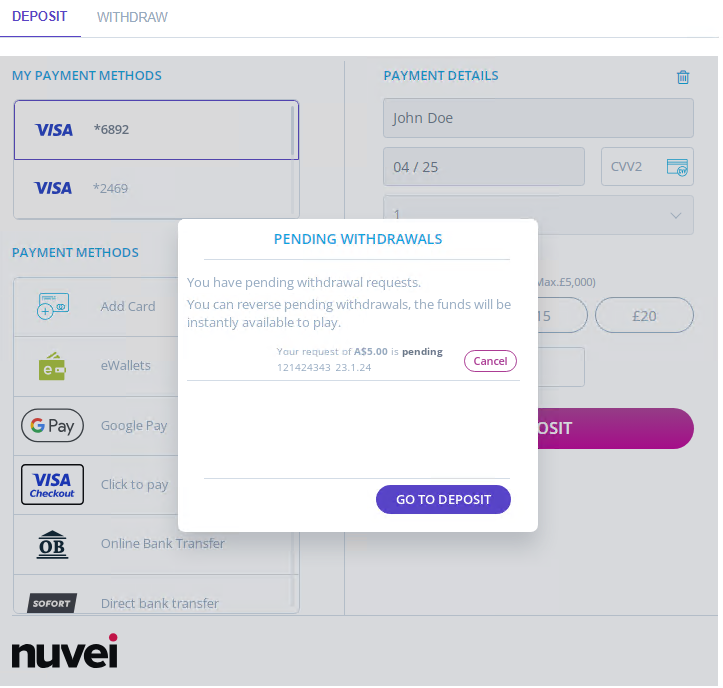
User Can Return to Merchant Site
If this option is enabled, the Payment Page allows the user to either cancel the withdrawal or to directly return to the merchant site without going throw the deposit page.
The merchant can also combine the first two options: skip the section and go to the deposit, or cancel the withdrawal and return to merchant site.
User Cannot Skip the Pending Withdrawals Section
This option allows showing the pending withdrawals request when the user is on the deposit page. However, if this option is enabled, the user cannot proceed with the deposit flow until they cancel the pending withdrawal transaction.
Quick Deposit
Nuvei provides an option for a user to open Nuvei’s Payment Page during a game or throughout a bet in case the user does not have enough balance to complete a needed action. With this solution, the user can determine their balance during a game or bet via a saved payment card account instead of having to leave the game or bet to determine the balance from the cashier.
This is a standard solution in the gaming industry.
Example Cashier Call (Integration)
Example Cashier Call (Production)
Desktop Example
Mobile Example
Scan Card
The Scan Card feature is an integrated SDK to native apps, which allows a customer to choose scanning a new payment card instead of manually entering their new card details when registering the new payment card.
The scanner scans the full card number, expiration date, and cardholder name. The user only needs to manually enter their CVV to complete the card registration.
Refer to these links to implement the functionality for iOS and Android, respectively. Contact your Account Manager if you need any help with the implementation.
User Flow
- The user taps the “SCAN CARD” button.
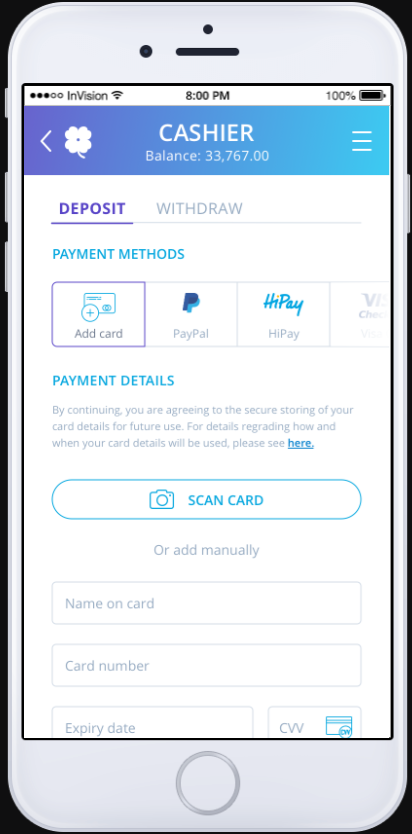
The user is transferred to camera scanner interface, which should contain basic text information on how to successfully scan a card. - The system displays a green rectangle where the card should be placed.
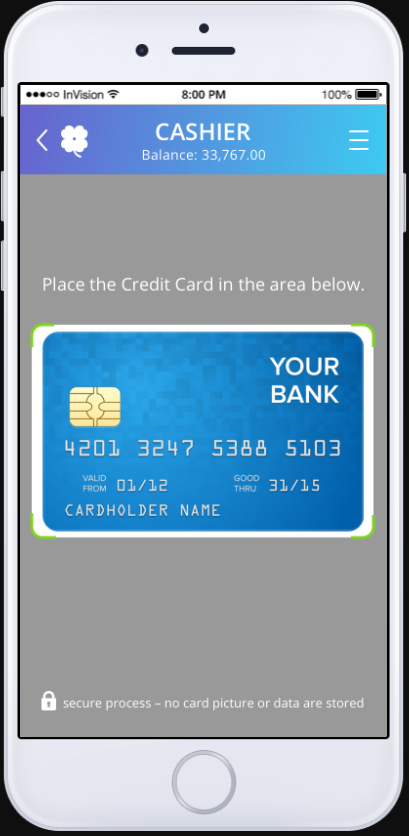
- The user places their payment card into the designated area.
The camera detects a card and indicates the detection visually by showing the scanned data. - The user is transferred from the camera scanner to the Deposit page in the Payment Page.
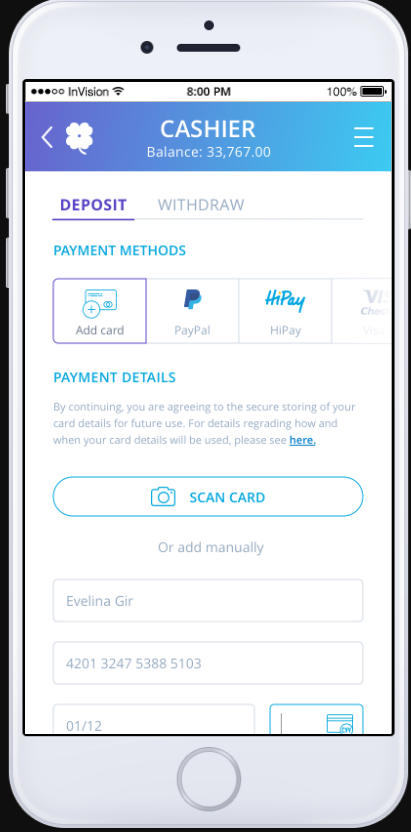
- The Payment Page populates the fields based on data from the scanner.
- The user must enter the CVV field to complete the registration process.
Stored Card Credentials
This section describes how stored card credentials are displayed on the Payment Page based on the configuration chosen by the merchant.
Card Schemes Rules
When capturing card information that is going to be stored for future use, merchants must obtain consent from the cardholder and ensure that:
- Truncated information of the stored card is shown to the cardholder when initiating a new payment with that card (for example, the last 4 digits of the Account Number).
- Cardholders are informed of how their stored card is to be used, and they are notified of any changes to the agreement.
Display
The stored card credentials option can be displayed in three different ways:
- Show text only – The text is presented on the top of the Payment Page as static text without any toggle.

- Show toggle with “Y” – The toggle is always turned on (Yes) in the stored card credentials Terms Information section. In addition, any UPO is shown on the Payment Page.

- Show toggle with “N” – The toggle is always turned off (No) in the stored card credentials Terms Information section.

Terms and Conditions
In addition, the merchant can provide a specific URL link that shows their own stored card credentials Terms and Conditions text. If this field remains empty, the default Terms and Conditions text that Nuvei provides to all merchants is shown instead.
We can also control how this URL is presented – if it appears as part of the Payment Page itself or in a new window.
Lightbox Solution
Nuvei has developed an option for the merchant to display a pop-up box with a confirmation if the customer wishes to use the stored card credentials feature. In this case, the customer does not see the toggle on the Payment Page, which improves the user experience.
In the pop-up, the customer needs to choose if they want to store their card information for the next use or not. The customer can also read the details regarding how and when the card details are used.
Theme Type
This feature allows the merchant to decide which theme to display on the Payment Page – DESKTOP or SMARTPHONE.
- For DESKTOP, the merchant needs to add “&themeType=DESKTOP” to the request URL.
- For SMARTPHONE, the merchant needs to add “&themeType=SMARTPHONE” to the request URL.
If a merchant tries to add one of these themes, but it is not available in the Control Panel, the Payment Page shows the other theme that is available.
Desktop Example
Mobile Example
UPO Removal
This feature allows the user to remove a saved payment method from the e-commerce Payment Page gallery for both deposits and withdrawals.
The user selects the desired payment method and then presses Remove Payment Method. 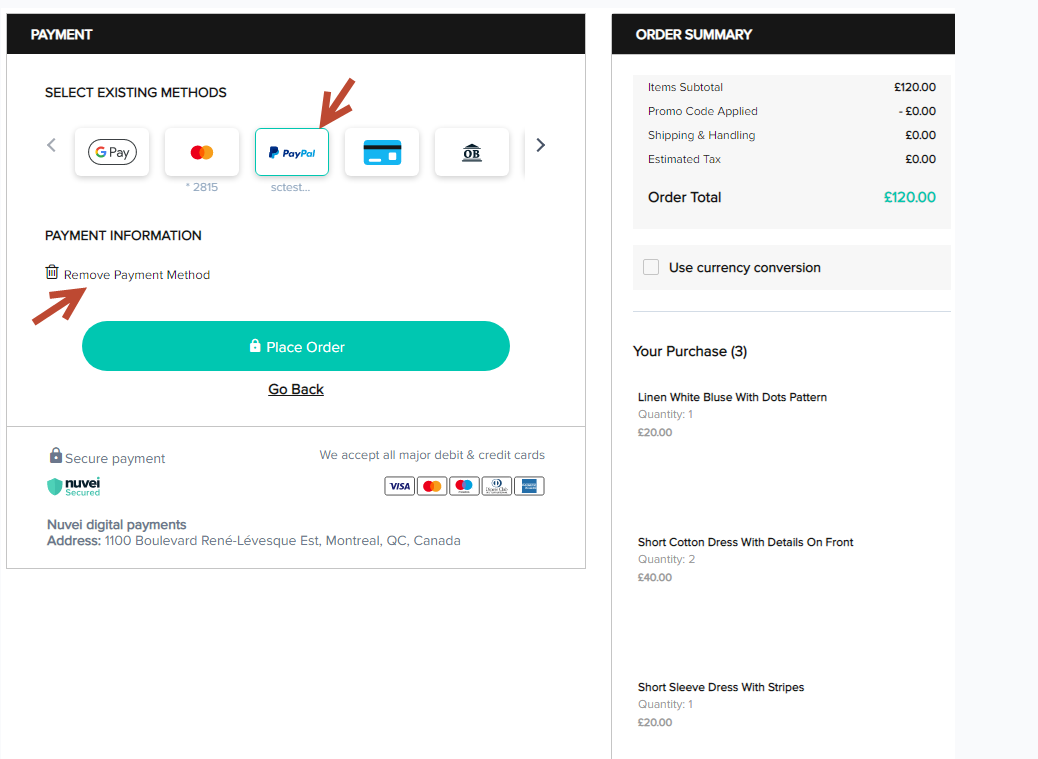
A confirmation message appears for approval.

Visual Promotion for Selected APM by the Merchant
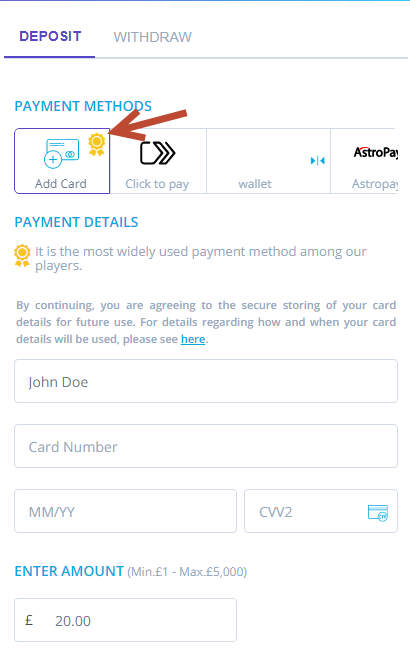
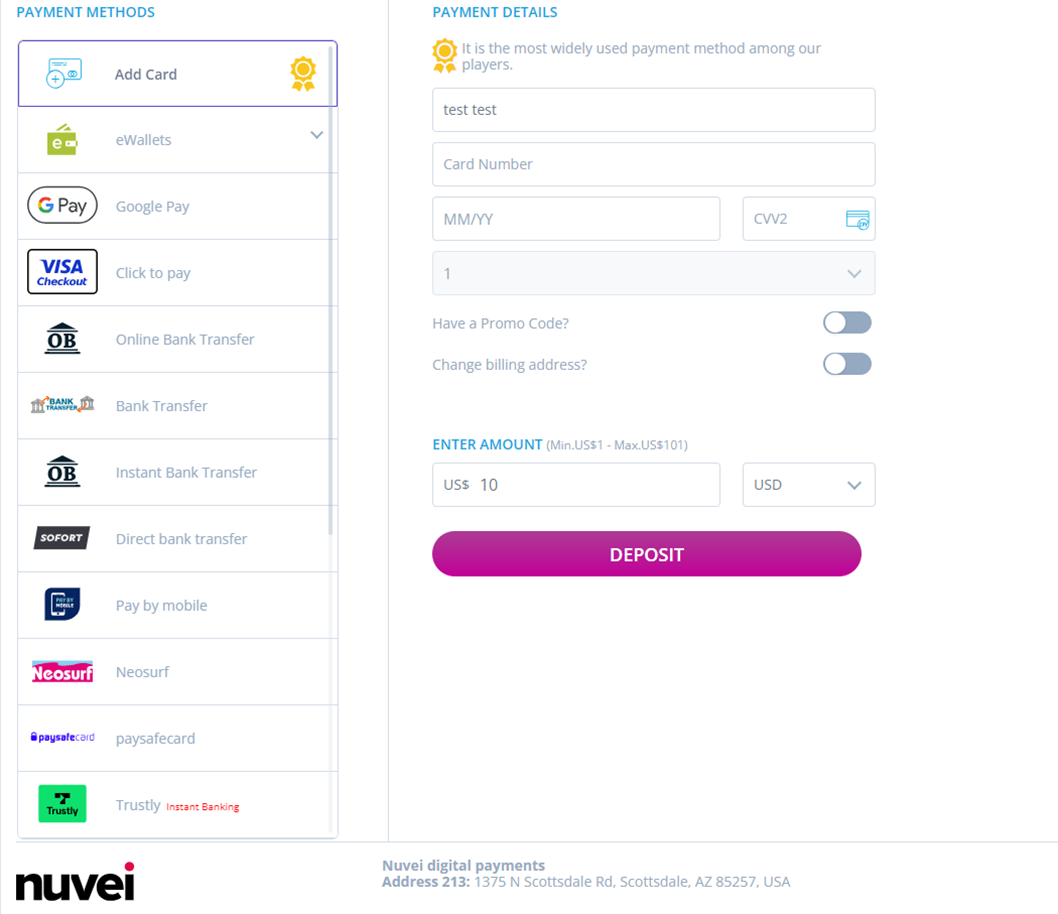
We want to give our merchants the ability to promote end users’ payment methods according to their behavior over time. This allows merchants to influence the end user’s choices using visual prioritization of the desired payment methods.
To enable the promotion of the payment methods, we have developed a new feature that enables merchants to “mark” the desired means of payment for promotion.
Desktop Example
Mobile Example






 Last modified February 2025