Overview
Nuvei Simply Connect provides an out-of-the-box payment experience, but it also allows you to control the process by setting values on the checkout() input and/or switching certain values on or off.
This page describes some of the many ways you can customize the Simply Connect payment flow.
General
Save Payment Method
The savePM parameter determines whether to present the user with a checkbox to save payment details and whether Nuvei saves them as a UPO.
Possible values:
- true (default) – Checkbox to save payment details appears. If the user selects it, Nuvei saves the payment details as a UPO. Required in the initial request of an APM Recurring Billing workflow.
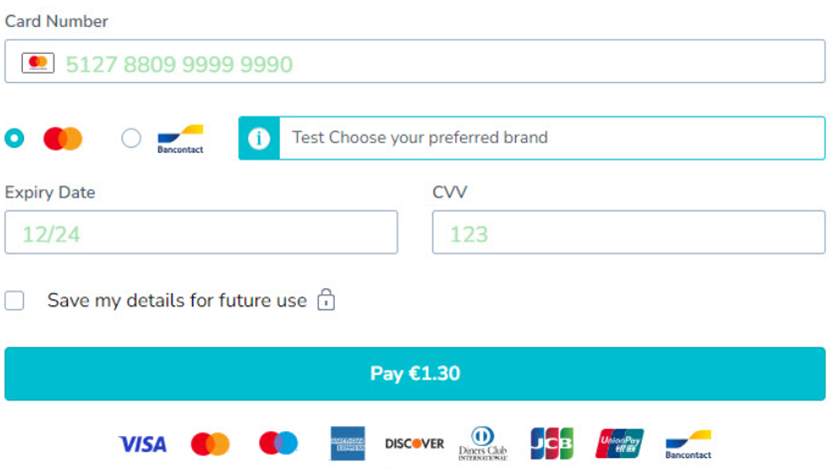
Example Card Payment Method When
savePM: “true”
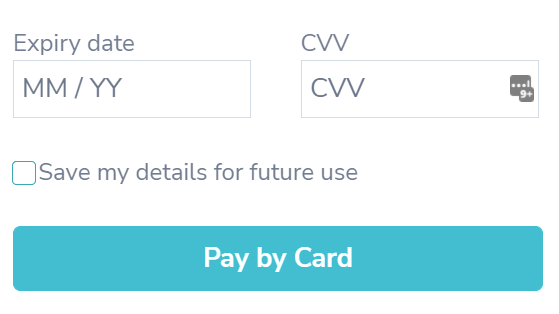
- force – Checkbox to save payment details appears. Selected by default, the user can clear the checkbox.
- false – Checkbox to save payment details does not appear. Therefore, users cannot save them and Nuvei cannot save them as a UPO.
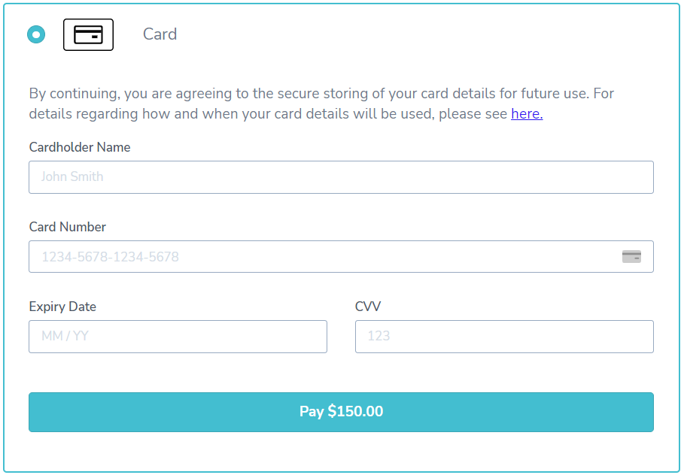
- always – Instead of the checkbox to save payment details, an agreement message appears, and Nuvei saves the payment details as a UPO.
In addition, you can include asavePmUrlfor the terms and conditions regarding secure storing of payment details. For a link tosavePmUrlto appear in addition to the agreement message,savePMmust be always.Example
savePM: “always” WithsavePmUrlcheckout({… savePM: "always", savePmUrl: "<URL for the T&C>", …});
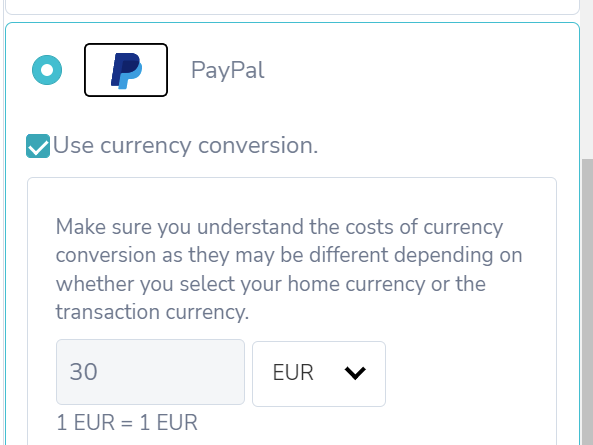
Dynamic Currency Conversion
You can use the useDCC input field to enable, disable or force the use of DCC on the payment page.
Possible values for DCC control:
- enable – Enables the checkbox.
- disable – (default): Disables the checkbox.
- force – Enables and selects the checkbox (the customer is still able to unselect the checkbox).
checkout ({…
    useDCC: "enable", //or disable, force
…});
Promotional Code
You can use the promoCode input field to enable a promotional code checkbox and field on the payment page.
Possible values:
- true – The checkbox and field appear on the payment page.
When a user selects the checkbox and enters a promotional code, Nuvei sends the merchant thepromoCodeas part of theprePaymentevent callback. The promotional code can be up to 10 alphanumeric characters. - false – (default): The checkbox and field do not appear.
checkout({...
  promoCode: true, // The default value is false.
...});

Card Processing
Blocking and Whitelisting Cards
blockCards– Specifies cards and sets of cards you do not accept.cardWhitelist– Specifies cards and sets of cards you accept.
Do not include both in the checkout() request.
The following example specifies that you do not accept corporate Visa credit cards and prepaid British American Express cards.
checkout({…
    blockCards: [
        ["visa", "credit", "corporate"],
        ["amex", "GB", "prepaid"]
    ], // Visa corporate credit cards and British prepaid Amex cards are blocked
…});
For more information, see Blocking and Whitelisting Cards.
CVV Customization
alwaysCollectCvv – Determines if the CVV should be collected for a stored card each time (default is true).
maskCvv – Determines if the CVV digits in the CVV textbox are masked or visible (default is false).
checkout({…
    alwaysCollectCvv: true,
    maskCvv: false
…});
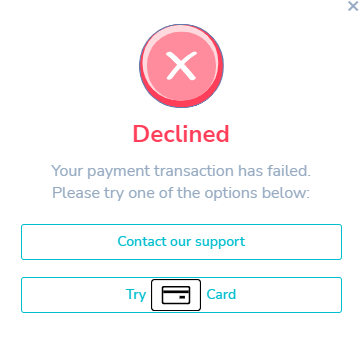
Decline Recovery
A certain percentage of payment requests are declined leading to the loss of those potential sales and transactions. This feature enables you to recover as many of these potential sales and transactions as possible.
To enable this feature, add disableDeclineRecovery: false to the checkout() function.
When the customer receives a decline, a pop-up or dialog offers other payment options:
- Contacting the merchant for support.
- Selecting another payment from the payment gallery.
- For the gaming industry, you have the option to suggest or enter a new amount.
checkout({...
  disableDeclineRecovery: false, // The default value is true.
...});
Installments
Merchants in Brazil, Chile, Colombia, Mexico, Peru, and Israel can offer card payment in installments by configuring the payment page using the cardInstallments class and its parameters:
| Parameter | Type | Mandatory | Values | Notes |
|---|---|---|---|---|
| installmentType | Class | No | Single Payment type1 – Deferred with interest. type2 – Deferred without interest. type3 – Deferred without interest and months of grace. |
|
| installmentType.singlePayment | String | No | true – Single Payment appears as an Installment Program option. false – Single Payment does not appear. | When selected, Number of Installments dropdown menu does not appear. |
| installmentType.type1 | Array | No | Positive integers separated by a comma (","). | Number of installments merchant offers with interest. |
| installmentType.type2 | Array | No | Positive integers separated by a comma (","). | Number of installments merchant offers without charging interest. |
| installmentType.type3 | Array | No | Positive integers separated by a comma (","). | Number of installments merchant offers without interest and months of grace. |
| nationalID | String | No | true – Personal ID user input field appears. false – Personal ID user input field does not appear. |
|
cardInstallments does not have a default value. When provided, installment payment options appear on the payment page.
checkout({...
  cardInstallments: {
    installmentType: {
      singlePayment:true,
      type1:[2,3,4],
      type2:[3,4,6]
  },
  nationalID: true
...});

Installment payment only supports cards; it does not support Apple Pay or Google Pay, for example.
Merchants can edit the field labels and provide labels in supported languages by using i18n Text and Translation UI Customization.
Merchants can review user selections by using the prePayment event callback function.
To see installment payment options on our Simply Connect Demo Site, open Testing Data & Settings, select the Cards & APMs tab, and scroll down to Installments.
Co-badged Cards (Dual Brand Cards)
You can use the useDualBrand input field to enable presenting both brands of co-badged cards (dual brand cards) on the payment page.
Possible values:
- true – When Nuvei detects a supported co-badged card, both brands appear on the payment page.
- false (default) – When Nuvei detects a supported co-badged card, only the primary brand appears on the payment page.
checkout({...
  useDualBrand: true, // The default value is false.
...});
Apple Pay and Google Pay
Google Pay
You can enable Google Pay as a payment method for your customers.
Simply follow the steps in the Google Pay guide (Simply Connect) guide.
- No special configuration code is needed.
- However, if you prefer, we provide a set of powerful customizations which are easy to apply.
Apple Pay
You can enable Apple Pay as a payment method for your customers:
- Contact Nuvei Technical Support to enable the Apple Pay payment provider in your merchant account.
- Set your domain, as described in the Register and Verify Your Domain topic.
- No special configuration code is needed.
However, if you prefer, we provide a set of powerful customizations which are easy to apply.
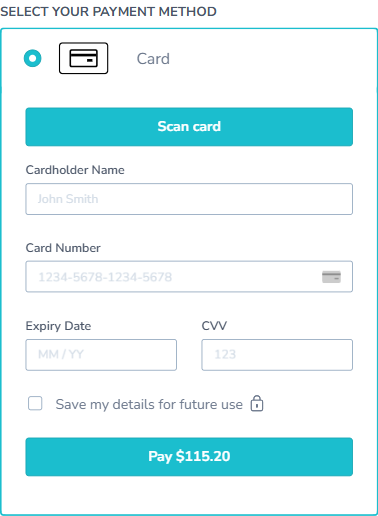
Scan Card
Scan Card is an SDK that integrates with native mobile apps and allows users to scan a payment card for details instead of manually entering them. The SDK retrieves the full card number, expiration date, and cardholder name. The user only needs to manually enter the card’s CVV.
User Experience
- On the payment page of a merchant’s mobile app integrated with Simply Connect and Scan Card, the user selects the Card payment method and then taps Scan card.
- A Nuvei Cashier camera interface appears with a rectangle showing where to place the card.
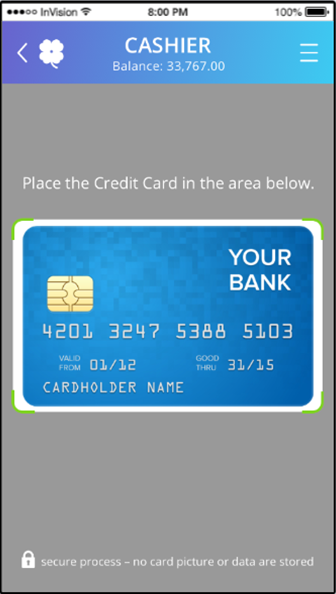
- The user places the card in the designated area.
- The interface detects the card and visually indicates the detection by showing the scanned data.
- The mobile app payment page reappears with the scanned card details filled in.

- The user enters the CVV and continues with the payment.
APMs
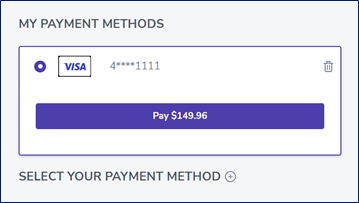
autoOpenPM
The optional parameter controls whether APM section of the Payment Method Gallery is always open or is collapsible, in the presence of a UPO.
Possible values:
- true (default) – The APM section is never collapsible.
- false – The APM section is collapsible only if UPOs exist; otherwise, it is not collapsible.
False provides a conversion-driven UX for users with UPOs - hide – The APM section is not diplayed at all (including the header).
Example of autoOpenPM: false
checkout({...
  autoOpenPM: false, // False provides a conversion-driven UX for users with UPOs.
...});
APM Whitelisting/Blacklisting
The APMs supported for your account is set on the Nuvei server side and, by default, only APMs relevant to the end user are displayed (according to country and currency). However, in some cases, you may want to override certain APMs for a certain audience, specific users, or a specific user session. This can be done by either whitelisting the APMs you would like to show, or by blacklisting the ones you wish to hide:
pmWhitelist– Only the specified APMs are displayed to the customer in the Payment Methods list.pmBlacklist– The specified APMs are not displayed to the customer in the Payment Methods list, even if they are returned by an API.
checkout({…
    pmBlacklist: ['apmgw_PaySafeCard', 'apmgw_Neteller', 'apmgw_MoneyBookers'],
    // -or- pmWhitelist: ['apmgw_PaySafeCard', 'apmgw_Neteller', 'apmgw_MoneyBookers', 'cc_card'],
…});
APM Fields
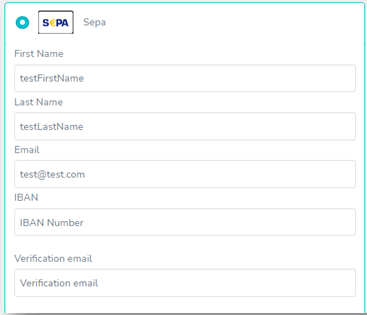
Some APMs require additional user fields (such as billingAddress and userDetails) that can be collected from the user during the payment initialization. The merchant can provide these fields to mitigate user friction. If, however, these fields are not provided, this feature prevents the payment from failing by automatically detecting that the fields were not provided and instead collecting them directly from the payment page (see Sepa example):
function main() {
    document.getElementById('checkout').innerHTML = "";
    checkout({
        sessionToken: document.getElementById('session').value,
        env: 'int', // Nuvei API environment - 'int' (integration) or 'prod' (production - default if omitted)
        merchantSiteId: '<your merchantSiteId goes here>',
        merchantId: '<your merchantId goes here>',
        country: 'US',
        currency: 'USD',
        amount: 135,
        userId: '259',
        billingAddress: {
            "email": "[email protected]",
            "country": "US"
        },
        renderTo: '#checkout', // <div id="container"></div>
        onResult: function(result) {
            console.log("Result", result)
        },

        fullName: document.getElementById('cardHolderName').value,
        email: '[email protected]',
        locale: 'en', // de, es, fr, it, pt, ru
        }
    });
}
apmWindowType
This allows you to specify the window type (popup, newTab, or redirect (modal window)) for the system to redirect the customer to their APM provider. Alternatively, by specifying customRedirect, the system provides you with the redirectUrl for you to initiate the redirect.
Possible values:
- popup (default) – A po-pup window opens automatically, redirecting the customer to their APM provider’s page.
- newTab – A new tab opens automatically, redirecting the customer to their APM provider’s page.
- redirect – A modal window opens automatically on top of the current payment page, redirecting the customer to their APM provider’s page.
- customRedirect – You (the merchant) must redirect your customer to their APM provider’s page, as follows:
- The response from the request includes a
redirectUrl.
Redirect your customer to thisredirectUrlusing a type of window of your choice, for example, IFrame, pop-up, a new tab, etc. - Your customer submits their APM details and closes the window.
- Check the transaction status either by sending a
/getPaymentStatusrequest, or by setting up a to receive a direct notification (at the webhook endpoint on your system, which you provided in theurlDetails.notificationUrlin the original/openOrderrequest).
- The response from the request includes a
checkout({
  ...
  apmWindowType: 'newTab', // 'popup' (default), 'redirect', 'customRedirect'
  ...
});
apmConfig Class
You can use the apmConfig class to provide payment method-specific parameters.
apmgw_<paymentMethod>(Class) – Identifies the payment method. For example: PayPal isapmgw_expresscheckout;cc_cardis for all credit cards; and so on.savePM(String) – For the specified payment method, determines whether to present the user with a checkbox to save payment details and whether Nuvei saves them as a UPO. Overrides the general, root-levelsavePMvalue.
Possible values:- true (default) – Checkbox to save payment details appears. If the user selects it, Nuvei saves the payment details as a UPO. Required in the initial request of an APM Recurring Billing workflow.
- false – Checkbox to save payment details does not appear. Therefore, users cannot save them and Nuvei cannot save them as a UPO.
- always – Instead of the checkbox to save payment details, an agreement message appears, and Nuvei saves the payment details as a UPO.
In addition, you can include asavePmUrlfor the terms and conditions regarding secure storing of payment details. For a link to thesavePmUrlto appear in addition to the agreement message,savePMmust be always.
The following example specifies that, in general, a checkbox to save payment details appears. However, for PayPal, an agreement message appears instead, and for credit cards, users cannot save payment details.
checkout({…
  savePM: "true",
  apmConfig: {
    apmgw_expresscheckout: {
      savePM: "force"
    },
    cc_card: {
      savePM: "false"
    }
  }
…});
apmConfig.apmgw_<paymentMethod> classes support other APM-specific parameters. For example, Apple Pay supports apmConfig.applePay.buttonType, which allows a merchant to customize the Apple Pay button text. When relevant, information about APM-specific apmConfig.apmgw_<paymentMethod> parameters appears in the APM guide and on the APM Input Parameters page.
Example
checkout {
    savePM: "always",
    savePmUrl: "<URL for the T&C>",
    apmConfig: {
        apmgw_Neteller: {
            savePM: "true",
            savePmUrl: "<URL for the T&C>",
        },
        cc_card: {
            savePM: "true",
            savePmUrl: "<URL for the T&C>",
        },
    }
}
Dynamic Payment Amount
Simply Connect allows you to change the payment amount dynamically according to the customer input or behavior using the /updateOrder API call.
For example, when a customer:
- Adds or removes purchased products from their shopping cart.
- Selects certain payment methods that require additional charges when using their service.
You can call the /updateOrder method anytime, or you can respond to events in Simply Connect using event callbacks such as prePayment, onSelectPaymentMethod, and onPaymentFormChange. These events trigger an /updateOrder API call from your server side to update the payment amount; for example, when a customer selects a payment method that requires adding a specific “payment method fee”.
For more details, see the list of Simply Connect Event Callbacks.
Changing the amount Based on Customer Input
You can set a “hook” on a customer event to trigger a callback function that updates the payment amount.
The following example uses the prePayment callback to change the payment amount in the order before proceeding with the payment, for example, to add additional fees required by certain Payment Methods:
- The
needToUpdateAmount(paymentDetails)function is used to determine if the original paymentamounthas changed (and therefore the paymentamountin the order also needs to be updated).
(paymentDetailsis provided in the input parameters of theprePaymentcallback.) - In a case where the amount needs to be updated, but the customer still needs to agree to the new amount:
Display an appropriate message informing the customer about the new payment amount, and ask if they wish to proceed.
-
- If the customer declines, then use the
reject()function to instruct Simply Connect to abort payment, and display the relevant custom error message. - If the customer agrees to proceed, then continue:
- The
updateAmountInUI()function updates the displayedamount. - The
callServerSideToUpdateOrder()function passes the decision to your server side, and then a server-side/updateOrderrequest is performed to set the newamount. - The
resolve()instructs Simply Connect to proceed to payment (based on the newamount).
- The
- If the customer declines, then use the
Example Simply Connect Code using the prePayment Callback Function to Change the Amount Based on Customer Input
prePayment: function(paymentDetails) {
  return new Promise(async(resolve, reject) => {

    //you get PM and card details such as name, card type, etc. in paymentDetails.paymentOption.card

    If(needToUpdateAmount(paymentDetails)) //decide if you want to update the amount
      updateAmountInUI();
      callServerSideToUpdateOrder() // openOrder server side call sample below
      resolve(); // proceed with payment
    //else
      //  reject("<message to the user>");
  });
},
Example /updateOrder Request
{
  "sessionToken": "<sessiontoken received from openOrder>",
  "orderId": "<orderId received from openOrder>",
  "merchantSiteId": "<your merchantSiteId>",
  "merchantId": "<your merchantId>",
  "timeStamp": "<YYYYMMDDHHmmss>",
  "checksum": "<calculated checksum>",
  "currency": "USD",
  "amount": "300",
  "items": [
    {
      "name": "product X",
      "price": "300",
      "quantity": "1"
    }
  ]
}
Open Amount Feature
This feature supports merchants in industries where the payment amount is not known at the beginning of the payment flow, or needs to be updated on the client-side device, for example, in the gambling industry.
The Open Amount feature allows you to:
- Set Amount Limits (min and max) in the
/openOrderrequest. - Call the checkout.setOpenAmount() method (if you have not sent the
checkout()request yet). - Use
amountSuggestionsto suggest up to three amounts when making a payment.
Set Amount Limits
You can set “payment amount limits” in the/openOrder request by including the openAmount{min,max} object.
Send an /openOrder request with its mandatory parameters, and include an openAmount{min,max} object (and the optional amount), as shown below:
Example /openOrder Request with an openAmount{min,max} Object
{
  "merchantId": "<your merchantId goes here>",
  "merchantSiteId": "<your merchantSiteId goes here>",
  "clientUniqueId": "<unique transaction ID in merchant system>",
  "clientRequestId": "<unique request ID in merchant system>",
  "currency": "USD",
  "openAmount": {
    "min": "1",
    "max": "100"
  },
  "amount": "50",
  "timeStamp": "<YYYYMMDDHHmmss>",
  "checksum": "<calculated checksum>"
}
checkout.setOpenAmount() Method
The checkout.setOpenAmount() method is used to set/overridden the payment amount (same currency) from the client side.
Use the checkout.setOpenAmount() method when you need to set the transaction amount.
For example, whenever the customer changes any amount on your payment page, etc.
Call the checkout.setOpenAmount() method from the client side, as shown below:
(If you included the openAmount{min,max} object in the /openOrder request earlier, then the system also validates that the amount falls within the (min,max) “limits”.)
Example checkout.setOpenAmount() Request
checkout.setOpenAmount('150', function(setOpenOrderResponse) {
    //Merchant code here
    console.log(setOpenOrderResponse);
});
amountSuggestions
This optional parameter enables Merchants using Open Amount to display three payment amount suggestions in their shopping cart, which allows customers to select from the suggested payment amounts during the checkout process.
checkout({
...,
openAmount: {
min: 1,
max: 500
}
amountSuggestions : ["110", "120", 130"],
});
 Last modified October 2025