Overview
Welcome to Getting Started with Nuvei Web SDK, which describes how to integrate our Web SDK into your payment page.
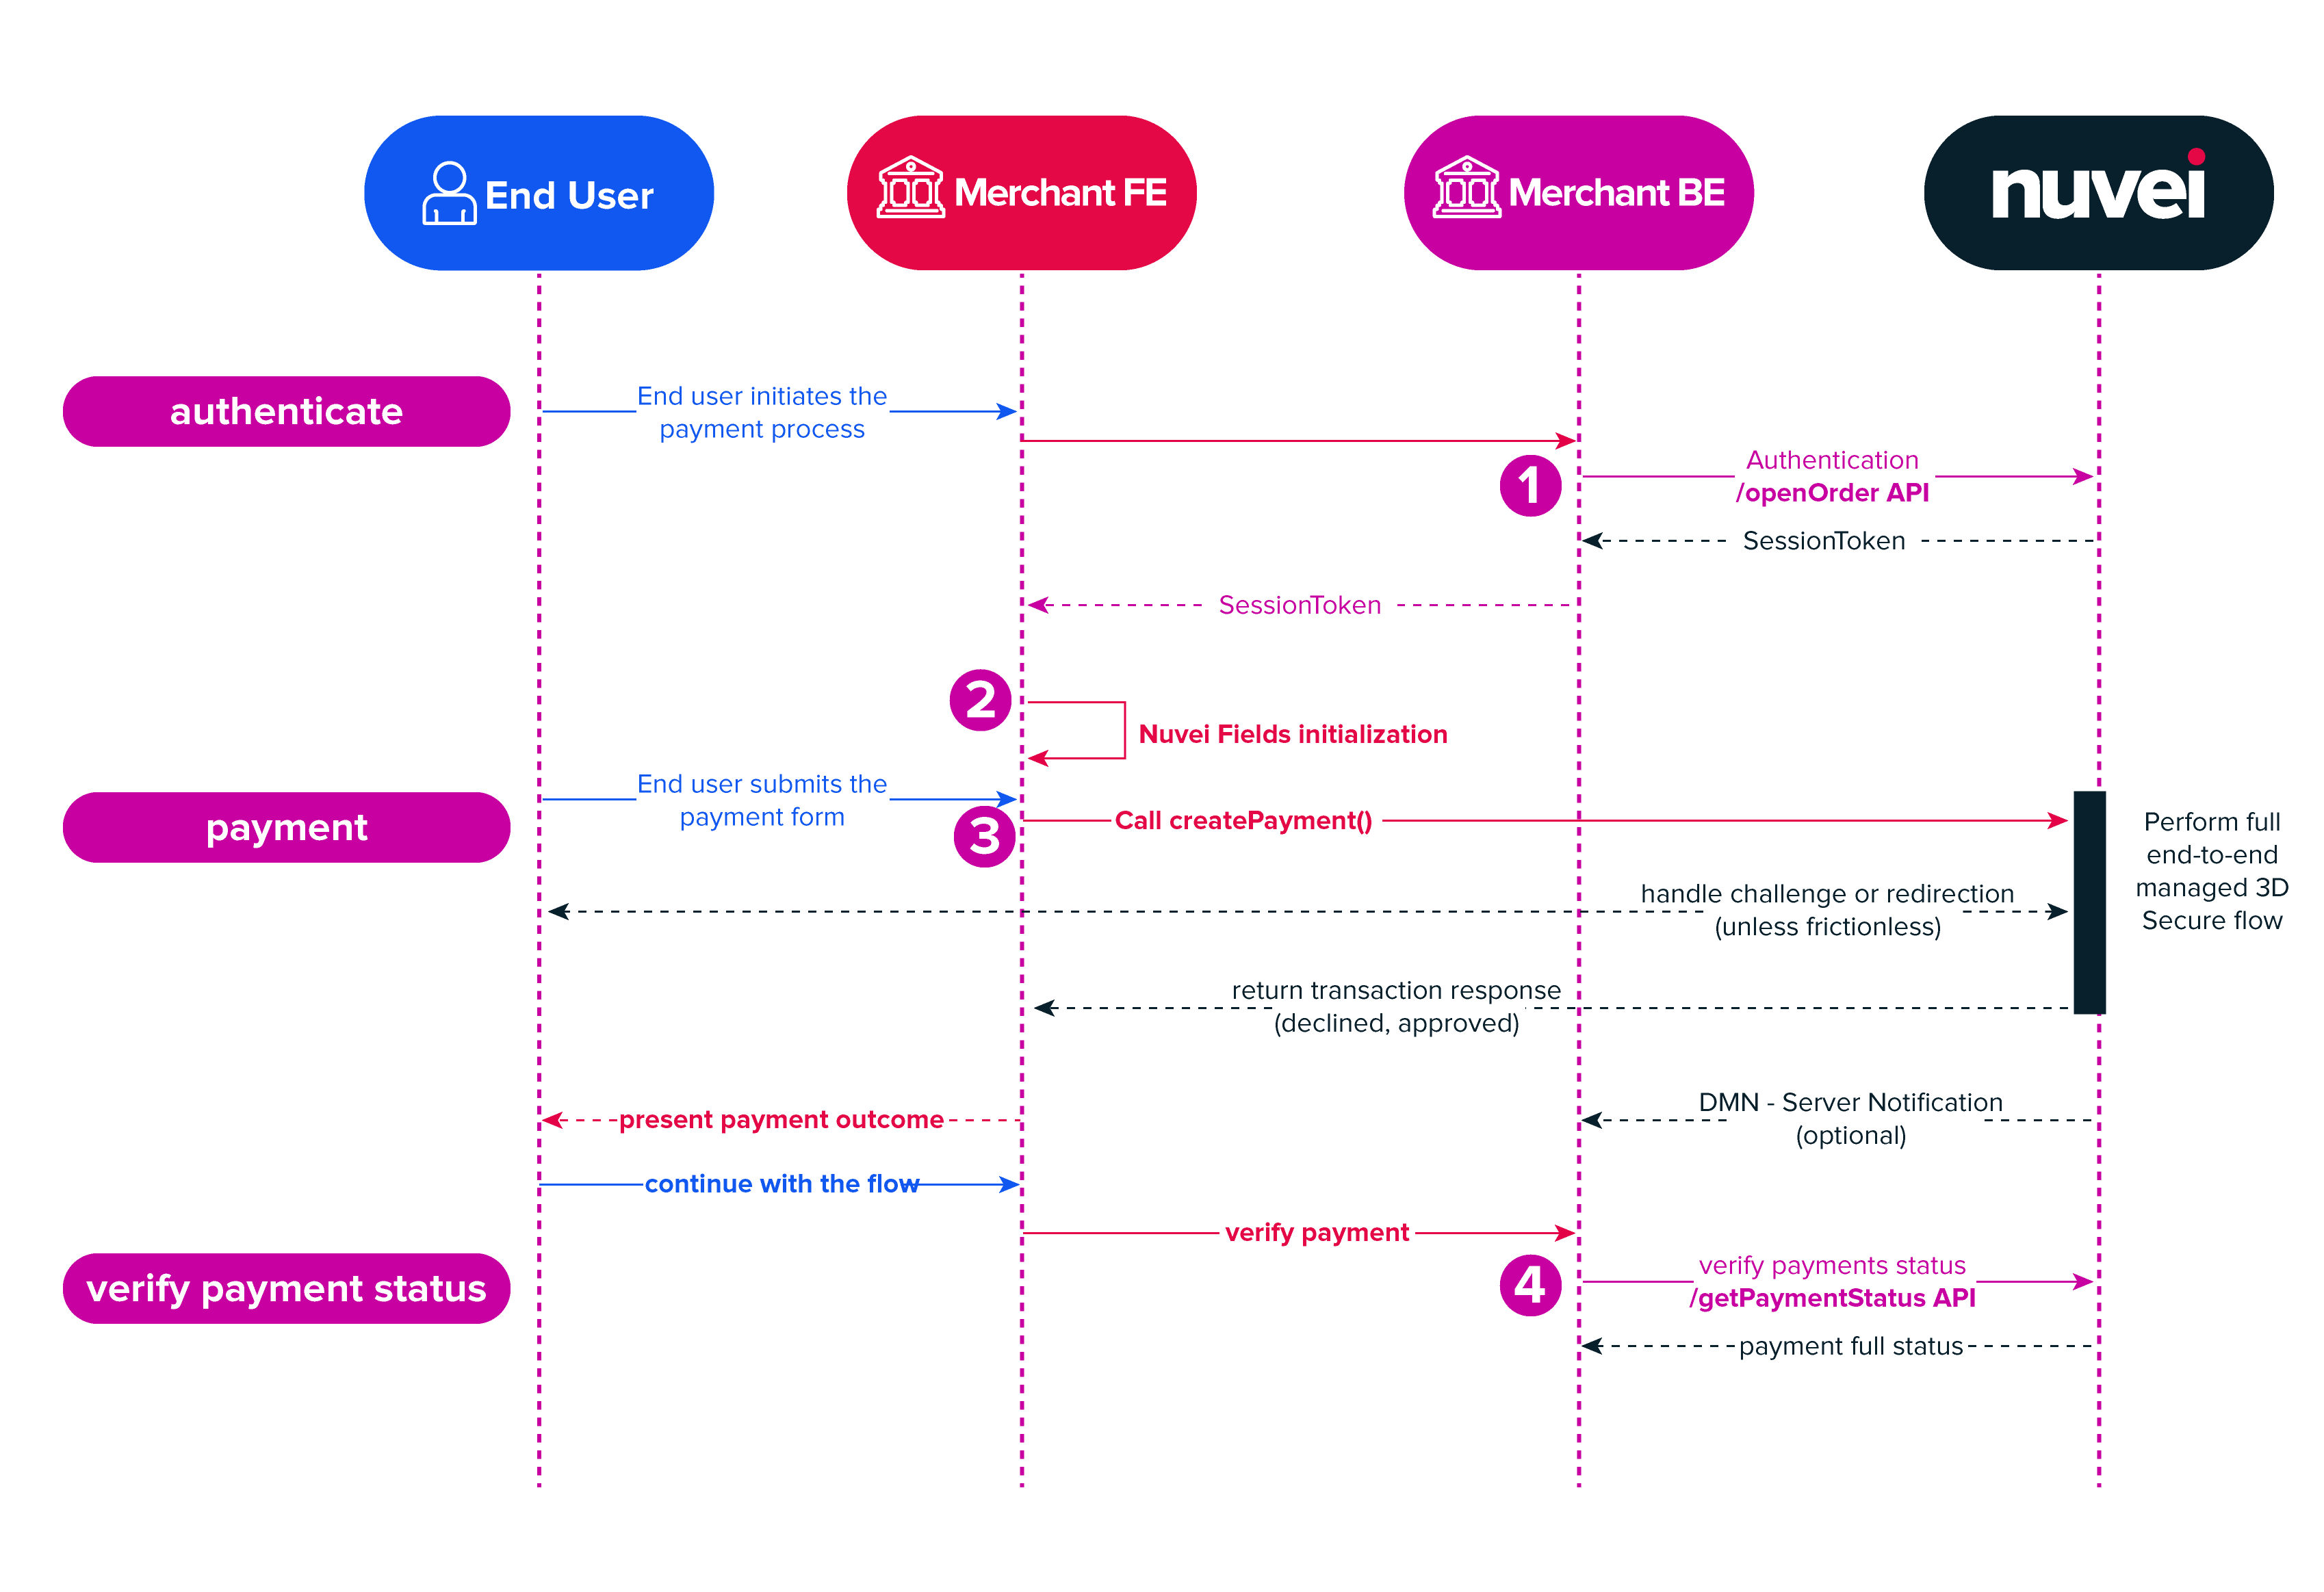
To integrate our Web SDK into your payment page, follow these steps:
- Server-to-Server Authentication – Before using the client-side Web SDK, you need to authenticate your Nuvei merchant details by sending a server-to-server
/openOrderAPI request. - Frontend Web SDK Initialization – Import the
safecharge.jslibrary; generate a payment form; and embed Nuvei Fields. - Frontend Web SDK Payment Submission – Send a
createPayment()request with its required parameters, includingpaymentOption. If relevant, Nuvei performs a full, end-to-end, managed 3D-Secure (3DS) flow. - Response Verification – Verify the response by sending a server-side
/getPaymentStatusAPI request or by using Nuvei’s Direct Merchant Notification (DMN) system, also known as webhooks.
Web SDK Flow
Additional Resources
- Nuvei Web SDK demo and advantages of using it as an integration method – Web SDK.
- Full, live examples of different Nuvei Web SDK scenarios using JSFiddle – Web SDK Scenarios.
To test your code, you can view, modify, and run these examples. - Test card data.
- Advanced Web SDK features.
1. Server-to-Server Authentication
Before submitting a payment using the client-side Web SDK, you need to send a server-to-server /openOrder API request.
Prerequisites and Notes for the /openOrder Request
- The server-side
/openOrderAPI request does the following:- Authenticates your Nuvei merchant credentials.
(You can log in to the Nuvei Control Panel using your username and password to find your credentials here.) - Sets up the authenticated order in the Nuvei system, and returns a
sessionTokenwhich is needed to send other requests in the session.
- Authenticates your Nuvei merchant credentials.
- Always send the
/openOrderrequest from your backend server because thechecksumparameter calculation includes your secret key, which should NOT be exposed on the client side.
Sending an /openOrder Request
On the server-side, send an /openOrder request with its mandatory parameters, and include the following:
checksum–
This is a SHA-256 encrypted string that you create, that is used for request authentication. You can calculate it by performing a SHA-256 encryption on a string of these concatenated fields, in the following order:
merchantId,merchantSiteId,clientRequestId,amount,currency,timeStamp, and yourmerchantSecretKeyat the end.countryandemail–
If these are not provided here, then they must be included later in acreatePayment()/authenticate3d()request.urlDetails.notificationUrl(optional) –
The URL to which DMNs can be sent.preventOverride="1"(optional) –
This prevents future requests from over-writing values contained in these blocks:userDetails,billingAddress, orshippingAddress.
Example /openOrder Request
{
    "merchantId":"<your merchantId>",
    "merchantSiteId":"<your merchantSiteId>",
    "clientUniqueId":"<unique transaction ID in merchant system>",
    "clientRequestId":"<unique request ID in merchant system>",
    "currency":"USD",
    "amount":"200",
    "timeStamp":"<YYYYMMDDHHmmss>",
    "checksum":"<calculated checksum>"
}
<?php
$safecharge = new \SafeCharge\Api\RestClient([
'environment' => \SafeCharge\Api\Environment::INT,
'merchantId' => '<your merchantId>',
'merchantSiteId' => '<your merchantSiteId>',
'merchantSecretKey' => '<your merchantSecretKey>',
]);

$openOrderRequest = $SafeCharge->getPaymentService()->openOrder([
    'clientUniqueId'    => '<unique transaction ID in merchant system>',
    'clientRequestId'   => '<unique request ID in merchant system>',
    'currency'          => 'USD',
    'amount'            => '200',
]);
?>
public static void main(String[] args) {
// for initialization
String merchantId = "<your merchantId>";
String merchantSiteId = "<your merchantSiteId>";
String merchantKey = "<your merchantSecretKey>";
safecharge.initialize(merchantId, merchantSiteId, merchantSecretKey,
APIConstants.Environment.INTEGRATION_HOST.getUrl(), Constants.HashAlgorithm.SHA256);

//for openOrder
String clientUniqueId = "<unique transaction ID in merchant system>";
String clientRequestId = "<unique request ID in merchant system>";
String currency = "USD";
String amount = "200";

Safecharge safecharge = new Safecharge();
SafechargeResponse response = safecharge.openOrder(userTokenId, clientRequestId,
clientUniqueId, null, null, null, null, currency, amount, null, null, null, null,
null, null, null, null, null, null, null, null, null, null, null, null,
null, null, null, null, null, null);
}
var safecharge = new Safecharge(
"<your merchantSecretKey>",
"<your merchantId>",
"<your merchantSiteId>",
"<your server host value>",
HashAlgorithmType.SHA256
);
var response = safecharge.OpenOrder(
 "USD",
 "200",
 clientUniqueId: "<unique transaction ID in merchant system>",
 clientRequestId: "<unique request ID in merchant system>",
);
const safecharge = require('safecharge');
safecharge.initiate(<your merchantId>, <your merchantSiteId>, <your merchantSecretKey>, <env>);
safecharge.paymentService.openOrder({
    'clientUniqueId'   : '<unique transaction ID in merchant system>',
    'clientRequestId'  : '<unique request ID in merchant system>',
    'currency'         : 'USD',
    'amount'           : '200'
}, function (err, result) {
    console.log(err, result)
});
The response includes sessionToken, which you need for the payment and other requests during the same session.
Example /openOrder Response
{
    "sessionToken": "9610a8f6-44cf-4c4f-976a-005da69a2a3b",
    "orderId": "39272",
    "merchantId": "427583496191624621",
    "merchantSiteId": "142033",
    "clientUniqueId": "12345",
    "clientRequestId": "1484759782197",
    "internalRequestId": "866",
    "status": "SUCCESS",
    "errCode": "0",
    "reason": "",
    "version": "1.0"
}
2. Frontend Web SDK Initialization
Import the safecharge.js JavaScript library for building payment flows:
<script src="https://cdn.safecharge.com/safecharge_resources/v1/websdk/safecharge.js"></script>
Generate a payment form with an HTML placeholder for Nuvei Fields. In the example below, card-field-placeholder is the placeholder.
Example Payment Form
<html>
    <head>
        <script src="https://cdn.safecharge.com/safecharge_resources/v1/websdk/safecharge.js"></script>
    </head>
    <body>
        <form action="/charge" method="post" id="payment-form">
            <div class="form-row">
                <label for="card-field-placeholder"> Credit or debit card </label>
                <div id="card-field-placeholder" class="some initial css-classes"><!-- SFC Card widget is inserted here. --></div>
                <!-- Used to display form errors. -->
                <div id="scard-errors" role="alert"></div>
            </div>
        </form>
        <button onclick="main();">Submit Payment</button>
    </body>
</html>
Activate Nuvei Fields. In the example below, as in the example payment form above, card-field-placeholder is the placeholder for Nuvei Fields. For information about how to customize the styles for Nuvei Fields, see Styling. Attach Nuvei Fields (scard) to the placeholder. When you generate the payment form for a customer, Nuvei replaces scard with our card detail fields.
Example Activating Nuvei Fields
// Instantiate Nuvei API
var sfc = SafeCharge({
        env: 'int', // Nuvei API environment - 'int' (integration) or 'prod' (production - default if omitted)
        merchantId: '<your merchantId>', // your Merchant ID provided by Nuvei
        merchantSiteId: '<your merchantSiteId>' // your Merchant site ID provided by Nuvei
});

//Instantiate Nuvei Fields
var ScFields = sfc.fields({
    fonts: [ { cssUrl: ''} ]  // e.g.  https://fonts.googleapis.com/css?family=Source+Code+Pro
})

// Specify styles for Nuvei Fields states / check Styling for details
var style = { /* state styles */ };

// Instantiate Nuvei Fields
var scard = ScFields.create('card', {style: style});

// Attach Nuvei Fields to the HTML placeholder
scard.attach(document.getElementById('card-field-placeholder'));
The payment form is now completely rendered and ready for the customer to enter card details and other payment information.
3. Frontend Web SDK Payment Submission
When the customer presses, for example, Submit Payment, the payment process is activated.
Send a createPayment() request with its mandatory parameters, including:
paymentOption: scard – Using Nuvei Fields, customer is paying with a card.
ORpaymentOption: alternativePaymentMethod – Customer selected an APM. See APM Payments with Web SDK.
To see other possible paymentOption values, press here.
Example createPayment() Request
// Call this from your main() for it to work with the HTML sample

  sfc.createPayment({
      "sessionToken": "{as received from openOrder}",
      "clientUniqueId": "<unique transaction ID in merchant system>", // optional
      "cardHolderName": "john smith",
      "paymentOption": scard,
      "billingAddress": {
        "email": "[email protected]",
        "country": "US"
      }
  },
  function(res) {
        console.log(res);
  })
When the createPayment() process is complete, Nuvei sends a synchronous response to the client side that includes:
result– Fiscal result: APPROVED, DECLINED, PENDING, or ERROR (in case of any error).errCodeanderrorDescription: In case of an error, the error code and description.
For information about these values, see the Gateway Response Codes, Gateway Decline Reasons, and Gateway Decline Description sections on the Response Handling page.
After receiving the createPayment() response, notify your server side and you can display a relevant message to the customer.
Example createPayment() Response
{
  "result": "APPROVED",
  "errCode": "0",
  "errorDescription": "",
  "userPaymentOptionId": "14958143",
  "ccCardNumber": "5****5761",
  "bin": "511142",
  "last4Digits": "5761",
  "ccExpMonth": "09",
  "ccExpYear": "21",
  "transactionId": "1110000000004146935",
  "threeDReason": "",
  "threeDReasonId": "",
  "challengeCancelReasonId": "",
  "challengeCancelReason": "",
  "isLiabilityOnIssuer": "1",
  "challengePreferenceReason": "12",
  "cancelled": false
}
For more information about the response, see the createPayment() output parameters.
4. Response Verification
Before storing complete payment information in your system, verify the response using one of these methods:
Need Help Deciding?
In general, developers prefer using /getPaymentStatus because the flow is synchronous:
- The server side receives a
createPayment()response from the client side. - The server side submits a
/getPaymentStatusrequest. - The server side receives a response.
On the other hand, Nuvei sends DMNs to the webhook endpoint on your system when a transaction or event occurs, in real time. Also, if you are using APMs, use DMNs to verify the response because APM transactions can be asynchronous, involving time delays ranging from a few seconds to several days. After Nuvei receives the final transaction result, Nuvei sends you a DMN with the final result of the transaction.
Send a /getPaymentStatus Request
Send a server-side /getPaymentStatus API request using the sessionToken from the /openOrder response (and previously used in the createPayment() request).
You can only send a /getPaymentStatus request:
- Before the session in which the payment was performed expires. After the session expires, the response is
session expired. - After the
createPayment()process ends. To detect the end of the process, monitor the JavaScript events for the final transaction event.
Example /getPaymentStatus Request
{
  "sessionToken": "<sessionToken from /openOrder>"
}
<?php
$getPaymentStatusRequest = $SafeCharge->getPaymentService()->getPaymentStatus([
    'sessionToken'  =>  '274ff0d9-c859-42f5-ae57-997641f93471',
]);
?>
public class ExampleGetPaymentStatus {

    public static void main(String[] args) {
            GetPaymentStatusResponse response = safecharge.getPaymentStatus();
    }
}
//Start by initializing the SDK. For more details, see the Nuvei .NET SDK at https://docs.nuvei.com/?p=48413.

// preceded by payment request
var response = safecharge.GetPaymentStatus();
The response includes complete, verified payment information, including information about the card used. For complete information about the response, see the /getPaymentStatus output parameters.
Example /getPaymentStatus Response
{
    "transactionStatus": "APPROVED",
    "gwExtendedErrorCode": 0,
    "errCode": 0,
    "reason": "",
    "authCode": "075449",
    "clientRequestId": "9WD9JCZW9",
    "internalRequestId": 13004281,
    "version": "1.0",
    "transactionId": "2110000000001496240",
    "amount": "200",
    "currency": "USD",
    "merchantSiteId": "142033",
    "transactionType": "Sale",
    "clientUniqueId": "695701003",
    "errCode": 0,
    "paymentOption": {
        "userPaymentOptionId": "7072706",
        "card": {
            "uniqueCC": "NuBcbNkc7kBwNExS5j/wgIS8sNk="
        }
    },
    "sessionToken": "64fe6953-69d1-440f-8e21-878c85701f09",
    "userTokenId": "230811147",
    "status": "SUCCESS"
}
Enable and Configure DMNs
You can enable and configure DMNs in the Control Panel My Integration Settings. Nuvei sends DMNs to the specified DMN URL on your system. Payment details appear in payment DMNs.
Example Payment DMN
...'ppp_status=OK&Status=APPROVED&ExErrCode=0&ErrCode=0&errApmCode=0&errApmDescription=&errScCode=0&errScDescription=&Reason=&ReasonCode=0&PPP_TransactionID=527324408&userid=websdk_demo&merchant_unique_id=&customData=&productId=NA&first_name=&last_name=&email=john.smoth%40email.com¤cy=GBP&isPrepaid=false&customField1=&customField2=&customField3=&customField4=&customField5=&customField6=&customField7=&customField8=&customField9=&customField10=&customField11=&customField12=&customField13=&customField14=&customField15=&invoice_id=&address1=&address2=&country=United+Kingdom&state=&city=&zip=&phone1=&phone2=&phone3=&client_ip=176.12.8.89&nameOnCard=John+Smith&cardNumber=5****6034&bin=510108&noCVV=&acquirerId=19&acquirerBank=Nuvei+Demo+Bank&expMonth=02&expYear=29&Token=TQAxAGUAUABGAGQAbgBkAFAAbgBkAGQAOQBxAGkAMABTAHAANAAjAHcAUgBAAC4ATwBiAFAAPgBiAFgAVwBzAFoASwBsADgAZAByACwAKgAmADsAXgBkAGcASwB0ACYANABOACYAMwA%3D&tokenId=1809085151&AuthCode=111958&AvsCode=&Cvv2Reply=&shippingCountry=GB&shippingState=&shippingCity=&shippingAddress=&shippingZip=&shippingFirstName=&shippingLastName=&shippingPhone=&shippingCell=&shippingMail=&total_discount=0.00&total_handling=0.00&total_shipping=0.00&total_tax=0.00&buyButtonProductBundleId=&merchant_site_id=2****8&merchant_status=&action=&requestVersion=&message=APPROVED&merchantLocale=&unknownParameters=&payment_method=cc_card&ID=&merchant_id=8*****************2&responseTimeStamp=2025-01-15.14%3A24%3A46&buyButtonProductId=&webMasterId=&appliedPromotions=&uniqueCC=rV8%2FVkhgZalm3lZahVgKfjFTHE8%3D&transactionType=Sale&externalEmail=&cardCompany=MASTERCARD&user_token_id=websdk_demo&userPaymentOptionId=&TransactionID=7110000000009040707&totalAmount=150.0&dynamicDescriptor=PluginsTest1&item_name_1=NA&item_number_1=&item_amount_1=150.00&item_quantity_1=1&item_discount_1=0.00&item_handling_1=0.00&item_shipping_1=0.00&feeAmount=&houseNumber=&customCurrency=&type=DEPOSIT&clientRequestId=&relatedTransactionId=&PAR=cTdO8EfecTtwrBgNGPMUGdTLoQci5&challengePreferenceReason=12&processedCardBrand=MASTERCARD&responsechecksum=aeccb1932197ea5f8d635f127078ad6026f3beff6849212510ae7857f949671a&advanceResponseChecksum=6d11d4ced6963d834101f44d847c018897f51adfcded7219002f3422fd4d4699',
For more information about payment DMNs, see Payment DMNs.
Advanced Web SDK Features
Nuvei Web SDK supports a wide variety of features, functions, and options, including:
- Customize Nuvei Fields.
- Additional operations such as withdrawals, APMs, 3D-Secure Authentication Only, Tokenization Only, and more.
- Special features such as Dynamic Currency Conversion (DCC) and Scan Card.
- Event handling.
- Amount features:
- Open Amount – Within a range you configure, customer specifies the payment (deposit) amount.
/updateOrder– Modifies the amount of an existing order.
For information about other Web SDK features, see Advanced Features.
 Last modified March 2025