
- METHOD TYPEE-wallet
- PAYMENTS

- PAYOUTS

- REFUNDS
- RECURRING
Overview
Google Pay enables your customers to complete their purchases quickly and easily in apps and on the web using the payment methods saved in their Google account or on their Android device.
This guide describes how to perform a non-3D Secure (non-3DS) Google Pay payment using Nuvei Web SDK 2.0.
Prerequisites and Notes
- This guide assumes you have completed all account setup prerequisites, and are ready to integrate Google Pay into your payment flow.
- Use these gateway credentials in requests:
- For the test (sandbox) environment:
gatewayMerchantId: “googletest“ - For the production environment:
gatewayMerchantId: “nuveidigital“
- For the test (sandbox) environment:
- The Google Pay Web environment must be set up according to the Google Pay guidelines:
- Google Pay Web Developer Documentation
- Google Pay Brand Promoting Guidelines
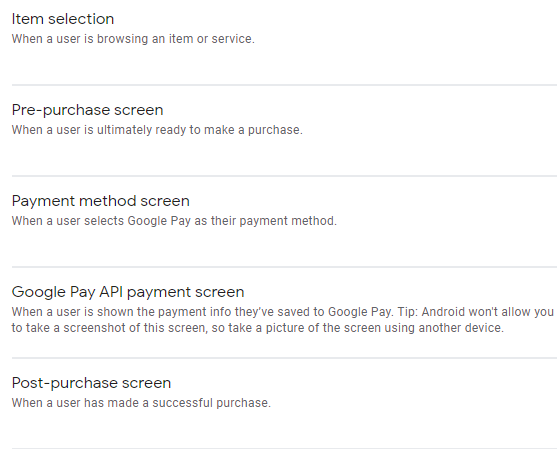
For your domain to be verified with Google, the merchant must send Nuvei’s Integration Team screenshots (like the one shown below) of your payment flow along with your domain URL:
- Google Pay Test Card Suite
- Google Pay Web Integration Checklist
- The Google account you use for testing should be linked to a relevant test card:
- Google Pay provides test cards. See Google Pay Test Card Suite for details.
- Alternatively, you can use one of the test cards listed on the Testing Cards page, which does not indicate support for Nuvei Web SDK 2.0. Nonetheless, you can use the test card information in Nuvei Web SDK 2.0 card payment flows.
Test credentials and testing scenarios can be provided by Nuvei if necessary.
You can contact Nuvei Support for any assistance.
Additional Resources
- What’s new in Nuvei Web SDK 2.0 and the advantages of using it as an integration method – Web SDK 2.0
- Other Nuvei Web SDK 2.0 integration guides:
- Getting Started with Nuvei Web SDK 2.0 – Card payment
- Apple Pay
- ACH
- Nuvei Payment Tokens – Payment with an existing payment token
- All Web SDK 2.0 methods
Supported Countries
- Afghanistan
- Aland Islands
- Albania
- Algeria
- Andorra
- Angola
- Anguilla
- Antarctica
- Antigua and Barbuda
- Argentina
- Armenia
- Aruba
- Australia
- Austria
- Azerbaijan
- Bahamas
- Bahrain
- Bangladesh
- Barbados
- Belarus
- Belgium
- Belize
- Benin
- Bermuda
- Bhutan
- Bolivia
- Bonaire
- Bosnia-Herzegovina
- Botswana
- Bouvet Island
- Brazil
- British Indian Ocean Territory
- Brunei
- Bulgaria
- Burkina Faso
- Cambodia
- Cameroon
- Canada
- Cape Verde
- Cayman Islands
- Central African Republic
- Chad
- Chile
- China
- Chinese Taipei
- Christmas Island
- Close
- Cocos (Keeling) Islands
- Colombia
- Comoros
- Congo
- Cook Islands
- Costa Rica
- Cote dIvoire
- Croatia
- Curacao
- Curaçao
- Cyprus
- Czech Republic
- Denmark
- Djibouti
- Dominica
- Dominican Republic
- Ecuador
- Egypt
- El Salvador
- Equatorial Guinea
- Eritrea
- Estonia
- Ethiopia
- Falkland Islands (Malvinas)
- Faroe Islands
- Fiji
- Finland
- France
- French Guiana
- French Polynesia
- French Southern Territories
- Gabon
- Gambia
- Georgia
- Germany
- Ghana
- Gibraltar
- Greece
- Greenland
- Grenada
- Guadeloupe
- Guam
- Guatemala
- Guernsey
- Guinea
- Guinea-Bissau
- Guyana
- Haiti
- Heard Island
- Honduras
- Hong Kong
- Hungary
- Iceland
- India
- Indonesia
- Iraq
- Ireland
- Isle of Man
- Israel
- Italy
- Jamaica
- Japan
- Jersey
- Jordan
- Kazakhstan
- Kenya
- Kiribati
- Kosovo
- Kuwait
- Kyrgyzstan
- Laos
- Latvia
- Lebanon
- Lesotho
- Liberia
- Libya
- Liechtenstein
- Lithuania
- Luxembourg
- Macau
- Macedonia
- Madagascar
- Malawi
- Malaysia
- Maldives
- Mali
- Malta
- Marshall Islands
- Martinique
- Mauritania
- Mauritius
- Mayotte
- Mexico
- Micronesia
- Moldova
- Monaco
- Mongolia
- Montenegro
- Montserrat
- Morocco
- Mozambique
- Myanmar
- Namibia
- Nauru
- Nepal
- Netherlands
- Netherlands Antilles
- New Caledonia
- New Zealand
- Nicaragua
- Niger
- Nigeria
- Niue
- Norfolk Island
- Northern Mariana Islands
- Norway
- Oman
- Pakistan
- Palau
- Palestinian Territory
- Panama
- Papua New Guinea
- Paraguay
- Peru
- Philippines
- Pitcairn
- Poland
- Portugal
- Puerto Rico
- Qatar
- Reunion
- Romania
- Russia
- Rwanda
- Saint Barthélemy
- Saint Helena
- Saint Kitts and Nevis
- Saint Lucia
- Saint Martin
- Saint Pierre and Miquelon
- Saint Thomas
- Saint Vincent
- Saint Vincent and Grenadines
- Samoa
- San Marino
- Sao Tome and Principe
- Saudi Arabia
- Senegal
- Serbia
- Seychelles
- Sierra Leone
- Singapore
- Slovakia
- Slovenia
- Solomon Islands
- Somalia
- South Africa
- South Georgia, South Sandwich Islands
- South Korea
- Spain
- Sri Lanka
- Suriname
- Svalbard and Jan Mayen Islands
- Swaziland
- Sweden
- Switzerland
- Taiwan
- Tajikistan
- Tanzania, United Republic of
- Thailand
- Timor-Leste
- Togo
- Tokelau
- Tonga
- Trinidad and Tobago
- Tunisia
- Turkey
- Turkmenistan
- Turks and Caicos Islands
- Tuvalu
- Uganda
- Ukraine
- United Arab Emirates
- United Kingdom
- Uruguay
- Uzbekistan
- Vanuatu
- Vatican City
- Venezuela
- Vietnam
- Virgin Islands
- Wallis and Futuna
- Western Sahara
- Yemen
- Zambia
- Zimbabwe
Supported Currencies
Google Pay supports all currencies supported by Nuvei.
Availability
For information about Google Pay availability, press here.
Payment (Deposit) Flow
To integrate Google Pay into your payment page using Nuvei Web SDK 2.0, follow these steps:
-
- Server-to-Server Authentication – Before submitting a payment using the client-side Web SDK 2.0, you need to send a server-to-server POST
/ordersREST API 2.0 request that authenticates your Nuvei merchant credentials and creates a session. - Frontend Web SDK Initialization – Import the
websdk2.0.jslibrary and instantiate Web SDK 2.0. - Google Pay UI Button Creation – Display on your payment page.
- Payment Method Selection – Customer selects a payment method associated with the Google account or adds a new payment method. Then, Google Pay sends you an encrypted Google Pay token.
- Frontend Web SDK Google Pay Payment Submission – Send a
payment()request with its required parameters and the Google Pay encrypted token. - Response Verification – Verify the response by sending a GET
/entities/{processing-entity-id}/transactions/{transaction-id}REST API 2.0 request or by using webhooks.
- Server-to-Server Authentication – Before submitting a payment using the client-side Web SDK 2.0, you need to send a server-to-server POST
1. Server-to-Server Authentication
Before submitting a payment using the client-side Web SDK 2.0, you need to send a server-to-server POST /orders REST API 2.0 request that authenticates your Nuvei merchant credentials and creates a session. For details, press here.
2. Frontend Web SDK 2.0 Initialization
For details, press here.
3. Google Pay UI Button Creation
For details, press here.
4. Payment Method Selection
Customer selects a payment method associated with the Google account or adds a new payment method. Then, Google Pay sends you an encrypted Google Pay token.
- Pressing the Google Pay button triggers the Google Pay payment flow.
- Google Pay displays payment methods associated with the customer’s Google account.
- Customer selects a payment method associated with the Google account or adds a new payment method.
- Google Pay returns an encrypted Google Pay token as a
PaymentMethodTokenizationDataJSON object.
The token contains values from a successful Google Pay authentication.
5. Frontend Web SDK Google Pay Payment Submission
The merchant sends the encrypted Google Pay token as-is in a payment() Web SDK 2.0 request. Nuvei decrypts the token and uses the relevant data extracted from it.
Send a non-3DS payment() request with its mandatory parameters and include:
paymentOptionclass with:networkTokenclass with:provider: “GooglePay“token: “<encrypted token merchant received from Google Pay>“
Example Google Pay payment() Request
// call this from your main() in order for it to work with the html sample
function payment() {
  nuveiWebSDK.payment({
    "merchantTransactionId": "<transaction id in the merchant's system>",
    "paymentOption": {
      "store": "none",
      "networkToken": {
        "provider": "GooglePay",
        "token": "<token received from Google Pay>"
      }
    },
    "buyerDetails": {
      "billingAddress": {
        "countryCode": "GB"
      },
    }
  });
}
Example Google Pay payment() Response
{
  "paymentId": "7b77229fa01d478cb369809f26534345",
  "transactionId": "8110000000001701567",
  "amount": 10,
  "currency": "EUR",
  "transactionType": "Sale",
  "result": {
    "status": "approved"
  },
  "authCode": "111387",
  "partialApproval": {
    "requestedAmount": 10,
    "requestedCurrency": "EUR"
  },
  "paymentOption": {
    "networkToken": {
      "provider": "GooglePay",
      "expirationMonth": "12",
      "expirationYear": "26",
      "bin": "476134",
      "last4Digits": "1390",
      "acquirerId": "19",
      "cardType": "Debit",
      "cardBrand": "VISA"
    }
  }
}
For more information about the output parameters in the Web SDK 2.0 payment() response, see Web SDK 2.0 Methods.
After receiving the payment() response, notify your server side and you can display a relevant message to the customer.
6. Response Verification
Before storing complete payment information in your system, you need to verify the response.
For details, press here.
 Last modified March 2025