
- METHOD TYPEE-wallet
- PAYMENTS
- PAYOUTS
- REFUNDS
- RECURRING
Introduction
Venmo is an American mobile payment service founded in 2009 and owned by PayPal since 2013.
Nuvei’s current Venmo implementation is focused on the US gaming industry and supports:
- Deposits
- Withdrawals
- Refunds – including partial refunds
- Account limitation (1:1 restriction, deposit required prior to withdraw)
- ACH is the only funding source
- Withdrawals is paid to the user’s PayPal account
Venmo works in connect mode only and requires merchants to provide both Braintree and Venmo/PayPal accounts.
Supported Countries
- USA
Supported Currencies
- USD
Creating a PayPal Account and REST App
To create your PayPal sandbox account and REST app, perform the following steps:
- Go to developer.paypal.com and press the Log into Dashboard button in the top right corner. Log in with an active personal or business PayPal account.
- Upon logging in, navigate to the Sandbox > Accounts page.
- Press the blue Create account button. When the Lightbox pops up, you have the option of instantly creating an account by selecting type (Business or Personal) and country or pressing the Create custom account link. For creating test merchant sandbox accounts, select Business.
- Once an account has been created, write down the Account name (email) and password. The password can be found by pressing the “…“> View/edit account next to the Sandbox account in the list.
- To create your PayPal REST app, navigate to My Apps & Credentials and press the Create App button.
- Give your App and App Name, select your newly created PayPal Sandbox account from the dropdown list, and press Create App.
- Write down your REST App Client ID and Secret.
Creating a Braintree Account
- Perform the following steps to go Live for Venmo in Control Panel.
- Log into the production Control Panel.
- Press the gear icon in the top right corner.
- Select Processing from the drop-down menu.
- Scroll to the Payment Methods section.
- Next to Venmo, press the Enable button.
- Complete the application form, including:
- A display name for your business (120-character limit).
- An image for your business, preferably your app’s icon (1024×1024 PNG).
- Your company’s phone, email, or URL to be included in customer purchase receipts; you can choose to provide one or all of these items.
- Anticipated annual Venmo volume.
- Press the Start Approval Process button.
Configuration for ‘state’ Field
- On the Braintree site, go to ‘Settings’ > ‘Processing Options’ > ‘Transactions’ > ‘Custom Fields’.
- In ‘Custom Fields’, add a custom field with the display name ‘State’ and the API name ‘state’.

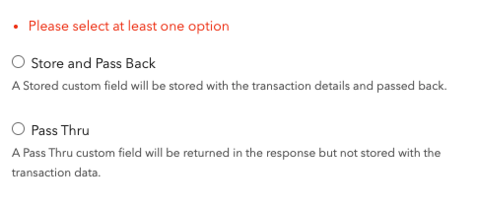
- As per merchant discretion, select ‘Store and Pass Back’ or ‘Pass Thru’.
Payment (Deposit) Flow
Follow these steps to perform a payment using Nuvei REST API integration:
1. Generate a sessionToken
Press here for details.
2. Send a /payment Request
Perform the payment by sending a /payment request with its mandatory parameters including:
userTokenIdamountcurrencypaymentOption.alternativePaymentMethodclass containing:paymentMethod: “apmgw_Venmo“venmoNonce– Taken from SDK (see https://developer.paypal.com/braintree/docs/guides/venmo/client-side/javascript/v3/).venmoDeviceData– Taken from SDK (see https://developer.paypal.com/braintree/docs/guides/venmo/client-side/javascript/v3/).
deviceDetailsclass containing:ipAddressbillingAddressclass containing:firstName,lastName,country,emailuserDetailsclass containing:firstName,lastName,country,email
Example /payment Request
{
  "sessionToken": "<sessionToken from /getSessionToken>",
  "merchantId": "<your merchantId>",
  "merchantSiteId": "<your merchantSiteId>",
  "userTokenId": "<unique customer identifier in merchant system>",
  "clientUniqueId": "<unique transaction ID in merchant system>",
  "clientRequestId": "<unique request ID in merchant system>",
  "amount": "8",
  "currency": "USD",
  "paymentOption": {
    "alternativePaymentMethod": {
      "paymentMethod": "apmgw_Venmo",
      "venmoNonce": "<taken from SDK>",
      "venmoDeviceData": "<taken from SDK>"
    }
  },
  "deviceDetails": {
    "ipAddress": "<customer's IP address>"
  },
  "billingAddress": {
    "firstName": "John",
    "lastName": "Smith",
    "email": "[email protected]",
    "country": "US"
  },
  "userDetails": {
    "firstName": "John",
    "lastName": "Smith",
    "email": "[email protected]",
    "country": "US"
  },
  "timeStamp": "<YYYYMMDDHHmmss>",
  "checksum": "<calculated checksum>"
}
After the transaction is processed, Nuvei sends a Direct Merchant Notification (DMN) that includes the result of the transaction to the URL provided in urlDetails.notificationUrl, which Nuvei recommends including in the /payment request.
Payout (Withdrawal) Flow
/payout requests for APM accounts can only be performed using a UPO.
If you do not have a UPO for the user’s APM account, create a UPO manually by sending an /addUPOAPM request (see APM without UPO).
Example /addUPOAPM Request
{
  "merchantSiteId": "<your merchantSiteId>",
  "merchantId": "<your merchantId>",
  "userTokenId": "<unique customer identifier in merchant system>",
  "clientRequestId": "<unique request ID in merchant system>",
  "timeStamp": "<YYYYMMDDHHmmss>",
  "apmData": {
    "venmoNonce": "<taken from SDK>",
    "venmoDeviceData": "<taken from SDK>"
  },
  "paymentMethodName": "apmgw_Venmo",
  "checksum": "<calculated checksum>"
}
After the transaction is processed, Nuvei sends a DMN that includes the result of the transaction to the URL provided in urlDetails.notificationUrl, which Nuvei recommends including in the /payout request.
User Experience
- The user selects the Venmo method on the Cashier page.

- The user enters the amount.
- The user presses the Venmo button.

- QR code is generated on the Cashier page to be scanned with Venmo App.
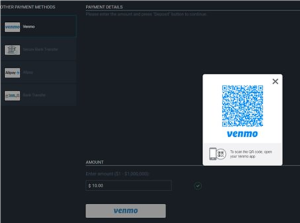
- The user opens Venmo App in their mobile device and scan the QR.
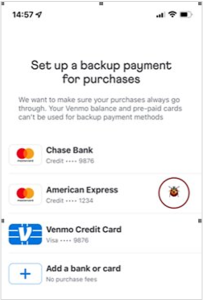
- The user selects the payment method.
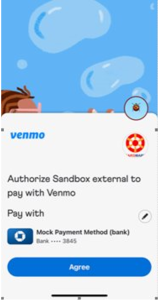
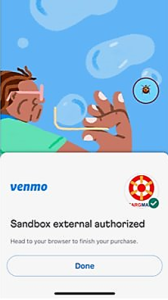
- The user authorizes the payment.
- Payment is completed.


 Last modified December 2025