
- METHOD TYPEVoucher
- PAYMENTS

- PAYOUTS

- REFUNDS
- RECURRING
Introduction
OKTO.CASH is an e-voucher service that allows users to load their accounts that are held with a collaborating merchant safely, securely and in real-time, by paying in cash at a partnering point of sale (POS) system (such as a store or a market).
The solution enables users to pay for a product or a service online and then pay in cash at the nearest POS, by presenting or scanning a unique PayCode (numerical code or GS1 barcode).
Supported Countries
- Cyprus
- Greece
- Romania
Supported Currencies
- EUR
- RON
Payment (Deposit) Flow


Press tab to open…
Follow these steps to perform a payment using Nuvei REST API integration:
1. Generate a sessionToken
Press here for details.
2. Send a /payment Request
Perform the payment by sending a /payment request with its mandatory parameters including:
userTokenIdamountcurrencypaymentOption.alternativePaymentMethodclass containing:paymentMethod: “apmgw_OKTO_CASH“
deviceDetailsclass containing:ipAddressbillingAddressclass containing:firstName,lastName,country,emailuserDetailsclass containing:firstName,lastName,country,email
For customers in Greece and Romania, the following additional parameters must be sent in the userDetails class:
firstName, lastName, dateOfBirth, address, city, email, phone, and identification.
Example /payment Request
{
  "sessionToken":"<sessionToken from /getSessionToken>",
  "merchantId":"<your merchantId>",
  "merchantSiteId":"<your merchantSiteId>",
  "clientRequestId":"<unique request ID in merchant system>",
  "amount":"200",
  "currency":"RON",
  "userTokenId":"<unique customer identifier in merchant system>",
  "clientUniqueId":"<unique transaction ID in merchant system>",
  "paymentOption":{
    "alternativePaymentMethod":{
      "paymentMethod":"apmgw_OKTO_CASH"
    }
  },
  "deviceDetails":{
    "ipAddress":"<customer's IP address>"
  },
  "billingAddress":{
    "firstName": "John",
    "lastName": "Smith",
    "country":"RO",
    "email":"[email protected]",
  },
  "userDetails":{
    "firstName": "John",
    "lastName": "Smith",
    "country":"RO",
    "email":"[email protected]"
  },
  "timeStamp":"<YYYYMMDDHHmmss>",
  "checksum":"<calculated checksum>"
}
After the transaction is processed, Nuvei sends a Direct Merchant Notification (DMN) that includes the result of the transaction to the URL provided in urlDetails.notificationUrl, which Nuvei recommends including in the /payment request.
Follow these steps to perform a payment using Nuvei Web SDK integration.
1. Initiate a Session
Before you can submit payment using the client-side Nuvei Web SDK, you need to send the /openOrder API call.
2. Initialize the Web SDK
Instantiate the Web SDK with the sessionToken received from the server call to /openOrder.
3. Create an APM Payment
Send a createPayment() request with its mandatory parameters including:
paymentOption.alternativePaymentMethodclass containing:paymentMethod: “apmgw_OKTO_CASH“
deviceDetailsclass containing:ipAddressbillingAddressclass containing:firstName,lastName,country,emailuserDetailsclass containing:firstName,lastName,country,email
For customers in Greece and Romania, the following additional parameters must be sent in the userDetails class:
firstName, lastName, dateOfBirth, address, city, email, and identification.
Example createPayment() Request
sfc.createPayment({
  sessionToken: "<sessiontoken>",
  paymentOption: {
    alternativePaymentMethod: {
      paymentMethod: "apmgw_OKTO_CASH",
    }
  },
  deviceDetails  : {
    ipAddress  : "<customer's IP address>"
  },
  billingAddress  : {
    firstName: "John",
    lastName: "Smith",
    country  : "RO",
    email:"[email protected]"
  },
  userDetails  : {
    firstName: "John",
    lastName: "Smith",
    country  : "RO",
    email:"[email protected]"
  },
}, function(res) {
  console.log(res);
});
After the transaction is processed, Nuvei sends a Direct Merchant Notification (DMN) that includes the result of the transaction to the URL provided in urlDetails.notificationUrl, which Nuvei recommends including in the /openOrder request.
- REST API
-
Follow these steps to perform a payment using Nuvei REST API integration:
1. Generate a
sessionTokenPress here for details.
2. Send a
/paymentRequestPerform the payment by sending a
/paymentrequest with its mandatory parameters including:userTokenIdamountcurrencypaymentOption.alternativePaymentMethodclass containing:paymentMethod: “apmgw_OKTO_CASH“
deviceDetailsclass containing:ipAddressbillingAddressclass containing:firstName,lastName,country,emailuserDetailsclass containing:firstName,lastName,country,email
For customers in Greece and Romania, the following additional parameters must be sent in the
userDetailsclass:
firstName,lastName,dateOfBirth,address,city,email,phone, andidentification.
Example
/paymentRequest{ "sessionToken":"<sessionToken from /getSessionToken>", "merchantId":"<your merchantId>", "merchantSiteId":"<your merchantSiteId>", "clientRequestId":"<unique request ID in merchant system>", "amount":"200", "currency":"RON", "userTokenId":"<unique customer identifier in merchant system>", "clientUniqueId":"<unique transaction ID in merchant system>", "paymentOption":{ "alternativePaymentMethod":{ "paymentMethod":"apmgw_OKTO_CASH" } }, "deviceDetails":{ "ipAddress":"<customer's IP address>" }, "billingAddress":{ "firstName": "John", "lastName": "Smith", "country":"RO", "email":"[email protected]", }, "userDetails":{ "firstName": "John", "lastName": "Smith", "country":"RO", "email":"[email protected]" }, "timeStamp":"<YYYYMMDDHHmmss>", "checksum":"<calculated checksum>" }After the transaction is processed, Nuvei sends a Direct Merchant Notification (DMN) that includes the result of the transaction to the URL provided in
urlDetails.notificationUrl, which Nuvei recommends including in the/paymentrequest. - Web SDK
-
Follow these steps to perform a payment using Nuvei Web SDK integration.
1. Initiate a Session
Before you can submit payment using the client-side Nuvei Web SDK, you need to send the
/openOrderAPI call.2. Initialize the Web SDK
Instantiate the Web SDK with the
sessionTokenreceived from the server call to/openOrder.3. Create an APM Payment
Send a
createPayment()request with its mandatory parameters including:paymentOption.alternativePaymentMethodclass containing:paymentMethod: “apmgw_OKTO_CASH“
deviceDetailsclass containing:ipAddressbillingAddressclass containing:firstName,lastName,country,emailuserDetailsclass containing:firstName,lastName,country,email
For customers in Greece and Romania, the following additional parameters must be sent in the
userDetailsclass:
firstName,lastName,dateOfBirth,address,city,email, andidentification.Example
createPayment()Requestsfc.createPayment({ sessionToken: "<sessiontoken>", paymentOption: { alternativePaymentMethod: { paymentMethod: "apmgw_OKTO_CASH", } }, deviceDetails : { ipAddress : "<customer's IP address>" }, billingAddress : { firstName: "John", lastName: "Smith", country : "RO", email:"[email protected]" }, userDetails : { firstName: "John", lastName: "Smith", country : "RO", email:"[email protected]" }, }, function(res) { console.log(res); });After the transaction is processed, Nuvei sends a Direct Merchant Notification (DMN) that includes the result of the transaction to the URL provided in
urlDetails.notificationUrl, which Nuvei recommends including in the/openOrderrequest.
User Experience
- The user is redirected to a page with a numeric code.
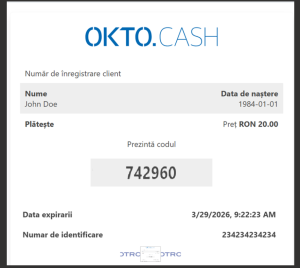
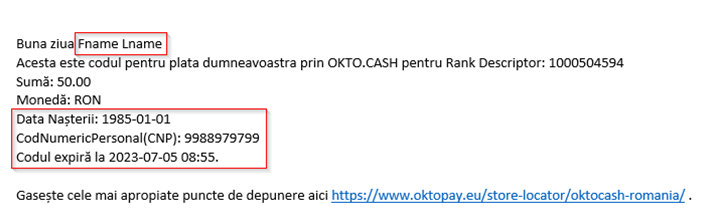
At the same time, the user receives an email with the payment details. For example, if they are not using a mobile phone, they can use the email to make the payment.
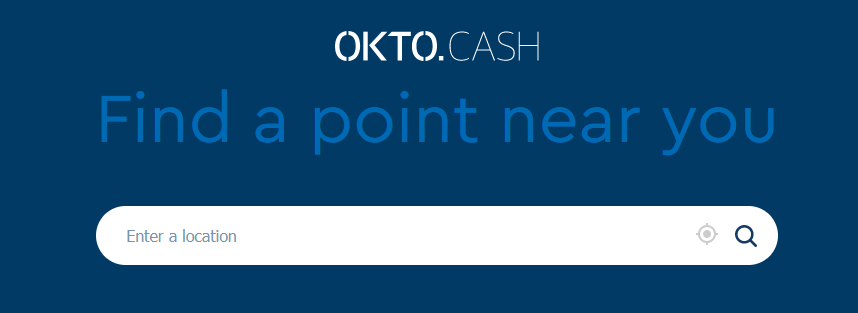
- The user presses the link to locate the nearest POS where the payment can be made.
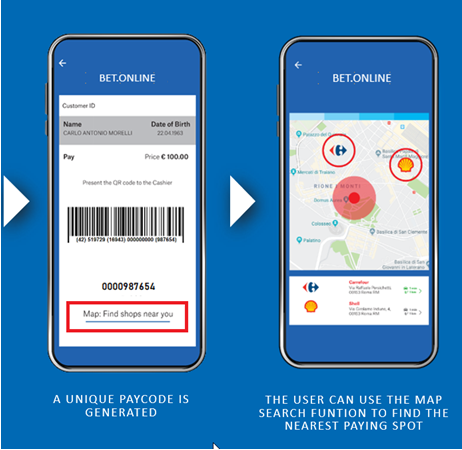
- The user goes to the nearest POS location and presents the pay code.
- The store merchant scans (or enters) the pay code.
- After receiving the money from the user, the store merchant executes a deposit and the player’s Okto account is instantly credited with the amount.
Testing
The merchant should contact Nuvei to complete the deposit testing.
 Last modified June 2026