Introduction
Purpose
This guide provides steps to integrate Apple Pay into your payment flow using the Nuvei Simply Connect platform.
After the successful completion of this integration, the Apple Pay button should appear in the Payment Methods Gallery of your website or application, when using an Apple Pay compatible device.
Prerequisites and Notes
This guide assumes you have completed all account setup prerequisites, and are ready to integrate Apple Pay into your payment flow.
You are responsible for the button implementation, according to the Apple Pay UI guidelines.
1. Authentication
Follow the instructions in these steps:
- Initiate a Session
This authenticates and sets up an order in the Nuvei system, by sending an /openOrder request, and returns asessionToken. - Create an HTML Placeholder
This instantiates the Web SDK with thesessionTokenreceived from the server call to /openOrder.
2. Collect the Card Details
The Apple Pay button is used to collect your customer’s card details.
Display the Apple Pay button in the payment methods gallery on the Nuvei Simply Connect page, as follows:
- Send a
checkout()request with its mandatory checkout() Input Parameters. - Any additional optional parameters that you require.
- (Recommended) Include the
apmConfigclass for various customizations:companyNamemust be sent for Apple Pay’s equivalentmerchantNameto appear on the Apple Pay payment page.
- If you would like Nuvei to collect the user’s details directly from ApplePay, then you can set
collectUserDetailsas ‘true‘ in theapmConfigclass. Default value is set as ‘false‘. When you set this parameter to true, Nuvei sends Apple Pay (in the token request) both shipping and billing objects to be returned, map them to the relative classes, and send them in theclientPaymentrequest. - To customize the Apple Pay button:
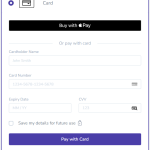
buttonStyle– Customizes the Apple Pay button color. Possible values: black (default), white, white-outline. For examples, see the Button Styles section.buttonType– Customizes the Apple Pay button text. Possible values: buy (default), plain, book, checkout, order, pay, subscribe, inStore, addMoney, X, contribute, donate, reload, rent, setUp, support, tip, topUp. For examples, see the Button Types section.buttonLocation– Customizes the Apple Pay button location in relation to other payment methods in the checkout page. Possible values:- onTop (default) – Button is integrated within the card block. In the Accordion theme, it looks like this:

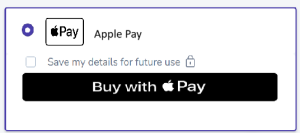
- gallery – Apple Pay appears in the payment method gallery alongside other payment methods. When the customer selects Apple Pay, the Apple Pay button appears. In the Accordion theme, it looks like this:

- onTop (default) – Button is integrated within the card block. In the Accordion theme, it looks like this:
- You can change the height and width of the Apple Pay button in the CSS of the container of the button, by adding the width and height to the apple-pay-button-with-text class.
- Add the
3Dflowparameter to theapmConfigclass to determine whether your card transaction is processed as non-3DS (disable – default) or if the transaction is processed with 3DS verification using Simply Connect (enable).
Example checkout() Request for Apple Pay
checkout({
  logLevel: 0,
  payButton: "amountButton",
  showResponseMessage: true,
  sessionToken: document.getElementById('session').value,
  env: 'test',
  merchantSiteId: document.getElementById('merchantSiteID').value,
  merchantId: document.getElementById('merchantID').value,
  country: 'US',
  locale: 'en',
  apmConfig: {
    applePay: {
      collectUserDetails: 'true', // false (default), true
      buttonStyle: 'black', // black (default), white, white-outline
      buttonType: 'checkout' // buy (default), plain,
        // book, checkout, order, pay, subscribe, inStore,
        // addMoney, continue, contribute, donate, reload,
        // rent, setUp, support, tip, topUp
      buttonLocation: ’onTop’// onTop (default), gallery,
      3Dflow: 'disable', // disable (default), enable
      companyName: "<company name>"
    }
  },
  currency: 'USD',
  amount: 135,
  renderTo: '.container_for_checkout',
  onResult: onResult,
  autoOpenPM: true,
  alwaysCollectCvv: false,
  fullName: 'CL-BRW1',
  email: '[email protected]'
})
3. Payment
The Apple Pay button is displayed in the payment methods gallery on the Nuvei Simply Connect page.
- The customer triggers the Apple Pay payment flow by pressing the Apple Pay button.
- Apple Pay displays the cards in the customer’s Wallet, or asks the customer to “Add new credit/debit card” details.
- After the customer selects one of their Apple Pay payment methods, Apple Pay returns the encrypted token for Nuvei to process the transaction.
- Nuvei processes the transaction and handles the rest of the payment flow automatically.
- When the transaction is complete, the system displays the relevant “Approved” / “Declined” transaction message.
Appendix – JSFiddle Example
Editing JSFiddle Examples
You can use the JSFiddle demonstration environment to view, run, and customize the code examples below.
To edit sample code in JSFiddle, press Edit in JSFiddle in the top right corner.
This redirects you to a page where you run and test the code.
Feel free to change your code, including the HTML and CSS.
Simply Connect JSFiddle
You can use the JSFiddle demonstration environment to view the Apple Pay Simply Connect example below.
If you are using an Apple device, then you can also run and customize the Apple Pay Simply Connect example.
 Last modified March 2025