• Documentation
  • API Reference
  • Documentation
  • API Reference
Expand All Collapse All
< BACK TO HOME
  • APMs Overview
    • Introduction to APMs
    • APM Input Fields and APIs
    • APM subMethod Class
    • Account Details Capture
    • APM Countries and Currencies
  • Global Guides
    • Apple Pay
      • Registering with Apple Pay
        • (Manually) Register in the Apple System
          • Create an Apple ID
          • Enroll in the Apple Developer Program
            • Submit an Enrollment Request
            • Complete the Enrollment Process
            • Activate your Apple Developer Program Account
          • Register a Merchant ID in the Apple System
            • Create a Merchant ID
            • Create a Payment Processing Certificate
            • Create a Merchant Identity Certificate
            • Register and Verify Your Domain
      • Nuvei Apple Pay Implementations
        • Payment Page using IFrame
        • Static Apple Pay Button
        • Static Pay Button (Web SDK)
        • Dynamic Apple Pay Button
      • Apple Pay Integration
        • Apple Pay Guide (REST API)
        • Apple Pay Guide (Web SDK)
        • Apple Pay Guide (Checkout)
        • Apple Pay Integration Testing
    • Google Pay
      • Google Pay (REST API)
      • Google Pay (Web SDK)
      • Google Pay (Checkout)
    • Neteller
    • PayPal
    • Skrill
    • Visa Checkout
      • Visa Checkout (REST API)
  • US and Canada Guides
    • ACH
    • Interac Instant
    • Mazooma
    • PayNearMe
    • PlayPlus
      • PlayPlus (REST)
      • PlayPlus (Web SDK)
    • VIP Preferred
      • VIP Preferred (REST)
      • VIP Pref. (Web SDK/Checkout)
  • Europe Guides
    • Aircash
    • Okto Cash
    • Open Banking
  • Latin America Guides
    • LATAM Payouts
    • Pay4Fun
    • PIX
    • PIX Payouts
    • PSE
    • STPmex
  • Asia Pacific Guides
    • Alipay HK
    • Dana
    • DragonPay
    • GCash
    • India Payouts
    • KakaoPay
    • Touch ’n Go
    • TrueMoney

Create an Apple ID

On this page:
  • Requirements
  • 1. Create an Apple Account (Apple ID)
  • 2. Turn on Two-Factor Authentication

Creating an Apple Account provides you with an Apple ID and allows you to work within the Apple system.

Requirements

You need to provide an email address that is on your company domain, for example, developer@yourcompany.com.

1. Create an Apple Account (Apple ID)

  1. Open https://appleid.apple.com/account#!&page=create
  2. Complete the fields in the Create Your Apple ID screen and click Continue when done.
Click to Expand...

null
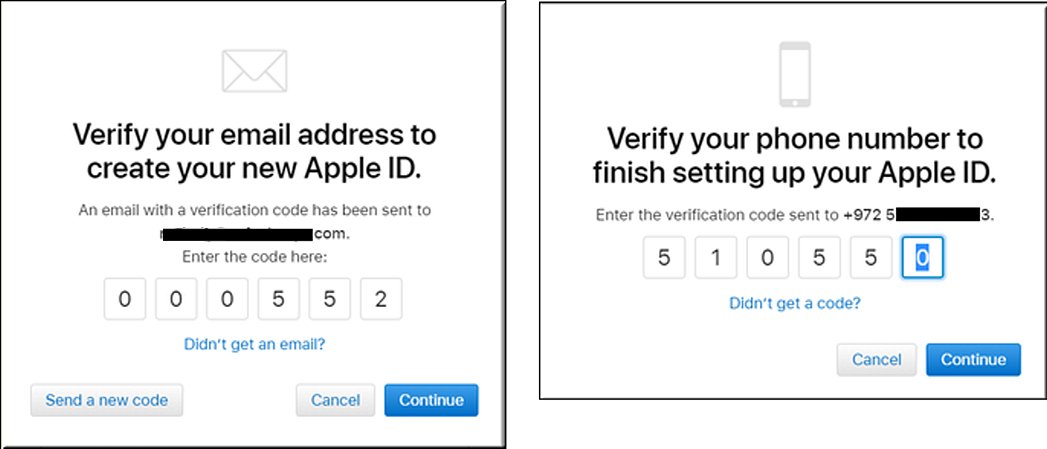
  1. Apple sends a verification email to the Email address that you supplied and a verification message to the Phone number that you supplied.
    Enter the relevant verification codes that were sent to you to complete the account creation process.


Well done! You have successfully created an Apple Account (Apple ID).

Next, turn on two-factor authentication for the new Apple ID before you can use the Apple ID to enroll in the Apple Developer Program.

2. Turn on Two-Factor Authentication

Apple requires two-factor authentication for all Apple IDs. Therefore, you must enable two-factor authentication on the Apple ID that is used in the role of Developer Account Holder. Once enabled, Apple verifies your identity when logging in to your Apple Developer account by sending an authentication code to your registered trusted devices or phone numbers.

You can enable two-factor authentication for an Apple ID using an iPhone, iPod, iPad, or Mac computer. (For more information, see Apple Pay Supported Devices.) If you don’t have an Apple product to use, then contact Apple Support for help to set up two-factor authentication for the Apple ID.

To use an Apple device to turn on two-factor authentication for your Apple ID, follow the relevant steps:

Apple DeviceClick the following:
iPhone, iPad, and iPod:Settings > [your name] > Password & Security > Two-Factor Authentication
Apple computer:Apple Menu > System Preferences > iCloud > Account Details > Security > Two-Factor Authentication

It is recommended to add multiple Trusted Phone Numbers to your account.

For more information, see Set up two-factor authentication for your Apple ID and Apple’s Support: Two-Factor Authentication to learn how to set up two-factor authentication on your Apple device.


BACK NEXT STEP
Apple Device Click the following:
iPhone, iPad, and iPod: Settings > [your name] > Password & Security > Two-Factor Authentication
Apple computer: Apple Menu > System Preferences > iCloud > Account Details > Security > Two-Factor Authentication


2022 Nuvei. All rights reserved.