
- METHOD TYPEE-wallet
- PAYMENTS
- PAYOUTS
- REFUNDS
- RECURRING
Introduction
Pay With Crypto allows making payments using crypto currencies such as Bitcoin. Crypto currencies are digital currencies that use cryptography for security.
Supported Countries
- Åland Islands
- American Samoa
- Andorra
- Angola
- Anguilla
- Antigua and Barbuda
- Armenia
- Aruba
- Australia
- Austria
- Azerbaijan
- Bahamas
- Bahrain
- Belgium
- Belize
- Benin
- Bermuda
- Bhutan
- Bonaire, Sint Eustatius and Saba
- Botswana
- Brazil
- British Virgin Islands
- Brunei Darussalam
- Bulgaria
- Canada
- Cape Verde
- Chad
- Chile
- Colombia
- Comoros
- Cook Islands
- Costa Rica
- Côte dIvoire
- Croatia
- Curaçao
- Cyprus
- Czech Republic
- Denmark
- Djibouti
- Dominica
- Dominican Republic
- El Salvador
- Equatorial Guinea
- Eritrea
- Estonia
- Eswatini
- Ethiopia
- Falkland Islands (Malvinas)
- Faroe Islands
- Fiji
- Finland
- France
- French Guiana
- French Polynesia
- Gabon
- Gambia
- Georgia
- Germany
- Ghana
- Gibraltar
- Greece
- Greenland
- Grenada
- Guadeloupe
- Guam
- Guatemala
- Guernsey
- Guinea
- Guyana
- Honduras
- Hong Kong
- Hungary
- Iceland
- India
- Indonesia
- Ireland
- Isle of Man
- Israel
- Italy
- Jersey
- Kazakhstan
- Kenya
- Kiribati
- Kuwait
- Laos
- Latvia
- Lesotho
- Liberia
- Liechtenstein
- Lithuania
- Luxembourg
- Macau
- Madagascar
- Malawi
- Malaysia
- Maldives
- Malta
- Marshall Islands
- Martinique
- Mauritania
- Mauritius
- Mayotte
- Mexico
- Micronesia
- Moldova
- Monaco
- Mongolia
- Montserrat
- Namibia
- Nauru
- New Caledonia
- New Zealand
- Niger
- Niue
- Norfolk Island
- Northern Mariana Islands
- Norway
- Oman
- Palau
- Papua New Guinea
- Paraguay
- Peru
- Pitcairn
- Poland
- Portugal
- Qatar
- Réunion
- Romania
- Rwanda
- Saint Barthélemy
- Saint Helena, Ascension and Tristan da Cunha
- Saint Kitts and Nevis
- Saint Martin (French part)
- Saint Pierre and Miquelon
- Saint Vincent and the Grenadines
- Samoa
- San Marino
- Sao Tome & Prin.
- Seychelles
- Sierra Leone
- Singapore
- Slovakia
- Slovenia
- Solomon Islands
- South Africa
- Spain
- Sri Lanka
- St Lucia
- St Maarten
- Suriname
- Svalbard and Jan Mayen
- Sweden
- Switzerland
- Taiwan
- Tajikistan
- Timor-Leste
- Togo
- Tokelau
- Tonga
- Turkmenistan
- Turks and Caicos Islands
- Tuvalu
- United Arab Emirates
- United Kingdom
- United States
- Uruguay
- US Virgin Islands
- Uzbekistan
- Vatican City State (Holy See)
- Wallis and Futuna
- Zambia
Supported Currencies
- AED
- ARS
- AUD
- AZN
- BAM
- BDT
- BGN
- BHD
- BOB
- BRL
- BYR
- CAD
- CDF
- CHF
- CLP
- CNY
- COP
- CRC
- CZK
- DKK
- DOP
- DZD
- EGP
- ETB
- EUR
- GBP
- GEL
- GHS
- GTQ
- HKD
- HNL
- HRK
- HUF
- IDR
- ILS
- INR
- IQD
- ISK
- JOD
- JPY
- KES
- KGS
- KRW
- KWD
- KZT
- LBP
- LKR
- MAD
- MDL
- MMK
- MNT
- MOP
- MXN
- MYR
- MZN
- NGN
- NIO
- NOK
- NPR
- NZD
- OMR
- PAB
- PEN
- PHP
- PKR
- PLN
- PYG
- QAR
- RON
- RSD
- RUB
- RWF
- SAR
- SEK
- SGD
- SLL
- SVC
- SYP
- THB
- TND
- TRY
- TWD
- TZS
- UAH
- UGX
- USD
- UYU
- UZS
- VEF
- VND
- XAF
- XOF
- YER
- ZAR
- ZMW
Payment (Deposit) Flow
After a user selects “Pay With Crypto” on the merchant’s payment page, display one of the following messages depending on the provider:
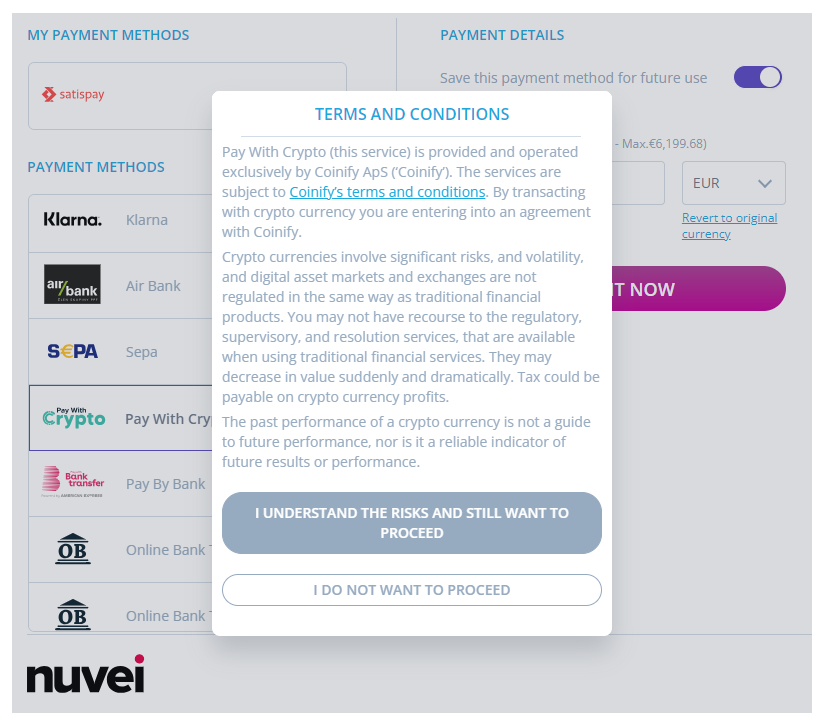
“Pay With Crypto (this service) is provided and operated exclusively by Coinify ApS (‘Coinify’). The services are subject to Coinify’s terms and conditions (https://www.coinify.com/legal). By transacting with crypto currency you are entering into an agreement with Coinify.
Crypto currencies involve significant risks, and volatility, and digital asset markets and exchanges are not regulated in the same way as traditional financial products. You may not have recourse to the regulatory, supervisory, and resolution services, that are available when using traditional financial services. They may decrease in value suddenly and dramatically. Tax could be payable on crypto currency profits.
The past performance of a crypto currency is not a guide to future performance, nor is it a reliable indicator of future results or performance.”
“Pay with Crypto (this service) is provided and operated exclusively by Nuvei Liquidity UAB (“Nuvei Liquidity”) and provided exclusively to its merchants.
Crypto currencies involve significant risks, and volatility, and digital asset markets and exchanges are not regulated in the same way as traditional financial products. You may not have recourse to the regulatory, supervisory, and resolution services, that are available when using traditional financial services. They may decrease in value suddenly and dramatically. Tax could be payable on crypto currency profits.
The past performance of a crypto currency is not a guide to future performance, nor is it a reliable indicator of future results or performance.”
The user must agree to these terms and conditions before the merchant can submit a payment request.
Example Terms and Conditions (Nuvei Payment Page)
Follow these steps to perform a payment using Nuvei REST API integration:
1. Generate a sessionToken
Press here for details.
2. Send a /payment Request
Perform the payment by sending a /payment request with its mandatory parameters including:
userTokenIdamountcurrencypaymentOption.alternativePaymentMethodclass containing:paymentMethod: “apmgw_PayWithCrypto“
deviceDetailsclass containing:ipAddressbillingAddressclass containing:firstName,lastName,country,emailuserDetailsclass containing:firstName,lastName,country,email,dateOfBirth
Example /payment Request
{
  "sessionToken":"<sessionToken from /getSessionToken>",
  "merchantId":"<your merchantId>",
  "merchantSiteId":"<your merchantSiteId>",
  "clientRequestId":"<unique request ID in merchant system>",
  "amount":"100",
  "currency":"EUR",
  "userTokenId":"<unique customer identifier in merchant system>",
  "clientUniqueId":"<unique transaction ID in merchant system>",
  "paymentOption":{
    "alternativePaymentMethod":{
      "paymentMethod":"apmgw_PayWithCrypto"
    }
  },
  "deviceDetails":{
    "ipAddress":"<customer's IP address>"
  },
  "billingAddress":{
    "firstName": "John",
    "lastName": "Smith",
    "country": "FR",
    "email": "[email protected]"
  },
  "userDetails":{
    "firstName": "John",
    "lastName": "Smith",
    "country": "FR",
    "email": "[email protected]"
    "dateOfBirth": "1975-05-15"
  },
  "timeStamp":"<YYYYMMDDHHmmss>",
  "checksum":"<calculated checksum>"
}
The response generates and returns a redirect URL (redirectUrl) to redirect the customer to the payment page, as well as a UPO (userPaymentOptionId) for use in future transactions.
Example /payment Response
{
  "orderId":"350866838",
  "userTokenId":"Johnsmith02",
  "paymentOption":{
    "redirectUrl":"https://stage-frame.nuvei.com/56af2066-6bad-4076-b440-7882aad2179f",
    "userPaymentOptionId":"86087958",
  },
  "transactionStatus":"REDIRECT",
  "sessionToken":"9df79d89-b5e1-43f5-9743-b77a3633286c",
  "clientUniqueId":"20180327175242",
  "internalRequestId":594576168,
  "status":"SUCCESS",
  "errCode":0,
  "reason":"",
  "merchantId":"2439523627382132721",
  "merchantSiteId":"224428",
  "version":"1.0",
  "clientRequestId":"20230118060805"
}
After the transaction is processed, Nuvei sends a Direct Merchant Notification (DMN) that includes the result of the transaction to the URL provided in urlDetails.notificationUrl, which Nuvei recommends including in the /payment request.
Payout (Withdrawal) Flow
After a user selects “Pay With Crypto” on the merchant’s payment page, display one of the following messages depending on the provider:
“Pay With Crypto (this service) is provided and operated exclusively by Coinify ApS (‘Coinify’). The services are subject to Coinify’s terms and conditions (https://www.coinify.com/legal). By transacting with crypto currency you are entering into an agreement with Coinify.
Crypto currencies involve significant risks, and volatility, and digital asset markets and exchanges are not regulated in the same way as traditional financial products. You may not have recourse to the regulatory, supervisory, and resolution services, that are available when using traditional financial services. They may decrease in value suddenly and dramatically. Tax could be payable on crypto currency profits.
The past performance of a crypto currency is not a guide to future performance, nor is it a reliable indicator of future results or performance.”
“Pay with Crypto (this service) is provided and operated exclusively by Nuvei Liquidity UAB (“Nuvei Liquidity”) and provided exclusively to its merchants.
Crypto currencies involve significant risks, and volatility, and digital asset markets and exchanges are not regulated in the same way as traditional financial products. You may not have recourse to the regulatory, supervisory, and resolution services, that are available when using traditional financial services. They may decrease in value suddenly and dramatically. Tax could be payable on crypto currency profits.
The past performance of a crypto currency is not a guide to future performance, nor is it a reliable indicator of future results or performance.”
The user must agree to these terms and conditions before the merchant can submit a payout request.
The cryptocurrency market is dynamic and constantly evolving. Any list of available cryptocurrencies will be provided upon request.
Example Terms and Conditions (Nuvei Payment Page)
Follow these steps to perform a payout using Nuvei REST API integration:
1. Register a userTokenId
A userTokenId is a field in the Nuvei system containing the user’s identifier in the merchant system.
If you do not have a userTokenId registered in the Nuvei system for this user, then register one by sending a /createUser request, including email, countryCode, firstName, lastName, and dateOfBirth.
Example /createUser Request
{
  "merchantId":"<your merchantId>",
  "merchantSiteId":"<your merchantSiteId>",
  "clientRequestId":"<unique request ID in merchant system>",
  "userTokenId":"<unique user identifier in merchant system>",
  "email":"[email protected]",
  "countryCode":"<2-letter ISO country code>",
  "firstName":"John",
  "lastName":"Smith",
  "dateOfBirth":"1975-01-01",
  "timeStamp":"<YYYYMMDDHHmmss>",
  "checksum":"<calculated checksum>"
}
Example /createUser Response
{
  "userId":78403498,
  "internalRequestId":552360538,
  "status":"SUCCESS",
  "errCode":0,
  "reason":"",
  "merchantId":"2439523627382132721",
  "merchantSiteId":"224428",
  "version":"1.0",
  "clientRequestId":"20221108130736"
}
The request registers the userTokenId (userId) in the Nuvei system, which is needed to generate a UPO in the next step.
2. Create the UPO
Create a UPO by sending an /addUPOAPM request and include:
userTokenId– The unique user identifier in your system.paymentMethodName: “apmgw_PayWithCrypto“apmDataclass containing:coindirect_ cryptoAddresscoindirect_ cryptoCurrency
Example /addUPOAPM Request
{
  "merchantId":"<your merchantId>",
  "merchantSiteId":"<your merchantSiteId>",
  "clientRequestId":"<unique request ID in merchant system>",
  "userTokenId":"<unique customer identifier in merchant system>",
  "paymentMethodName":"apmgw_PayWithCrypto",
  "apmData":{
    "coindirect_ cryptoAddress": "<your cryptoAddress>",
    "coindirect_ cryptoCurrency": "<your cryptoCurrency"
  },
  "billingAddress":{
    "country":"FR",
    "email":"[email protected]",
  },
  "timeStamp":"<YYYYMMDDHHmmss>",
  "checksum":"<calculated checksum>"
}
The request returns an encrypted userPaymentOptionId (UPO) representing the user’s APM account details.
Example /addUPOAPM Response
{
  "userPaymentOptionId":83458468,
  "internalRequestId":553078068,
  "status":"SUCCESS",
  "errCode":0,
  "reason":"",
  "merchantId":"2439523627382132721",
  "merchantSiteId":"224428",
  "version":"1.0",
  "clientRequestId":"20221109154215"
}
3. Send a /payout Request
Send a /payout request and include the userPaymentOptionId, which contains the user’s previously stored APM account details. Press here for an example.
After the transaction is processed, Nuvei sends a DMN that includes the result of the transaction to the URL provided in urlDetails.notificationUrl, which Nuvei recommends including in the /payout request.
DMNs
Deposits
Example of DMN with Status Approved/Overpaid
ppp_status=OK&&Status=APPROVED&&ExErrCode=0&&ErrCode=0&&errApmCode=0&&errApmDescription=&&errScCode=0&&errScDescription=&&Reason=&&ReasonCode=0&&PPP_TransactionID=180639111&&userid=Test_1757588767&&merchant_unique_id=&&customData=&&productId=&&first_name=QA&&middle_name=&&last_name=Test&&email=andreia.grozea%40nuvei.com&¤cy=EUR&&customField1=&&customField2=&&customField3=&&customField4=&&customField5=&&customField6=&&customField7=&&customField8=&&customField9=&&customField10=&&customField11=&&customField12=&&customField13=&&customField14=&&customField15=&&invoice_id=&&address1=65%2C+Overlea+str&&address2=&&country=Germany&&state=&&city=Toronto&&zip=K0A+0A2&&phone1=14161238888&&phone2=&&phone3=&&client_ip=192.168.1.1&&nameOnCard=&&cardNumber=&&bin=&&noCVV=&&acquirerId=&&acquirerBank=SimplexMS-PI&&expMonth=&&expYear=&&Token=&&tokenId=&&AuthCode=&&AvsCode=&&Cvv2Reply=&&shippingCountry=DE&&shippingState=&&shippingCity=Berlin&&shippingAddress=Berliner&&shippingZip=10115&&shippingFirstName=John&&shippingLastName=Doe&&shippingPhone=&&shippingCell=&&shippingMail=andreia.grozea%40nuvei.com&&total_discount=0.00&&total_handling=0.00&&total_shipping=0.00&&total_tax=0.00&&buyButtonProductBundleId=&&merchant_site_id=242181&&merchant_status=&&action=&&requestVersion=&&message=APPROVED&&merchantLocale=&&unknownParameters=&&payment_method=apmgw_PayWithCrypto&&ID=&&merchant_id=5634436935940029474&&responseTimeStamp=2025-09-11.11%3A07%3A00&&buyButtonProductId=&&webMasterId=&&appliedPromotions=&&uniqueCC=&&transactionType=Sale&&externalEmail=&&cardCompany=&&eci=&&user_token_id=Test_1757588767&&userPaymentOptionId=230465000111&&TransactionID=2610000000000350678&&externalTransactionId=01993874-441d-7334-9ba7-c7af3863dcfb&&APMReferenceID=185BF8E011DB1F84CB7CF1A5C2C83E29&&orderTransactionId=139065111&&totalAmount=5.00&&dynamicDescriptor=static+test&&item_name_1=NA&&item_number_1=&&item_amount_1=5.00&&item_quantity_1=1&&item_discount_1=0.00&&item_handling_1=0.00&&item_shipping_1=0.00&&feeAmount=&&amountWithoutFee=&&houseNumber=&&customCurrency=&&externalToken_blockedCard=&&externalToken_cardAcquirerId=&&externalToken_cardAcquirerName=&&externalToken_cardBin=&&externalToken_cardBrandId=&&externalToken_cardBrandName=&&externalToken_cardExpiration=&&externalToken_cardLength=&&externalToken_cardMask=&&externalToken_cardName=&&externalToken_cardTypeId=&&externalToken_cardTypeName=&&externalToken_clubName=&&externalToken_creditCompanyId=&&externalToken_creditCompanyName=&&externalToken_extendedCardType=&&externalToken_Indication=&&externalToken_tokenValue=&&externalToken_tokenProvider=&&ECIRaw=&&cryptogram=&&maskedNetworkTokenNumber=&&upoRegistrationDate=20250911&&type=DEPOSIT&&clientRequestId=&&relatedTransactionId=&&apmPayerInfo=%7B%7D&&sessionId=8743ddd4797336db147f41a5fda5&&responsechecksum=680a50176c577dc6536c51c0a311633e&&advanceResponseChecksum=6d441e9e760e1d4035f946c2ca95834b
Example of DMN with Status Underpaid
ppp_status=FAIL&Status=DECLINED&ExErrCode=0&ErrCode=1&errApmCode=1&errApmDescription=UNDERPAID&errScCode=2018&errScDescription=Technical+Error&Reason=Technical+Error&ReasonCode=2018&PPP_TransactionID=180643111&userid=Test_1757588935&merchant_unique_id=&customData=&productId=&first_name=QA&middle_name=&last_name=Test&email=andreia.grozea%40nuvei.com¤cy=EUR&customField1=&customField2=&customField3=&customField4=&customField5=&customField6=&customField7=&customField8=&customField9=&customField10=&customField11=&customField12=&customField13=&customField14=&customField15=&invoice_id=&address1=65%2C+Overlea+str&address2=&country=Germany&state=&city=Toronto&zip=K0A+0A2&phone1=14161238888&phone2=&phone3=&client_ip=192.168.1.1&nameOnCard=&cardNumber=&bin=&noCVV=&acquirerId=&acquirerBank=SimplexMS-PI&expMonth=&expYear=&Token=&tokenId=&AuthCode=&AvsCode=&Cvv2Reply=&shippingCountry=DE&shippingState=&shippingCity=Berlin&shippingAddress=Berliner&shippingZip=10115&shippingFirstName=John&shippingLastName=Doe&shippingPhone=&shippingCell=&shippingMail=andreia.grozea%40nuvei.com&total_discount=0.00&total_handling=0.00&total_shipping=0.00&total_tax=0.00&buyButtonProductBundleId=&merchant_site_id=242181&merchant_status=&action=&requestVersion=&message=DECLINED&merchantLocale=&unknownParameters=&payment_method=apmgw_PayWithCrypto&ID=&merchant_id=5634436935940029474&responseTimeStamp=2025-09-11.11%3A09%3A43&buyButtonProductId=&webMasterId=&appliedPromotions=&uniqueCC=&transactionType=Sale&externalEmail=&cardCompany=&eci=&user_token_id=Test_1757588935&userPaymentOptionId=230465001111&TransactionID=2610000000000350680&externalTransactionId=01993876-d6e3-7334-9ba7-f71f9d0da7e4&APMReferenceID=90DDDC4355456E45A096B65E8D49791D&orderTransactionId=139068111&totalAmount=6.00&dynamicDescriptor=static+test&item_name_1=NA&item_number_1=&item_amount_1=6.00&item_quantity_1=1&item_discount_1=0.00&item_handling_1=0.00&item_shipping_1=0.00&feeAmount=&amountWithoutFee=&houseNumber=&customCurrency=&externalToken_blockedCard=&externalToken_cardAcquirerId=&externalToken_cardAcquirerName=&externalToken_cardBin=&externalToken_cardBrandId=&externalToken_cardBrandName=&externalToken_cardExpiration=&externalToken_cardLength=&externalToken_cardMask=&externalToken_cardName=&externalToken_cardTypeId=&externalToken_cardTypeName=&externalToken_clubName=&externalToken_creditCompanyId=&externalToken_creditCompanyName=&externalToken_extendedCardType=&externalToken_Indication=&externalToken_tokenValue=&externalToken_tokenProvider=&ECIRaw=&cryptogram=&maskedNetworkTokenNumber=&upoRegistrationDate=20250911&type=DEPOSIT&clientRequestId=&relatedTransactionId=&sessionId=876cd92fe7b444b7711afbdcdbca&responsechecksum=c3cf21c1a217190614d338b07ea41628&advanceResponseChecksum=9889e499a96cd0dc40f0e6f2053c03f7
Example of DMN with Status Expired
ppp_status=FAIL&Status=DECLINED&ExErrCode=0&ErrCode=1&errApmCode=1&errApmDescription=EXPIRED&errScCode=2018&errScDescription=Technical+Error&Reason=Technical+Error&ReasonCode=2018&PPP_TransactionID=178809111&userid=Alipay_Unified_20250910122629&merchant_unique_id=&customData=&productId=&first_name=John&middle_name=&last_name=Doe&email=automation%40test.com¤cy=EUR&customField1=&customField2=&customField3=&customField4=&customField5=&customField6=&customField7=&customField8=&customField9=&customField10=&customField11=&customField12=&customField13=&customField14=&customField15=&invoice_id=&address1=123+test+str&address2=&country=Germany&state=&city=Madrid&zip=12345&phone1=700000000&phone2=&phone3=&client_ip=87.120.11.158&nameOnCard=&cardNumber=&bin=&noCVV=&acquirerId=&acquirerBank=SimplexMS-PI&expMonth=&expYear=&Token=&tokenId=&AuthCode=&AvsCode=&Cvv2Reply=&shippingCountry=&shippingState=&shippingCity=&shippingAddress=&shippingZip=&shippingFirstName=&shippingLastName=&shippingPhone=&shippingCell=&shippingMail=&total_discount=0.00&total_handling=0.00&total_shipping=0.00&total_tax=0.00&buyButtonProductBundleId=&merchant_site_id=242181&merchant_status=&action=&requestVersion=&message=DECLINED&merchantLocale=&unknownParameters=&payment_method=apmgw_PayWithCrypto&ID=&merchant_id=5634436935940029474&responseTimeStamp=2025-09-10.18%3A26%3A32&buyButtonProductId=&webMasterId=&appliedPromotions=&uniqueCC=&transactionType=Sale&externalEmail=&cardCompany=&eci=&user_token_id=Alipay_Unified_20250910122629&userPaymentOptionId=230464264111&TransactionID=2610000000000350213&externalTransactionId=01993397-8033-7001-ae63-7d6c66502a5f&APMReferenceID=723C60794FD1C104C8FDB79483901615&orderTransactionId=137878111&totalAmount=5.00&dynamicDescriptor=static+test&item_name_1=NA&item_number_1=&item_amount_1=5.00&item_quantity_1=1&item_discount_1=0.00&item_handling_1=0.00&item_shipping_1=0.00&feeAmount=&amountWithoutFee=&houseNumber=&customCurrency=&externalToken_blockedCard=&externalToken_cardAcquirerId=&externalToken_cardAcquirerName=&externalToken_cardBin=&externalToken_cardBrandId=&externalToken_cardBrandName=&externalToken_cardExpiration=&externalToken_cardLength=&externalToken_cardMask=&externalToken_cardName=&externalToken_cardTypeId=&externalToken_cardTypeName=&externalToken_clubName=&externalToken_creditCompanyId=&externalToken_creditCompanyName=&externalToken_extendedCardType=&externalToken_Indication=&externalToken_tokenValue=&externalToken_tokenProvider=&ECIRaw=&cryptogram=&maskedNetworkTokenNumber=&upoRegistrationDate=20250910&type=DEPOSIT&clientRequestId=&relatedTransactionId=&apmPayerInfo=%5B%5D&sessionId=397784552a2edc8dfaad523b13b3&responsechecksum=95c117959b4d6222f49e84fdc731756d&advanceResponseChecksum=522994873fa821f362ee2f5f6102e456
Payouts
Example of DMN with Status Approved
wdOrderId=14365111&wdRequestId=16762111&merchantWDRequestId=12345567&gwTrxId=2610000000000340932¬ificationType=WITHDRAW_ORDER_NOTIFICATION&merchantSiteId=242181&merchantGwId=5634436935940029474&merchantLocale=en_US&wdRequestState=Closed&wdRequestStatus=Approved&wdOrderStatus=Settled&settlementType=WITHDRAWAL&gwErrCode=0&gwExtendedErrorCode=0&apmTrxId=2610000000585877&externalTransactionId=0198e010-a0ec-7114-8337-50320e76661c&apmReferenceId=CFCDEAFC7CC62E2B4B71452A277B253F&apmErrorCode=0&firstName=Doefvvblct&lastName=Vxbfcfwoii&userTokenId=PayWithCrypto_Test&zip=CH+233242U&city=Chiprovci+Updated&country=DE&phone1=359888440549&email=fihay.ymfgd%40fwfla.mq&address=22+Automation+Str.+Updated.&amount=6.00&approvedAmount=6.00¤cy=USD&userId=123456&userPMId=2153754221&paymentMethod=apmgw_PayWithCrypto&version=1.0&pmDisplayName=TAKPFW8d7Hp6XDMVVTMHt9ZHUn9ikSKVtM&userAccountId=1234567&wdOrderAmount=6.00&wdOrderCurrency=USD&responseTimeStamp=2025-08-25.09%3A01%3A10&ExternalaccountID=TAKPFW8d7Hp6XDMVVTMHt9ZHUn9ikSKVtM&feeAmount=0.0&transactionAmount=6.0&merchantUniqueId=1234567&upoRegistrationDate=20250310&apmPayerInfo=%5B%7B%22name%22%3A%22Amount%22%2C%22value%22%3A%226.0%22%7D%2C%7B%22name%22%3A%22Currency%22%2C%22value%22%3A%22USD%22%7D%2C%7B%22name%22%3A%22BlockchainHash%22%2C%22value%22%3A%22760f6c93e4c6ec359bbf61df6024db80bc6a0f6c7756597799f6dc7f747fa5e4%22%7D%2C%7B%22name%22%3A%22PaidAmount%22%2C%22value%22%3A%225.12%22%7D%2C%7B%22name%22%3A%22PaidCurrency%22%2C%22value%22%3A%22EUR%22%7D%2C%7B%22name%22%3A%22LiquidityProvider%22%2C%22value%22%3A%22nevadaex-broker%22%7D%5D&acquirerBank=SimplexMS-PI&checksum=943edf5c05ee21c73434759f82ac5542
User Experience
Payment
- On the merchant’s website, the customer chooses Pay with Crypto.
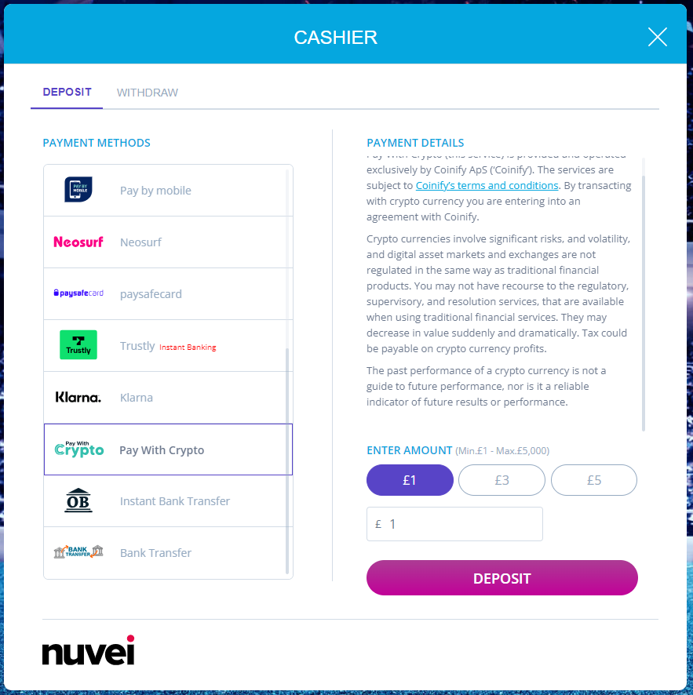
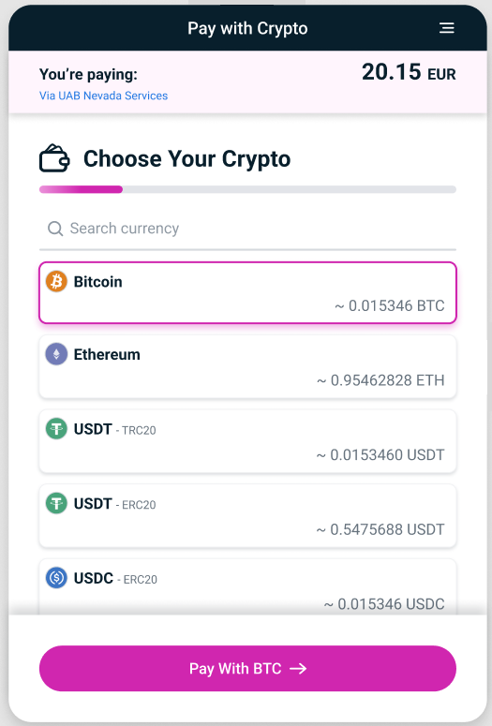
- The customer is redirected to the provider’s website to choose a crypto currency.
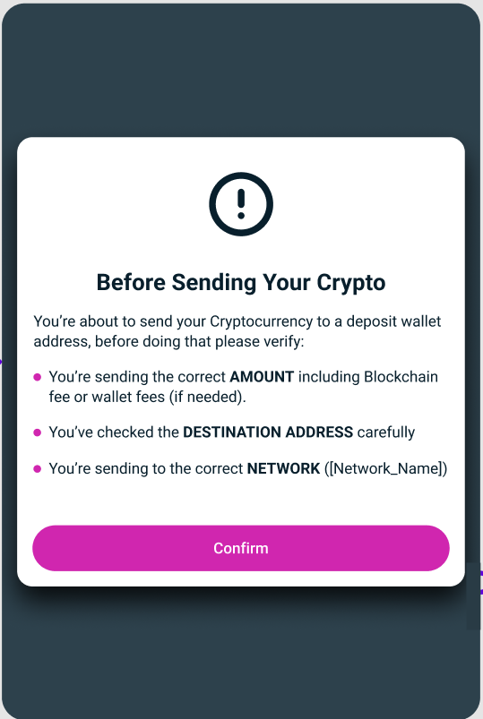
- The customer is requested to confirm that the amount includes network fees and that the destination address is correct.
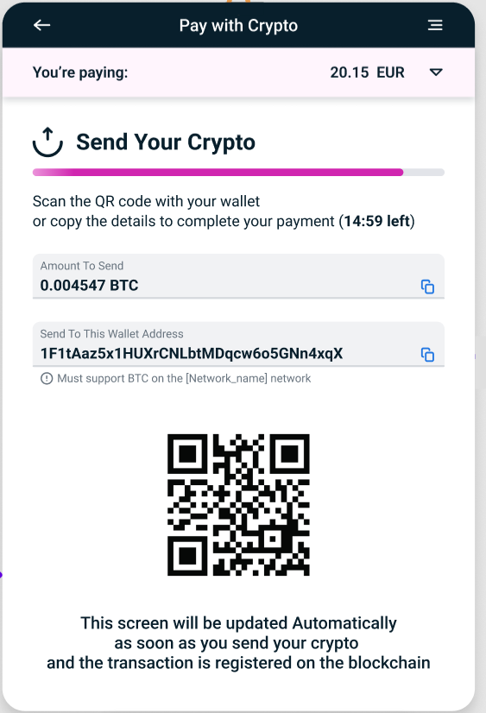
- The amount to send, the wallet address, and a QR code are displayed. The customer scans the QR code into his wallet to make the payment.
- The customer presses ‘Send’ to send the cryptocurrency.
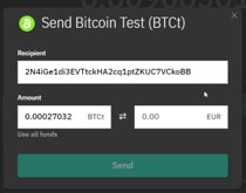
- The customer receives a Confirm Send and presses Confirm.
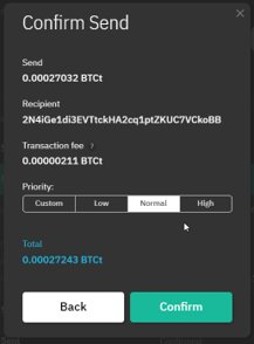
A confirmation that the cryptocurrency is sent is displayed.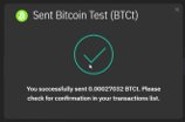
A payment processing notification is displayed.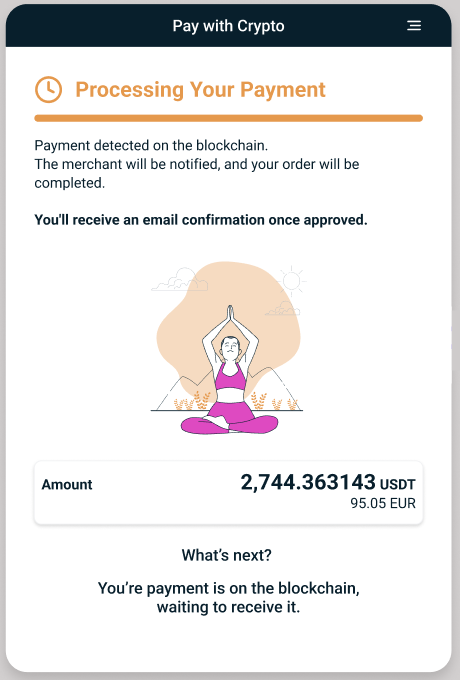
If the payment is successful, a payment approval notification is displayed.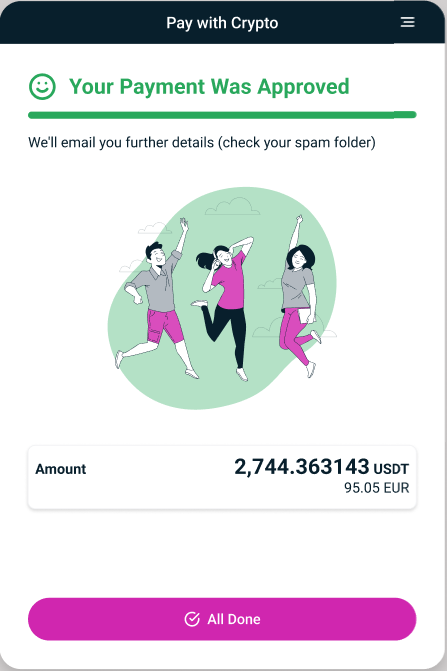
Overpayment
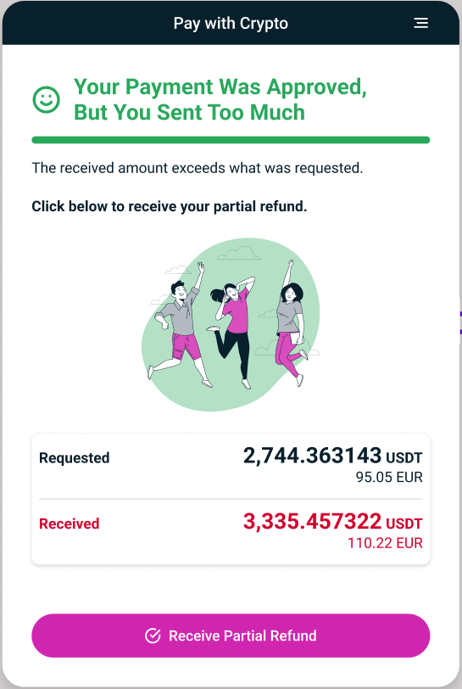
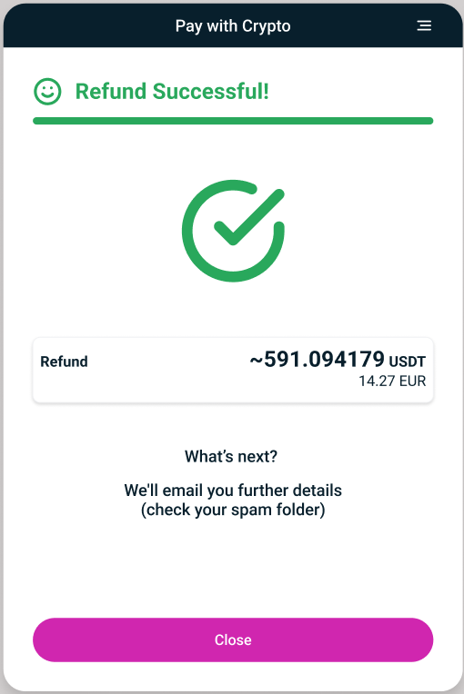
- If the customer pays more from a wallet than the required amount, a confirmation page is displayed with the option ‘Receive Partial Refund’ to request a refund of the extra amount.
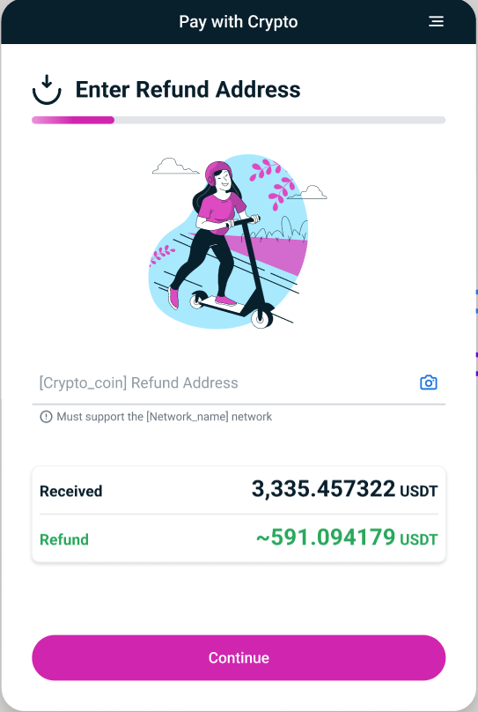
- The customer must provide the crypto wallet address for the refund.
A payment processing notification for the refund is displayed.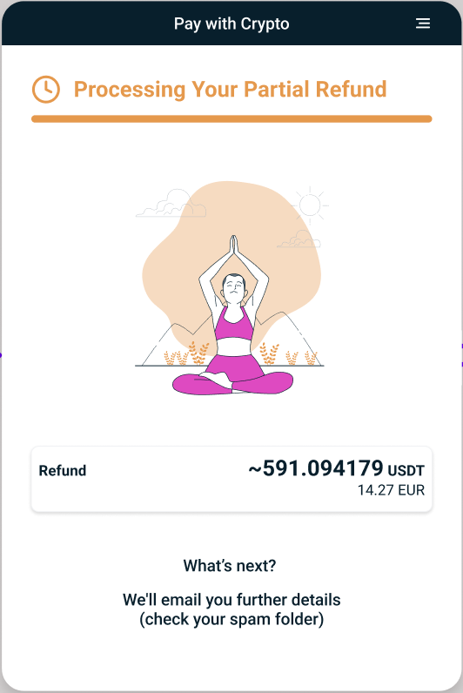
- If the payment is successful a confirmation notification is displayed and the customer presses ‘Close’ to close the screen.
Underpayment
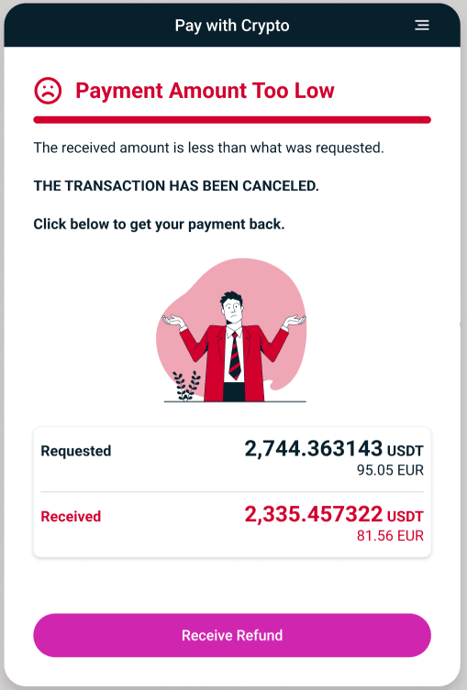
- If the customer pays less from a wallet than the required amount, the transaction is cancelled. The customer can press ‘Receive Refund’ to request a refund (in a process similar to refund for an overpayment).
Payment After Expiration
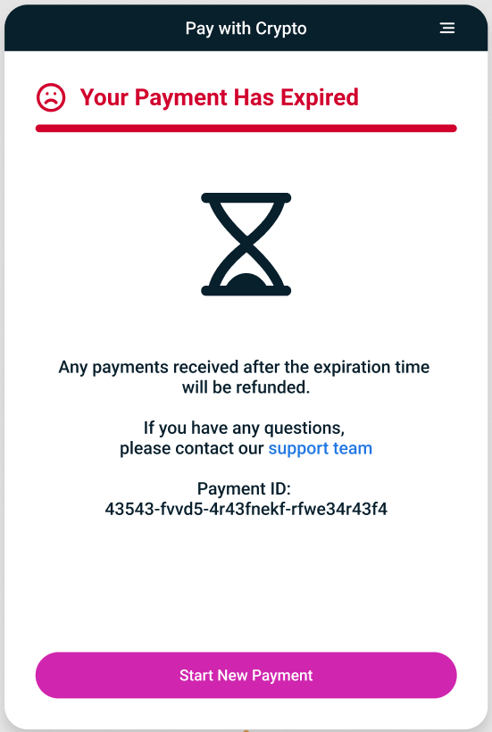
- If the customer pays after a transaction expires, the transaction is refunded automatically and the customer has an option to start a new payment.


 Last modified December 2025