

- METHOD TYPEE-wallet
- PAYMENTS

- PAYOUTS

- REFUNDS
- RECURRING
Introduction
Apple Pay was launched in 2014 as a mobile payment method by Apple. It allows users to make payments in person, in iOS apps, and on the web. It works similarly to other NFC technology-based mobile payments, such as Google Pay and Samsung Pay. Apple Pay requires two-factor authentication via Touch ID, Face ID, PIN, or passcode.
This guide describes how to perform a non-3D Secure (non-3DS) Apple Pay payment using Nuvei Web SDK 2.0.
Supported Countries
- Australia
- Austria
- Belarus
- Belgium
- Brazil
- Bulgaria
- Canada
- China
- Croatia
- Cyprus
- Czech Republic
- Denmark
- Estonia
- Faroe Islands
- Finland
- France
- Georgia
- Germany
- Greece
- Greenland
- Guernsey
- Hong Kong
- Hungary
- Iceland
- Ireland
- Isle of Man
- Italy
- Japan
- Jersey
- Kazakhstan
- Latvia
- Liechtenstein
- Lithuania
- Luxembourg
- Macau
- Malta
- Monaco
- Netherlands
- New Zealand
- Norway
- Poland
- Portugal
- Romania
- San Marino
- Saudi Arabia
- Singapore
- Slovakia
- Slovenia
- Spain
- Sweden
- Switzerland
- Taiwan
- Ukraine
- United Arab Emirates
- United Kingdom
- United States
- Vatican City
Supported Currencies
Apple Pay supports all currencies supported by Nuvei.
Payment Flow
The following payment flow is for integration of Apple Pay into a merchant payment page using Nuvei Web SDK 2.0.
-
- Apple Pay Registration.
- Server-to-Server Authentication – Before submitting a payment using the client-side Web SDK 2.0, it is required to send a server-to-server POST
/ordersREST API 2.0 request that authenticates the Nuvei merchant credentials and creates a session. - Frontend Web SDK Initialization – Import the
websdk2.0.jslibrary and instantiate Web SDK 2.0. - Static Apple Pay Button Creation – Display the Apple Pay button on the payment page.
- Frontend Web SDK Apple Pay Payment Submission – Send a
payment()request with the required parameters and the encrypted token received from Apple Pay. - Response Verification – Verify the response by sending a GET
/entities/{processing-entity-id}/transactions/{transaction-id}REST API 2.0 request, or by using webhooks. - Integration Testing – Test the Apple Pay integration in the Apple Pay sandbox environment.
1. Apple Pay Registration
2. Server-to-Server Authentication
Before submitting a payment using the client-side Web SDK 2.0, it is required to send a server-to-server POST /orders REST API 2.0 request that authenticates the Nuvei merchant credentials and creates a session.
3. Frontend Web SDK 2.0 Initialization
This step and the steps that follow involve integration on your frontend.
4. Static Apple Pay Button Creation
a. Create a Button Handler
Include the JavaScript (see example) that includes the following steps:
- Verify that the customer has an Apple Pay device.
- Initialize the button handler by adding an HTML button to the payment page.
- Display the Apple Pay button on the payment page.
Example Creating a Button Handler
// Verify that you have an Apple Pay device

// Initialize the button handler by adding this HTML button to your page.
if (window.ApplePaySession) {
  var merchantIdentifier = 'example.com.store';
  var promise = ApplePaySession.canMakePaymentsWithActiveCard(merchantIdentifier);
  // Display Apple Pay Button
  promise.then(function(canMakePayments) {
      if (canMakePayments) {
        < button id = "apple-pay-button" > Pay < /button>} / / Display Apple Pay Button here…
      });
  });
}
b. Create a Result Handler
If a customer presses the Apple Pay button, the Apple Pay payment sheet opens. The payment sheet displays the values passed in the request, including currency, amount, and total label. Shipping and billing details can also be collected from a customer via the Apple Pay wallet.
- Call
paymentWithApplePay()to initiate the following supported actions:
-
- Start the Apple Pay session and collect the encrypted Apple Pay token from the device.
- Send the payment in a
POST /orders/paymentsrequest. - Return the result to the callback function and provide the result to the customer.
- Collect shipping and billing details from the Apple Pay wallet with the following optional parameters:
-
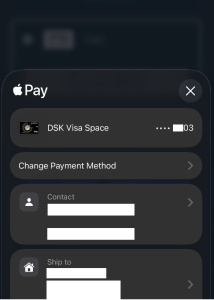
collectWalletUserShippingDetails– The default value isfalse. Set the value totrueto collect the customer shipping details.collectWalletUserBillingDetails– The default value isfalse. Set the value totrueto collect the customer billing details.
Example Shipping Details Displayed collectWalletUserShippingDetails=true
Example Shipping Details Not Displayed collectWalletUserShippingDetails=false
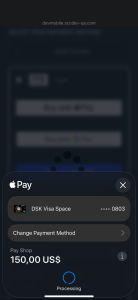
Shipping Details
Collect shipping details from the Apple Pay wallet with the following parameters:
firstNamelastNamecountryCodeaddressaddressLine2zipcityphone
Nuvei Web SDK 2.0 sends the returned values in buyerDetails.shippingAddress in the POST /orders/payments request. Shipping details are sent only in buyerDetails.shippingAddress. If the wallet does not return a value, Nuvei Web SDK 2.0 does not send the corresponding parameter.
Billing Details
Collect billing details from the Apple Pay wallet with the following parameters:
buyerDetailsclass containing:firstNamelastNamebillingAddressclass containing:countryCodeaddressaddressLine2zipcity
Nuvei Web SDK 2.0 sends the returned values in buyerDetails and buyerDetails.billingAddress in the POST /orders/payments request. If the wallet does not return a value, Nuvei Web SDK 2.0 does not send the corresponding parameter.
Example Creating a Result Handler
// Define the button handler on click
document.getElementById("apple-pay-button").addEventListener("click", function() {
  nuveiWebSDK.paymentWithApplePay({
    sessionId: "<sessionId>", // received from the POST /orders request
    countryCode: "US",
    currencyCode: "USD",
    merchantTransactionId: "<unique transaction ID in your system>",
    collectWalletUserShippingDetails: false, // default: false
    collectWalletUserBillingDetails: true,   // default: false
    buyerDetails: {
      buyerId: "12345"
    },
    total: {
      label: "Your Company",
      amount: "19.99"
    }
  }, function(res) {
    // Show the result to the customer.
    // Do not log the full response in production. It can contain customer details.
    if (res.result && res.result.status === "approved") {
      // payment approved
    } else {
      // payment declined, failed, or cancelled
    }
  });
});
5. Frontend Web SDK Apple Pay Payment Submission
- Send the encrypted Apple Pay token as-is in a Web SDK 2.0
payment()request.
Nuvei decrypts the token and uses the relevant data extracted from it. - Send a non-3DS
payment()request with its mandatory parameters and include:
-
paymentOptionblock with:networkTokenblock with:-
provider: “ApplePay“
token: “<encrypted Apple Pay token>“
-
Example Apple Pay payment() Request
// call this from your main() in order for it to work with the html sample
function payment() {
  nuveiWebSDK.payment({
    "merchantTransactionId": "<transaction id in the merchant's system>",
    "paymentOption": {
      "store": "none",
      "networkToken": {
        "provider": "ApplePay",
        "token": "<encrypted Apple Pay token>"
      }
    },
    "buyerDetails": {
      "billingAddress": {
        "countryCode": "US"
      },
    }
  });
}
Example Apple Pay payment() Response
{
  "paymentId": "7b77229fa01d478cb369809f26534345",
  "transactionId": "8110000000001701567",
  "amount": 20,
  "currency": "USD",
  "transactionType": "Sale",
  "result": {
    "status": "approved"
  },
  "authCode": "111387",
  "partialApproval": {
    "requestedAmount": 20,
    "requestedCurrency": "USD"
  },
  "paymentOption": {
    "networkToken": {
      "provider": "ApplePay",
      "expirationMonth": "10",
      "expirationYear": "27",
      "bin": "520424",
      "last4Digits": "2826",
      "acquirerId": "19",
      "cardType": "Credit",
      "cardBrand": "MASTERCARD"
    }
  }
}
- After receiving the
payment()response, notify your server side and you can display a relevant message to the customer.
6. Response Verification
Before storing complete payment information in your system, it is required to verify the response.
7. Integration Testing
After completing the integration steps, test the Apple Pay integration in the Apple Pay sandbox environment using the provided test cards.
 Last modified November 2026