Overview
The Nuvei Salesforce Plugin (Cartridge) provides a comprehensive suite of payment features for your customers, which offers easy integration and customization for an optimized customer experience.
Visit the Nuvei Plugin Page on the official Salesforce marketplace.
The Nuvei Salesforce Plugin has been designed with your integration needs in mind, which include:
- Quick and easy installation.
- Lowest possible PCI DSS burden. We will help you reach full compliance with minimum effort.
- Full support whenever you need it.
Features
These are the main features of the Nuvei Salesforce Plugin:
| Feature | Description |
|---|---|
| Payment Methods |
|
| Payment Pages | Redirection or opening in a light box with the PCI-compliant payment page that Nuvei hosts. |
| 3D Secure (3DS) | 3DS is a security protocol that was developed to provide an additional layer of security for online credit/debit card transactions. The best practice is to use one of the Nuvei out-of-the-box, end-to-end solutions for 3DS, for example Nuvei Web SDKs or the Nuvei Payment Page. These solutions take all the hard work out of implementing 3DS, and manage all the 3DS requirements along the entire payment flow, both on the client side and server side. |
| Stored Credentials | With sophisticated methods to improve authorization rates and ensure compliance, we support stored credentials for credit cards. This feature complies with scheme mandates for storing (and subsequently using) card payment credentials for cardholder and merchant-initiated transactions. |
| Multi-merchant Support | The multi merchant support feature enables you to use different Nuvei merchant code(s) across several sites. You can configure different Nuvei merchant codes for each site in the Business Manager instance. |
| Locales | The cartridges are available for Controllers (v105.1.0) and SFRA (v5.1.0) SiteGenesis implementations. |
| *NOTE: Although many APMs have been fully tested in the test environment, some features are only partially tested, and others are yet to be tested in the production environment. If you experience any issues in production, please contact your Nuvei Relationship Manager or Nuvei support. |
|
Specification Details
- Compatibility
- Cartridges are available for Controllers (v105.1.0) and SFRA (v5.1.0) SiteGenesis implementations. Compatibility mode: 19.10.
- The Nuvei cartridge supports both Storefront Reference Architecture (SFRA) and Salesforce Commerce Cloud (SFCC).
- Privacy and Payment
This integration requires access to the following customer data elements: Billing Address, Shipping Address, Order Details and Customer Profile. - Data Storage
Incoming Direct Merchant Notification requests to be handled by the nuveiHandleNotifications Job, are stored in the “nuveiDirectMerchantNotification” custom object. The custom object definition is located in the: link-nuvei/metadata/site_import/meta/custom-objecttype-definitions.xml file. - Availability
The Nuvei platform is expected to be available 24/7. If the platform is not available, a custom error message is logged in SFCC. Contact Nuvei Support for assistance with any Nuvei API failures. - Support
Contact a Nuvei representative if you need support for this integration. - External Interfaces
- All requests are done through Nuvei’s REST API and with the checksum calculated using SHA-256 with the secret key provided by Nuvei.
- Only HTTPS is allowed. JSON is used across all communications.
- The full reference guide, along with the resource structure for requests and responses, can be found in the Nuvei Developer Portal:
- Documentation: https://docs.nuvei.com
- API Reference: https://docs.nuvei.com/api/main/indexMain_v1_0.html
- Additional Services: https://docs.nuvei.com/api/advanced/indexAdvanced.html
- Firewall Requirements
No special rules are needed as all of the requests are going through a common https port (443) to the following domains:- Live: secure.nuvei.com
Example: https://secure.safecharge.com/ppp/api/v1/getSessionToken.do - Test: ppp-test.safecharge.com
Example: https://ppp-test.nuvei.com/ppp/api/v1/getSessionToken.do
- Live: secure.nuvei.com
Implementation
Before you Start
- Prerequisites
You need to have installed and correctly set up your Salesforce store. If you have any problems with your Salesforce set-up, please visit the Salesforce support center. If you have not already done so, you must contact Nuvei for sandbox and production account details needed for implementation. Check that your Implementation Manager or support contact has given you:- A merchant code (or codes)
- A Merchant Administration Interface username and password
Make sure you have installed and correctly set up your SFRA site in Business Manager. Use your GitHub credentials to download SFRA and see the Salesforce B2C Commerce guide for more details.
- Access the system
Once you have the system setup and your credentials to login to the Merchant Administration Interface, follow these steps to configure your connection credentials:- Log in to the Merchant Administration Interface.
- In the left menu navigate to the Settings section and then select My Account.
- In My Account section, you see your settings:
- Merchant ID
- Secret Key
- Merchant Site ID’s
- Install the Salesforce cartridge
See the Install the Salesforce Cartridge appendix. - Set up the Business Manager
See the Set up the Business Manager appendix.
Configuration
Configure the plugin as described in the steps below.
1. Custom Site Preferences
Set the site preferences, as follows:
- In Business Manager, navigate to Site/Merchant Tool/Site Preferences/Custom Preferences, where you see many custom site preference groups.
- Press the preference group with the Nuvei Configuration ID.
- Edit the attributes according to your Nuvei Account’s data.
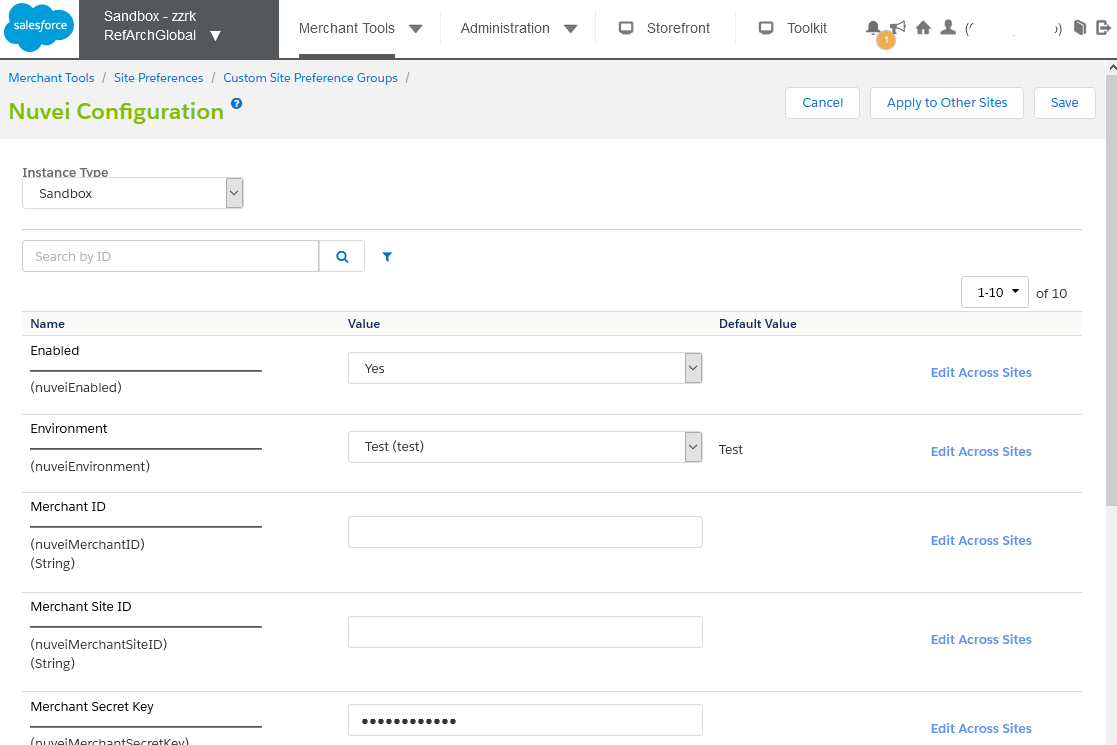
Nuvei Configuration – Fields
* = Mandatory fieldField Description Default values Enabled*
nuveiEnabledThe flag manages Nuvei integration. If set to True, Nuvei is enabled for the site. Yes Environment*
nuveiEnvironmentThe environment you are running on, ‘prod‘ for Production, ‘test‘ for Sandbox. Used for the Direct integration type.
Use the ‘test‘ environment until you are ready to move to the ‘prod‘ environment.Test Merchant ID*
nuveiMerchantIdThe vendor’s unique identification number provided by Nuvei. You can access in the Merchant Administration Interface. Your merchant ID from Nuvei. Merchant Site ID*
nuveiMerchantSiteIdThe vendor website’s unique identification number provided by Nuvei. You can access in the Merchant Administration Interface. Your site ID from Nuvei. Merchant Secret Key* nuveiMerchantSecretKeyThe secret key for checksum calculations used for API requests. You can access in the Merchant Administration Interface. Your Secret Key from Nuvei. Transaction Type*
nuveiTransactionTypeThe type of transaction: Sale, Auth, or PreAuth.
See more information in the documentation.Auth Redirect Mode*
nuveiRedirectModePayment Page type: Hosted (yes) or Direct (no). Hosted Page Redirect Type*
nuveiRedirectTypeIf Redirect Mode = yes, then this field is relevant.
Type of the flow to be used for Hosted Payment page: redirect or iFrame.
- If “redirect”, then the customer is redirected to Nuvei’s HPP.
- If “Iframe”, then the customer stays on site’s Payment Page, and the HPP is opened in a light box (pop-up)
redirect Merchant Name
nuveiMerchantNameOptional setting to be used to perform Settle Transactions. Merchant Phone
nuveiMerchantPhoneOptional setting to be used to perform Settle Transactions.
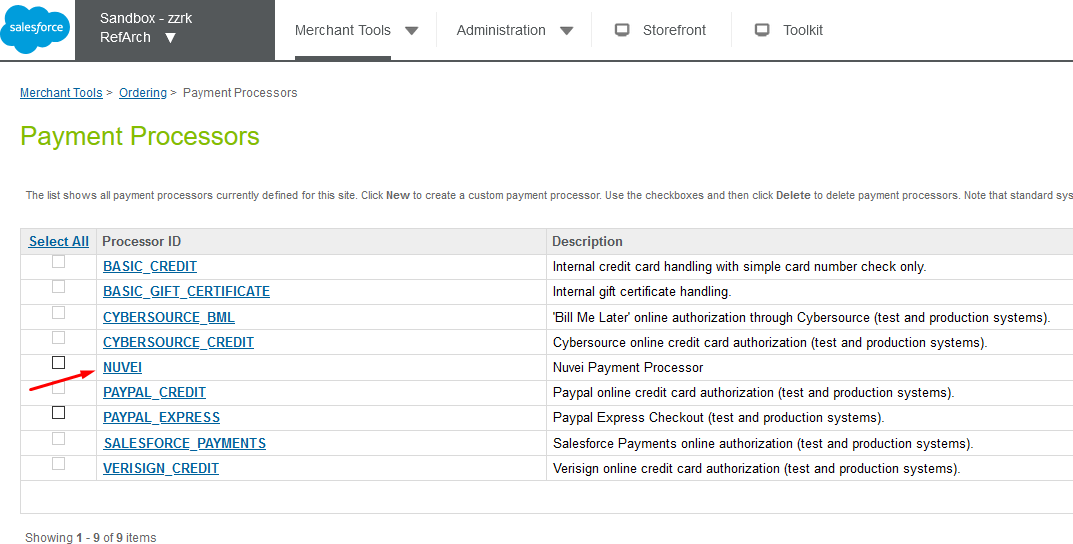
2. Verify Processors
After you have uploaded the metadata, all your payment-processor details are updated automatically.
Verify these payment processors, as follows:
- In Business Manager, use the “Site dropdown box” to select the Site to configure.
- Navigate to Merchant Tools/Ordering/Payment Processors.
- Verify that the “NUVEI” processor is listed, as shown below:
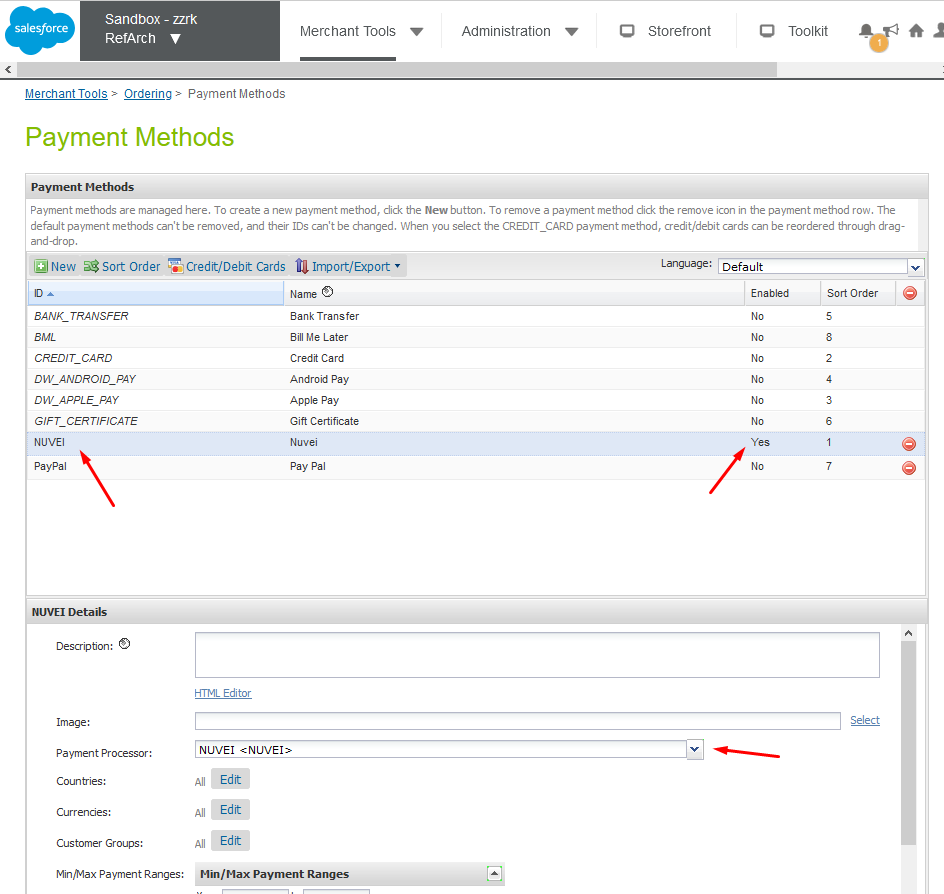
3. Enable Payment Methods
Enable the payment methods as follows:
- Navigate to Merchant Tools/Ordering/Payment Methods.
- Verify that the “NUVEI” payment method is set to the “NUVEI” Payment Processor.
- Enable payment methods as required:
 (You have already imported payment-method definitions earlier as part of the integration package. Payment-method definitions are provided in the payment-methods.xml file, located in the metadata folder.)
4. Job Management
Job definitions are provided in jobs.xml. The nuveiHandleNotifications job is associated with the cartridge, and does the following:
- Selects the details stored in custom objects as part of the order notification flow from Nuvei.
- Sorts the details in order of “creation time”.
- Reads the custom objects one by one, and updates their statuses (Order Status/Payment Status/Confirmation Status) in Business Manager.
Associate jobs with each of your sites, as follows:
- In Business Manager, navigate to Administration/Operations/Jobs.
All the jobs are listed on this screen, including the job currently in the “Out of the box” (OOTB).
You can easily see if a job is enabled, the last run time, status of the last run, priority, and execution scope.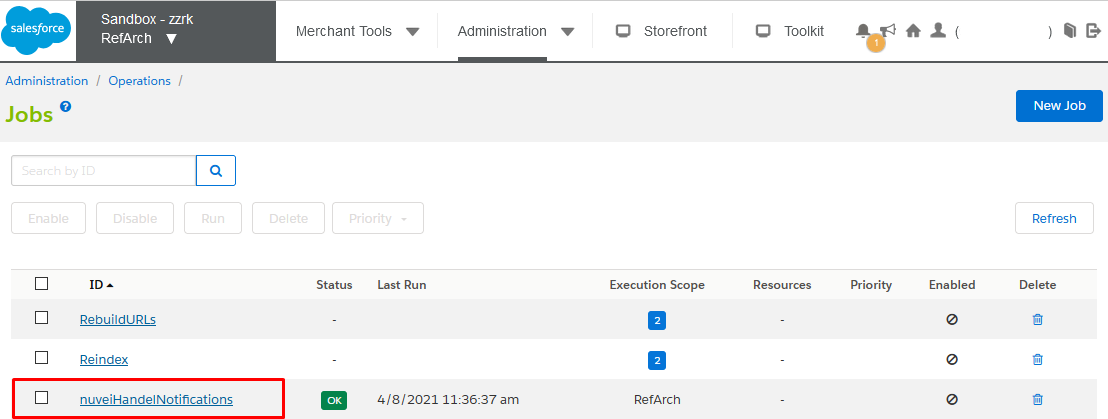
- Select the nuveiHandleNotifications job, and press the Job Steps tab.
- Set the scope for your sites as necessary.

5. DMN Configuration
To use Nuvei integration properly, set up several service URLs in your Nuvei’s Merchant Administration Interface, as follows:
- Log in to the Merchant Administration Interface.
- In the left menu select Settings, and then select My Integration Settings.
- Enter the following fields: Success URL, Pending URL, Back URL, Failure URL, and DMN URL.
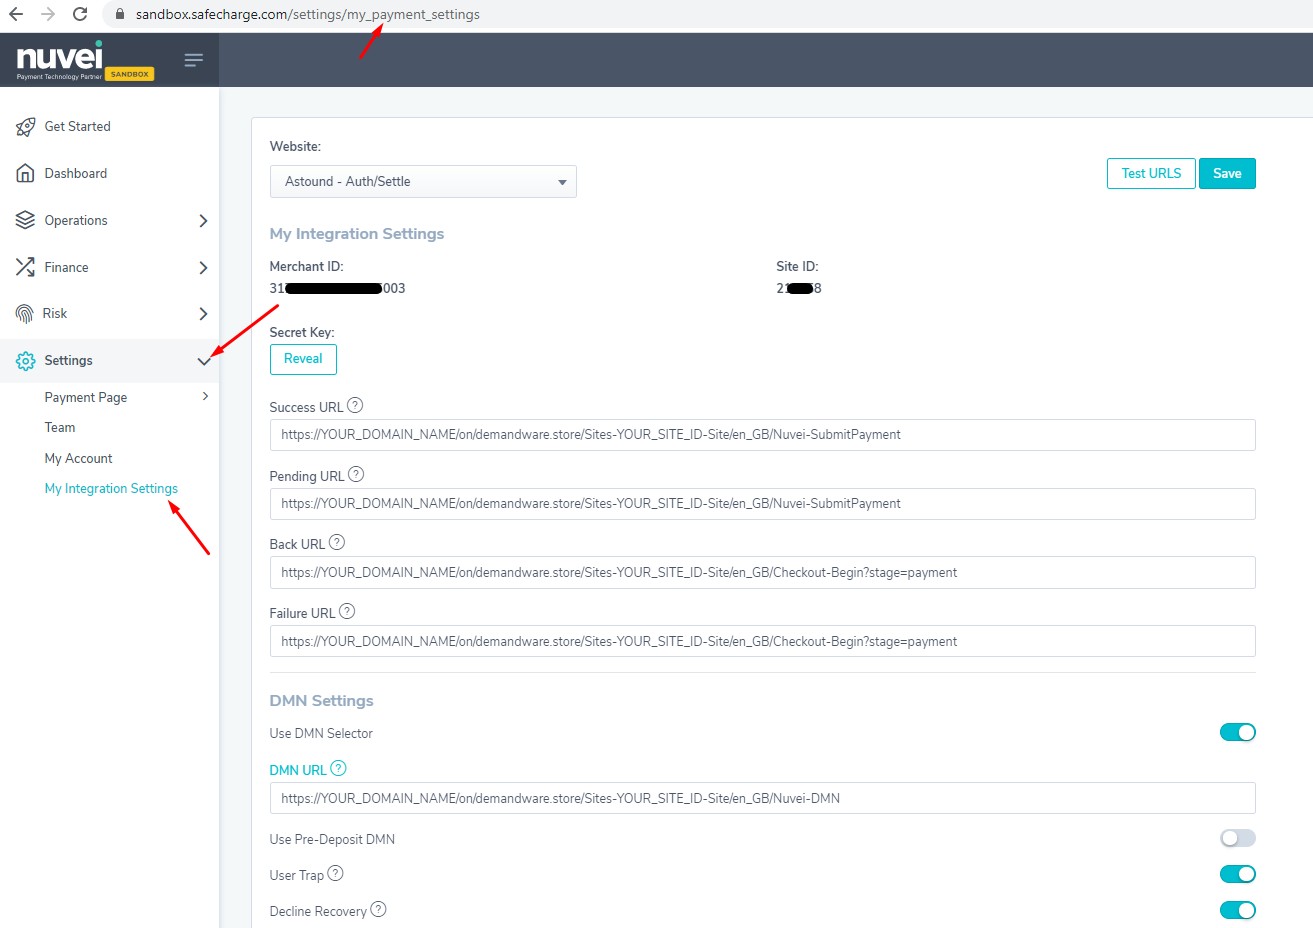
URL Description Value Success URL The URL the customer is redirected to after a SUCCESSFUL transaction. https://YOUR_DOMAIN_NAME/on/demandware.store/Sites-YOUR_SITE_ID-Site/default/Nuvei-SubmitPayment Pending URL The URL the customer is redirected to when the transaction status is PENDING. (Most APM flows return a Pending state at first.) https://YOUR_DOMAIN_NAME/on/demandware.store/Sites-YOUR_SITE_ID-Site/default/Nuvei-SubmitPayment Back URL If the user selects the BACK button/CANCELS, the transaction is redirected to this URL. https://YOUR_DOMAIN_NAME/on/demandware.store/Sites-YOUR_SITE_ID-Site/default/Nuvei-Back Failure URL Following a FAILED transaction, the user is redirected to this URL. https://YOUR_DOMAIN_NAME/on/demandware.store/Sites-YOUR_SITE_ID-Site/default/Checkout-Begin?stage=payment DMN URL The server URL where our Direct Merchant Notifications (DMN) is received. https://YOUR_DOMAIN_NAME/on/demandware.store/Sites-YOUR_SITE_ID-Site/default/Nuvei-DMN
Code Updates for SiteGenesis
For SiteGenesis implementations, after completing the configuration described above, perform the relevant Code Customization.
Testing Storefront Checkout Flow
Once the cartridge is installed and integrated, you can now test the functionality by placing an order on your sandbox.
Place the order using either:
1. Direct Mode: CC or APM
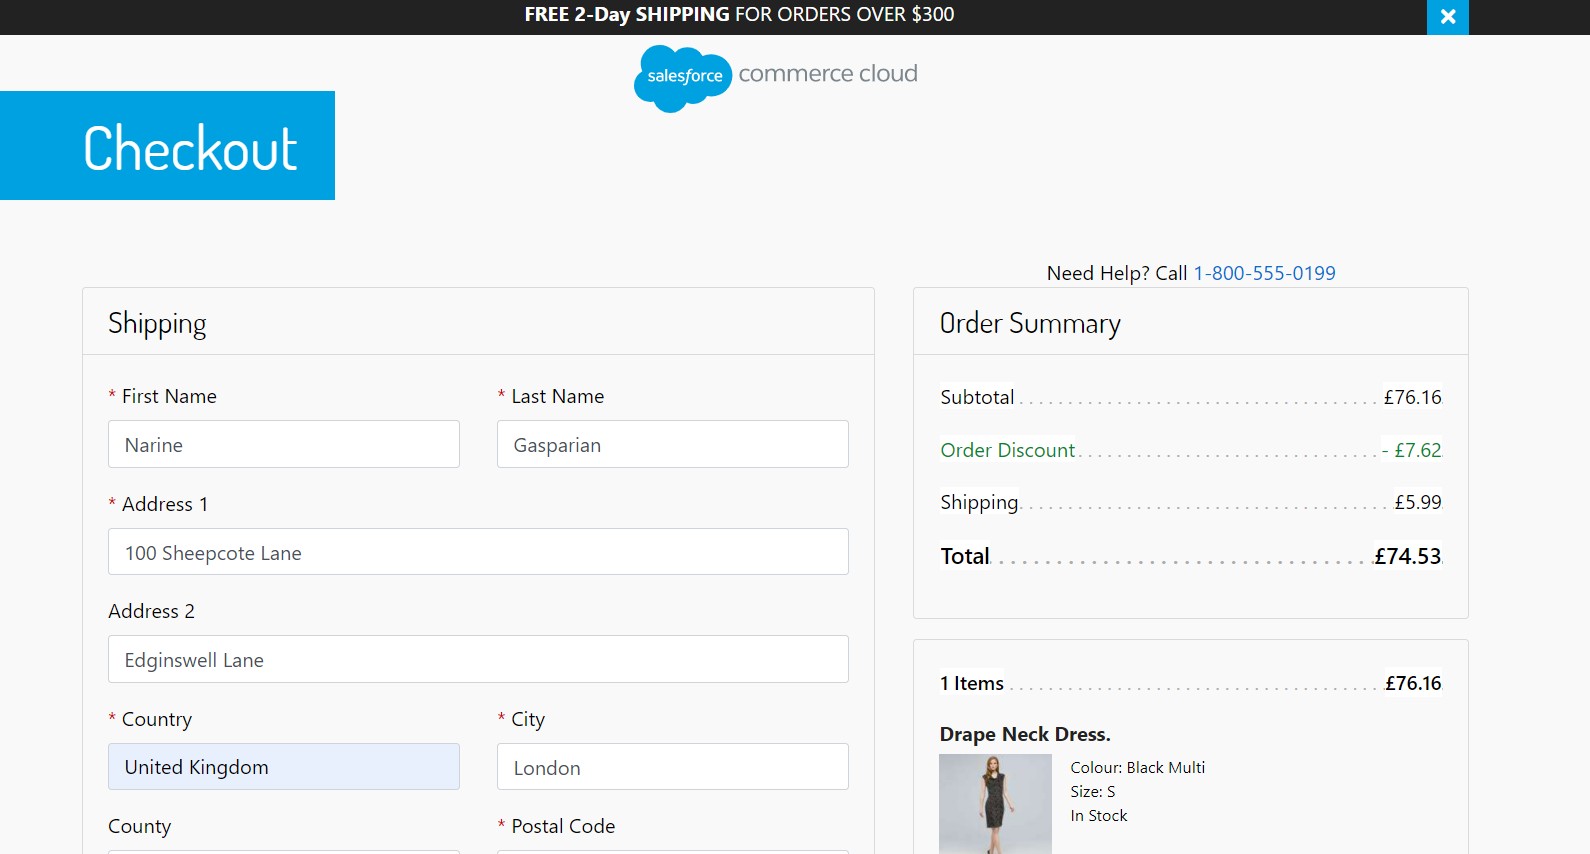
Shopping Page

Shipping Page
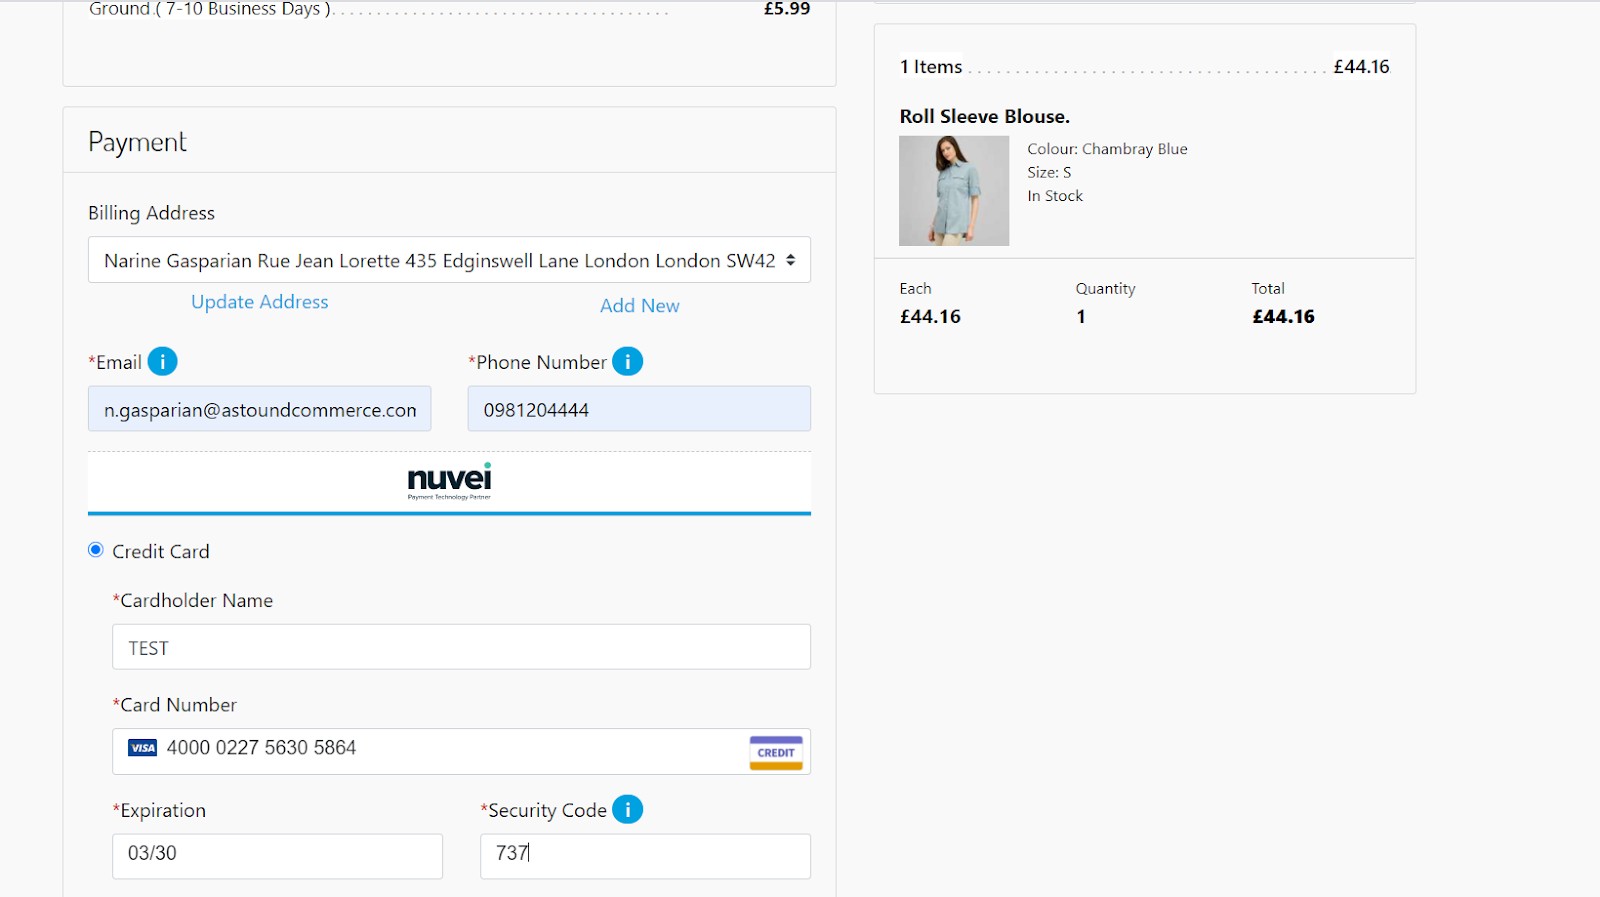
Direct Mode: Credit Card
Use testing cards from the list proposed in the documentation.
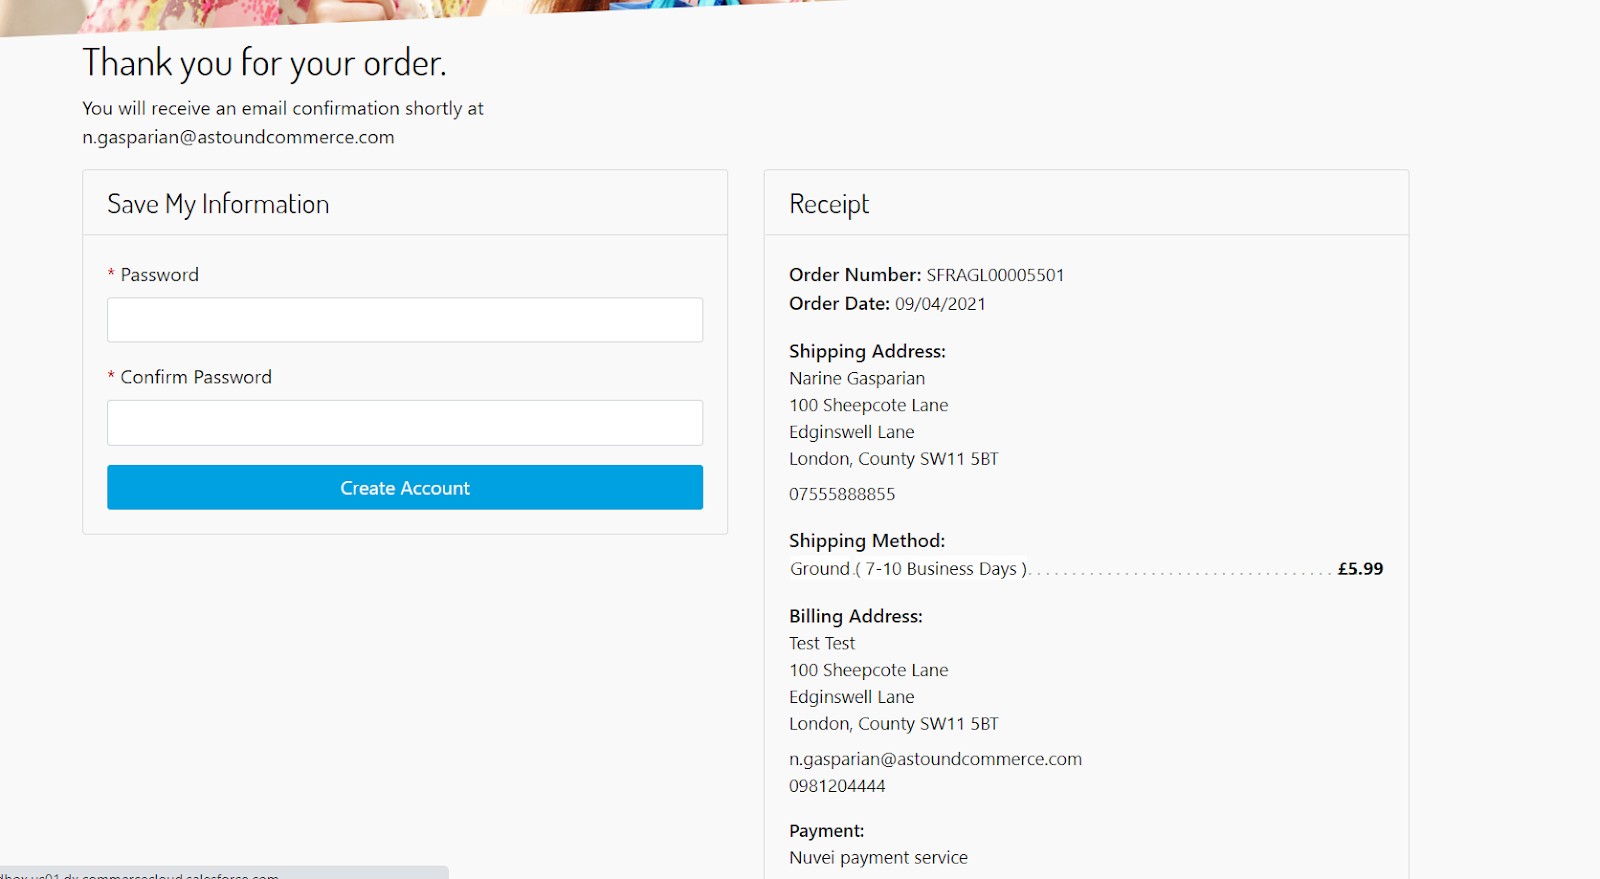
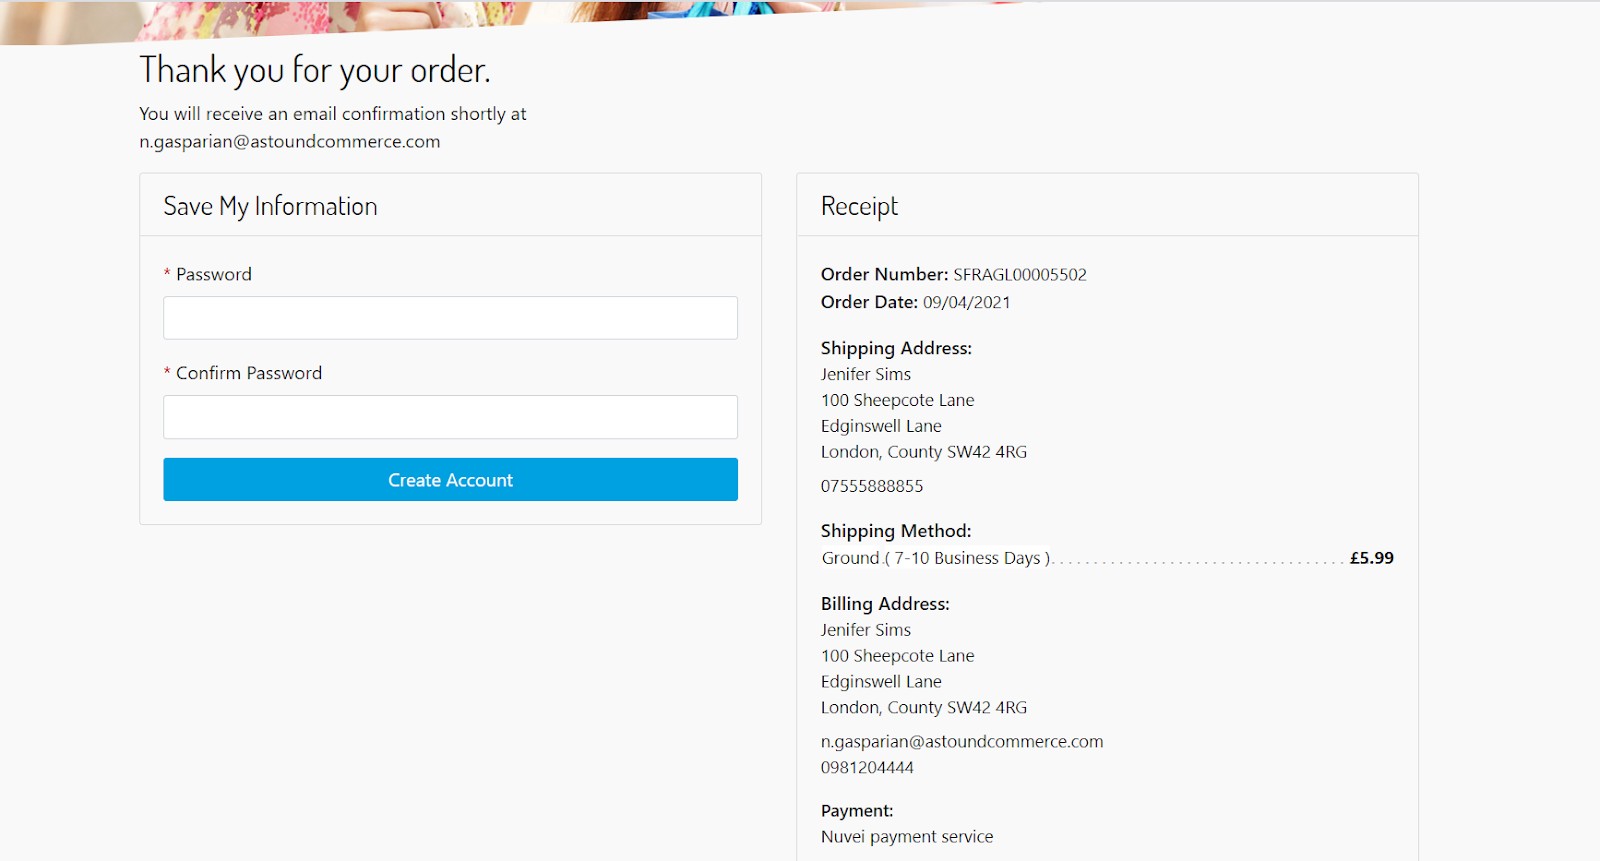
Thank you Page
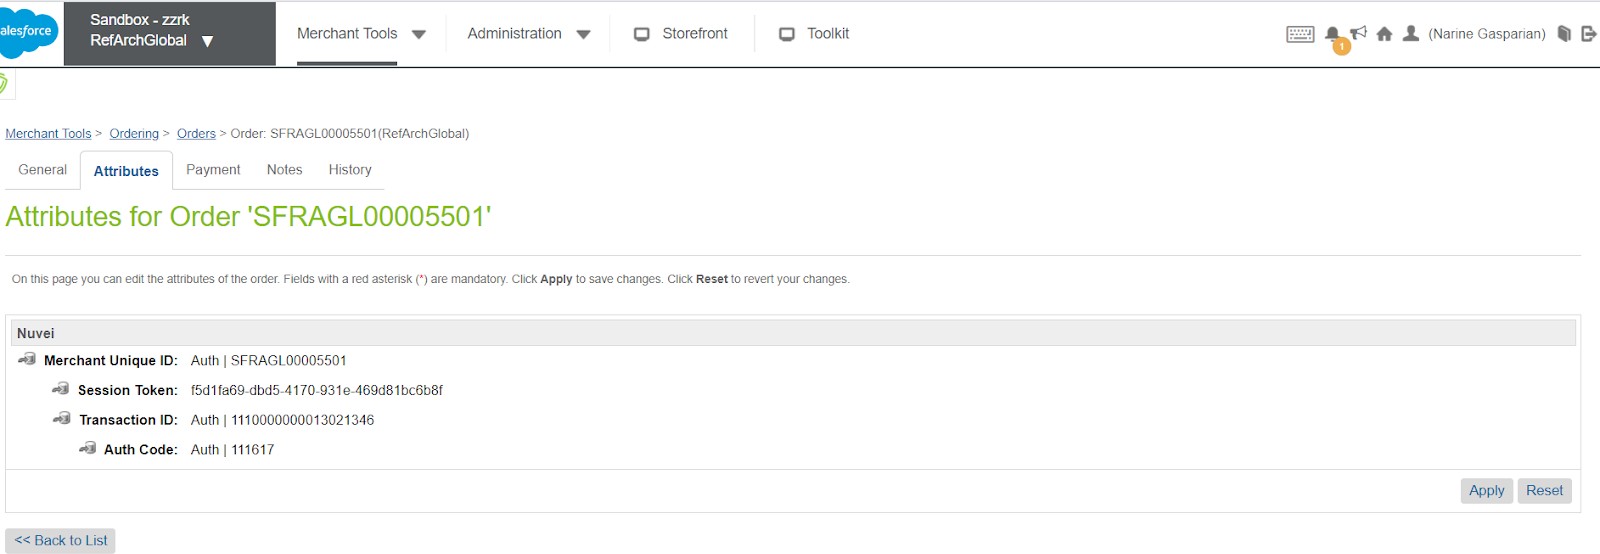
Order Attributes in BM
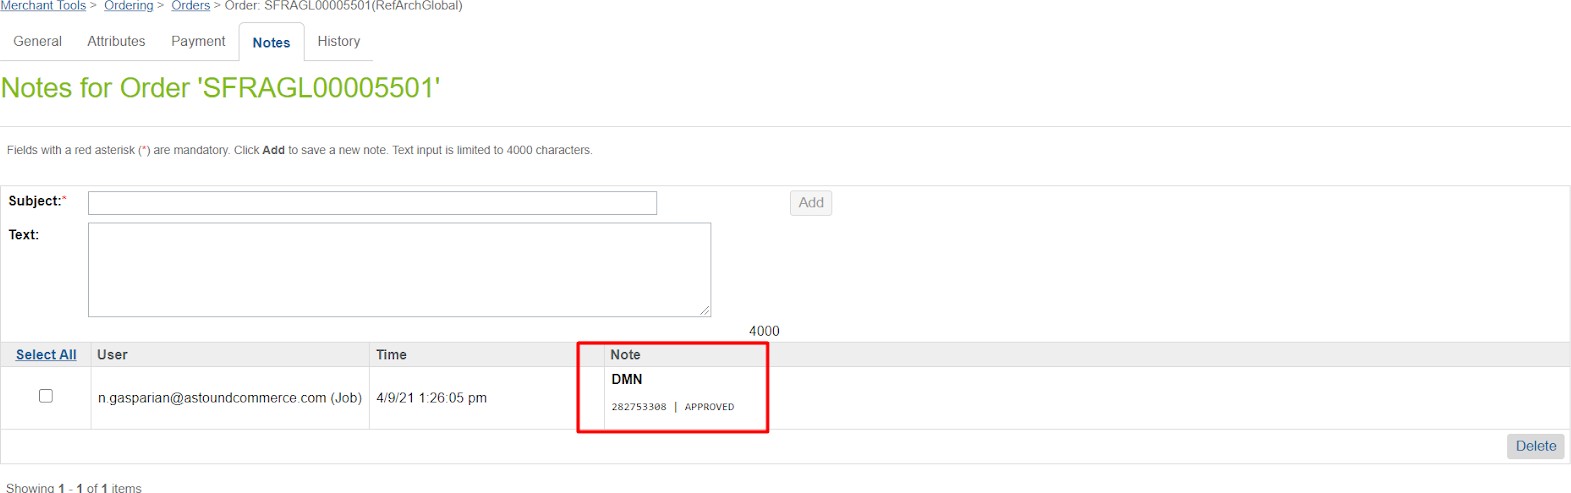
Direct Merchant Notification
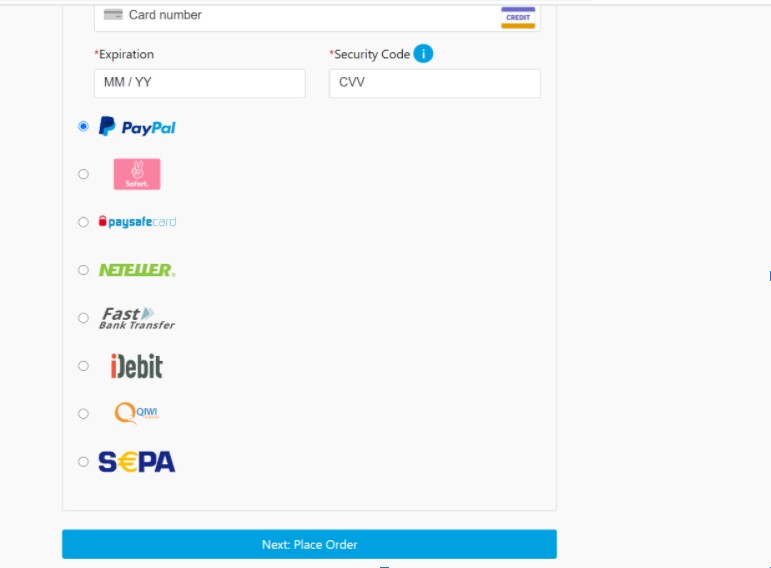
Direct Mode: Alternative Payment Methods
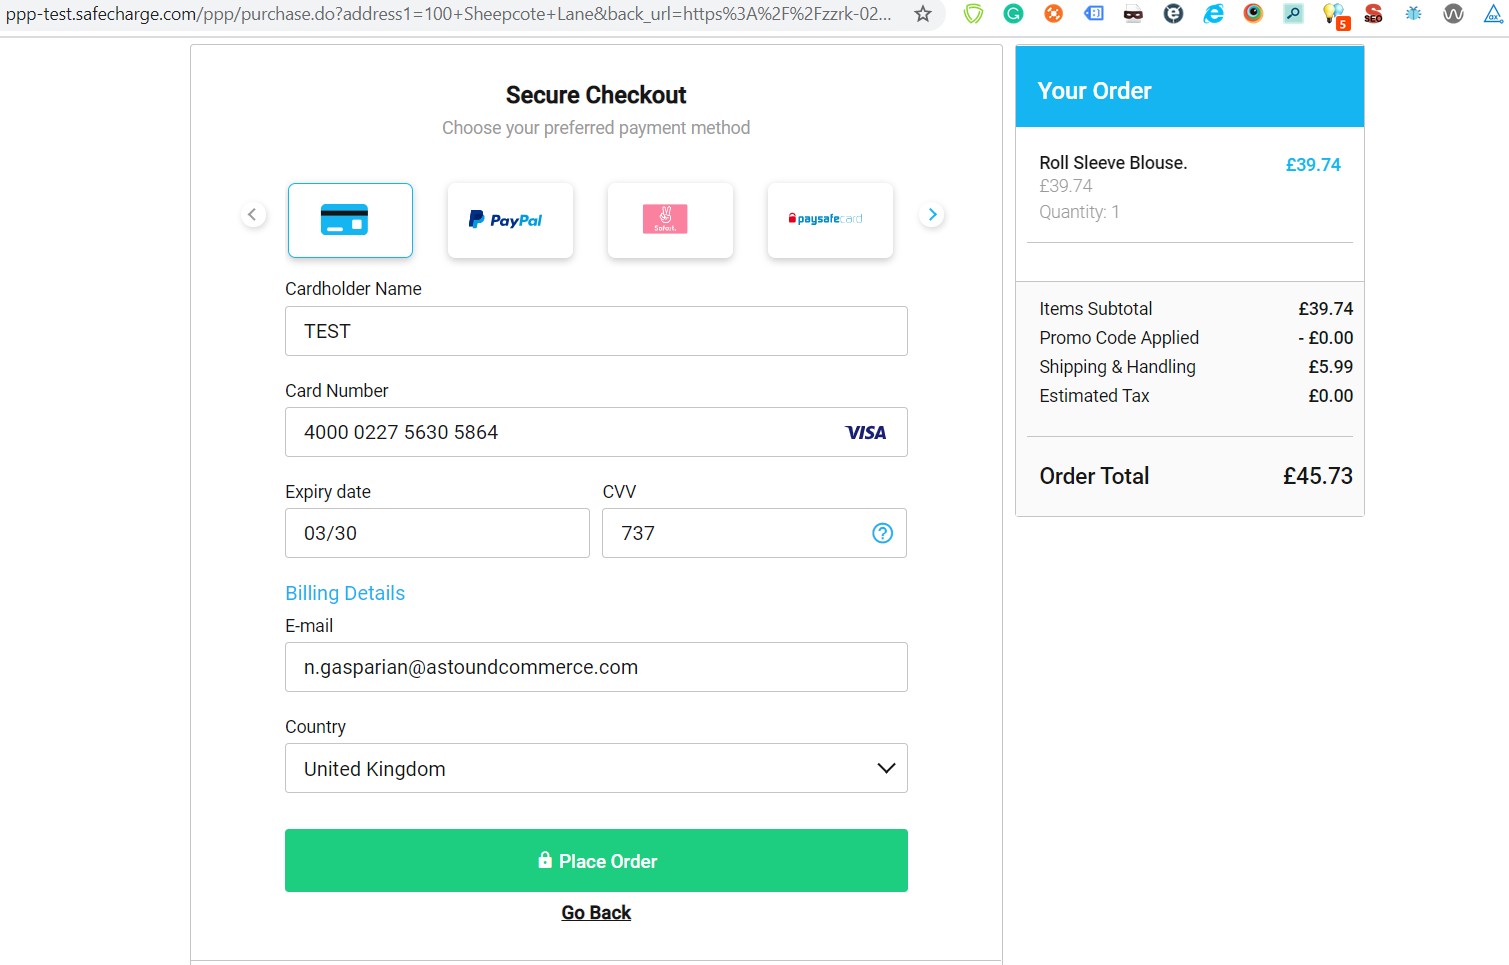
2. Redirect Mode: Hosted Payment Page
Nuvei Hosted Payment Page
Thank you Page
Appendices
Install Salesforce Cartridge
Add the Cartridge in the Salesforce Commerce Cloud Studio, as follows:
- Navigate to the link-nuvei folder and edit the package.json file.
- Ensure the base path is correctly resolved to the app_storefront_base, as shown below:
"paths":{ "base":"../storefront-reference-architecture/cartridges/app_storefront_base/" } - Ensure that Node.js v18 or higher is installed. The system has been tested with Node.js v18.19, which is the recommended version.
- Open the command prompt, run “npm install”, and then run “npm run build”.
- Create a dw.json file, in the same folder that contains the source code for the cartridge (that you downloaded).
Paste the following code in the dw.json:{ "hostname":"your-sandbox-hostname.demandware.net", "username":"your-login", "password":"your-pwd", "code-version":"version-to-upload-to" }
Set Up Business Manager
1. Activate the Cartridge
Add the cartridges to the Cartridge Path of the sites, in order to make Nuvei functionality available to the reference architecture, as follows:
a. Set up the Cartridge Path for SFRA
- Log in to the Business Manager.
- Navigate to Administration/Sites/Manage Sites.
- Press the site name, which takes you to the General (default) tab.
- Navigate to the Settings tab.
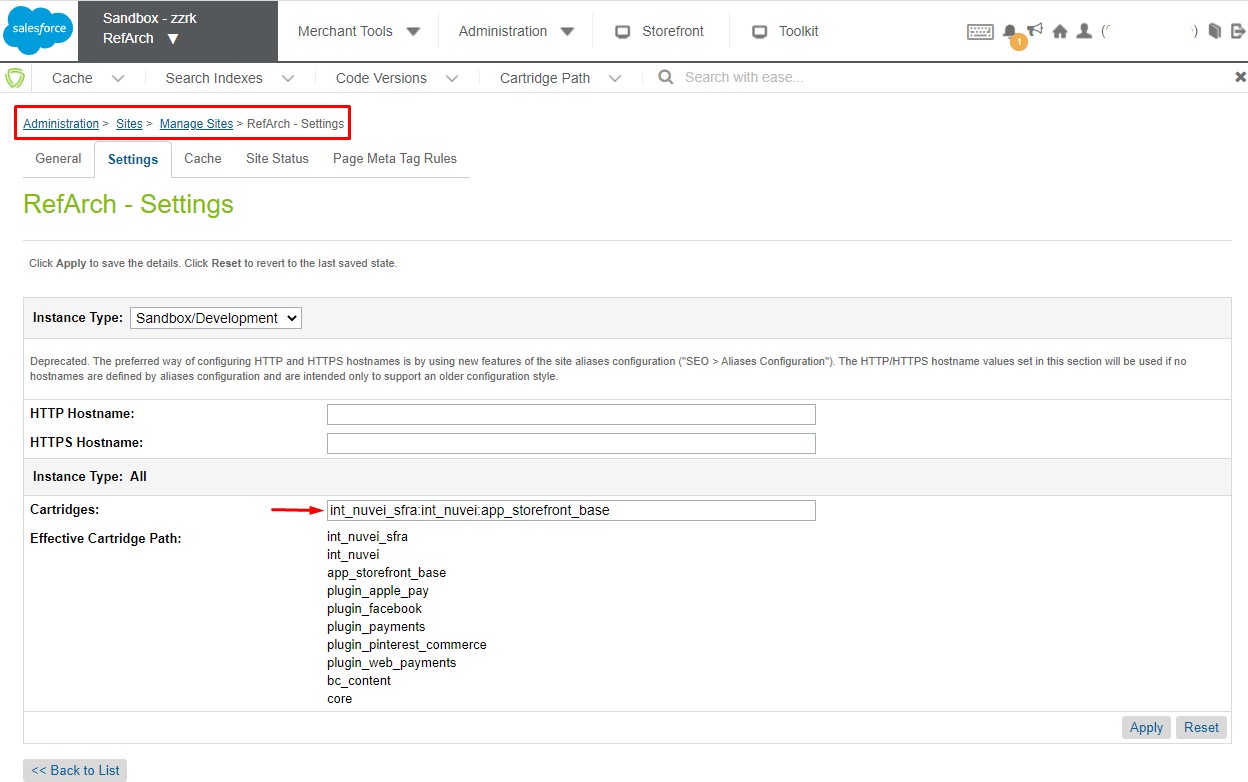
- In the Cartridges text box add:
int_nuvei_sfra:int_nuvei
For example: Cartridges:int_nuvei_sfra:int_nuvei:app_storefront_base
As shown below:
- Press Apply.
- Note: Keep in mind other cartridges and integrations. Therefore, the final cartridge path could look like this:
int_nuvei_sfra:int_nuvei:YOUR_OTHER_CARTRIDGES:app_storefront_base. - Note: Sandbox – To activate the cartridge for sandbox use, select the appropriate instance from the Instance Type dropdown list.
Then repeat steps 5 and 6 above.
- Note: Keep in mind other cartridges and integrations. Therefore, the final cartridge path could look like this:
- Repeat steps 3 to 6, for each site that uses Nuvei.
b. Set up the Cartridge Path for SiteGenesis Controllers
- Log in to the Business Manager.
- Navigate to Administration/Sites/Manage Sites.
- Press the site name, which takes you to the General (default) tab.
- Navigate to the Settings tab.
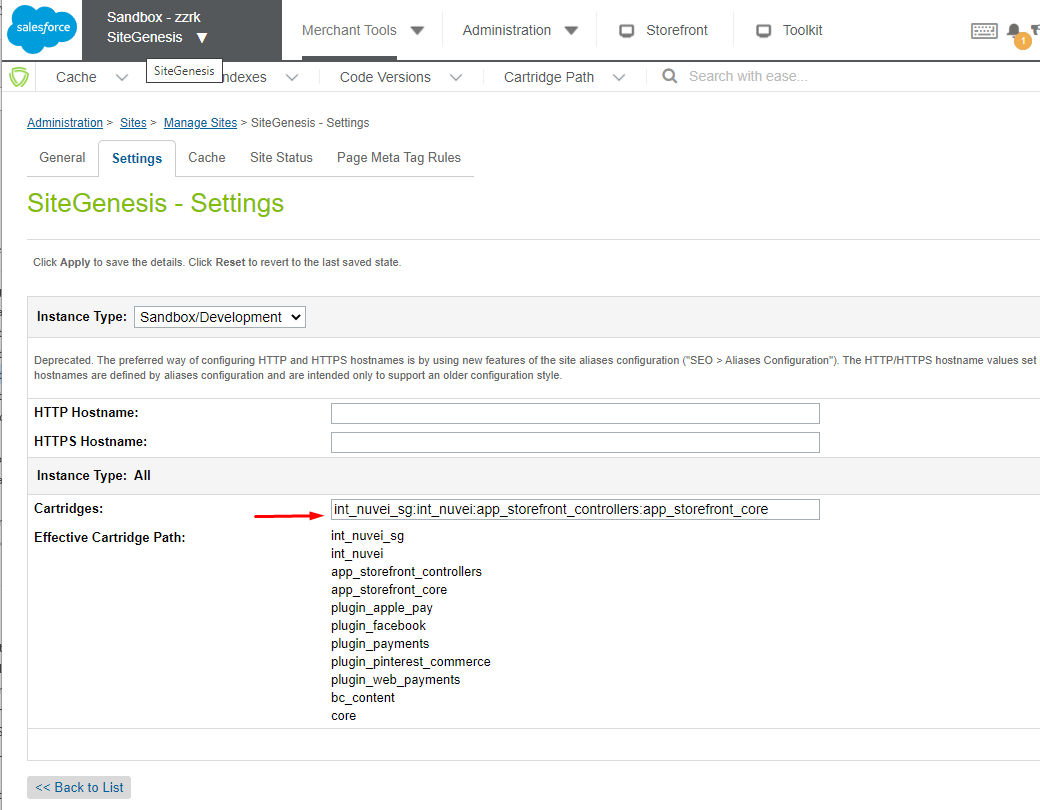
- In the Cartridges text box add: int_nuvei_sg:int_nuvei
For example: Cartridges:int_nuvei_sg:int_nuvei:app_storefront_base
As shown below:
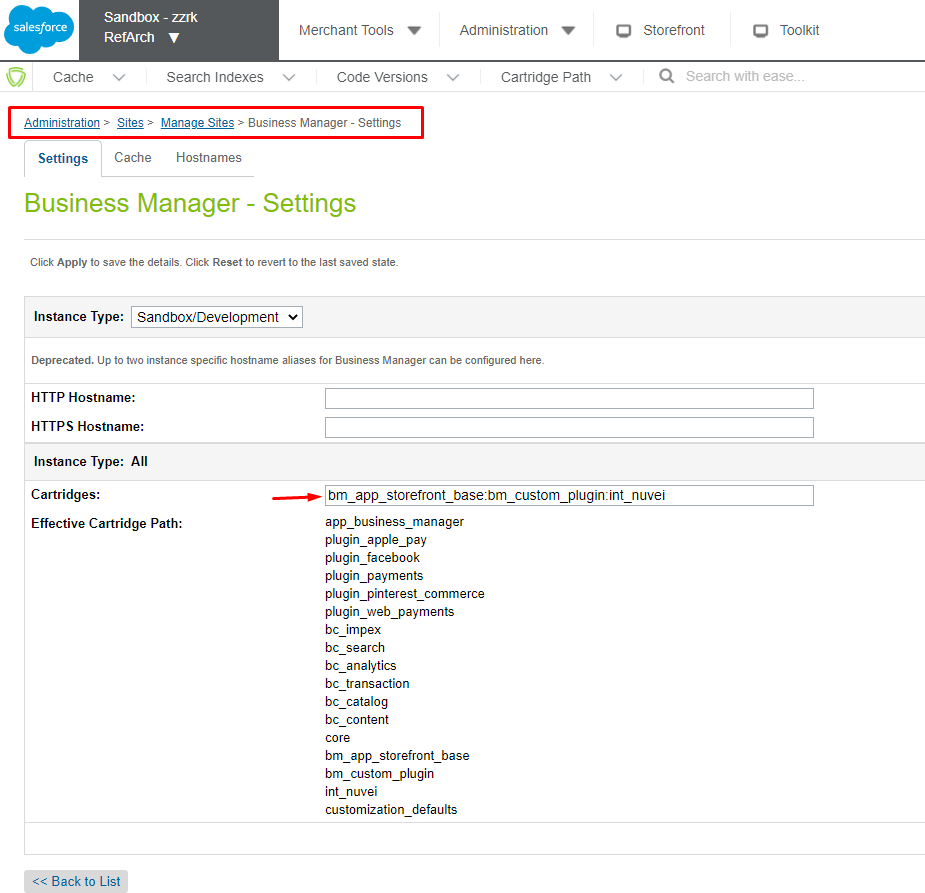
c. Set up the Cartridge Path for Business Manager
- To be able to run the job in the Nuvei cartridge, navigate to Administration/Sites/Manage Sites/Business Manager > Settings.
- In the Cartridges text field, enter:
int_nuvei.
For example:
Cartridges:bm_app_storefront_base:bm_custom_plugin:int_nuvei
As shown below:
- Press Apply.
2. Import the Metadata
All the import files are located in the import folder of the cartridge installation pack, the link_nuvei/metadata folder.
Import metadata (all the required Nuvei settings) with a single site import as follows:
- Navigate to the link-nuvei/metadata/ folder in the repository structure, and edit the site_import/jobs.xml file.
- Change the references in RefArch to your Site ID.
(If you prefer, or you can do this after the job is imported.) - Make sure that the link-nuvei/metadata/site_import/sites folder contains a destination folder (named with the site ID) for each site that you are planning to use with the Nuvei Plugin (into which the XML is imported).
- Change the folder named RefArch to your first site ID.
- Then for each of the other site IDs that you are planning to use with the Nuvei Plugin, copy and rename the folder to the name of the site ID.
- Navigate to the link-nuvei/metadata/site_import folder in the repository structure, and zip the contents of the site_import folder into a file.
- Log in to Business Manager and navigate to Administration/Site Development/Site Import & Export.
- Press Upload, and select the zipped file (containing the contents of the site_import folder).
- Press Import.
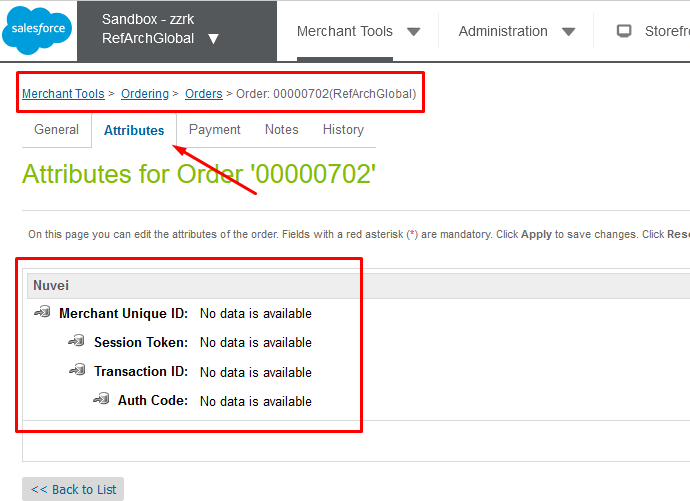
After a successful import, all the cartridge configurations are available to you, according to your Nuvei account data. - Verify the order-level attributes in Business Manager as follows:
Navigate to Site/Ordering/Order.
Open any order and navigate to the Attributes tab. It should appear similar to this screenshot:
Code Customization
For SiteGenesis implementations, after completing the Configuration steps described above, perform the relevant code customization:
1. SiteGenesis Controllers
In order for the integration to work, a few updates needs to be made on the storefront cartridge.
All the changes are stored in cartridge nuvei_sg_changes.
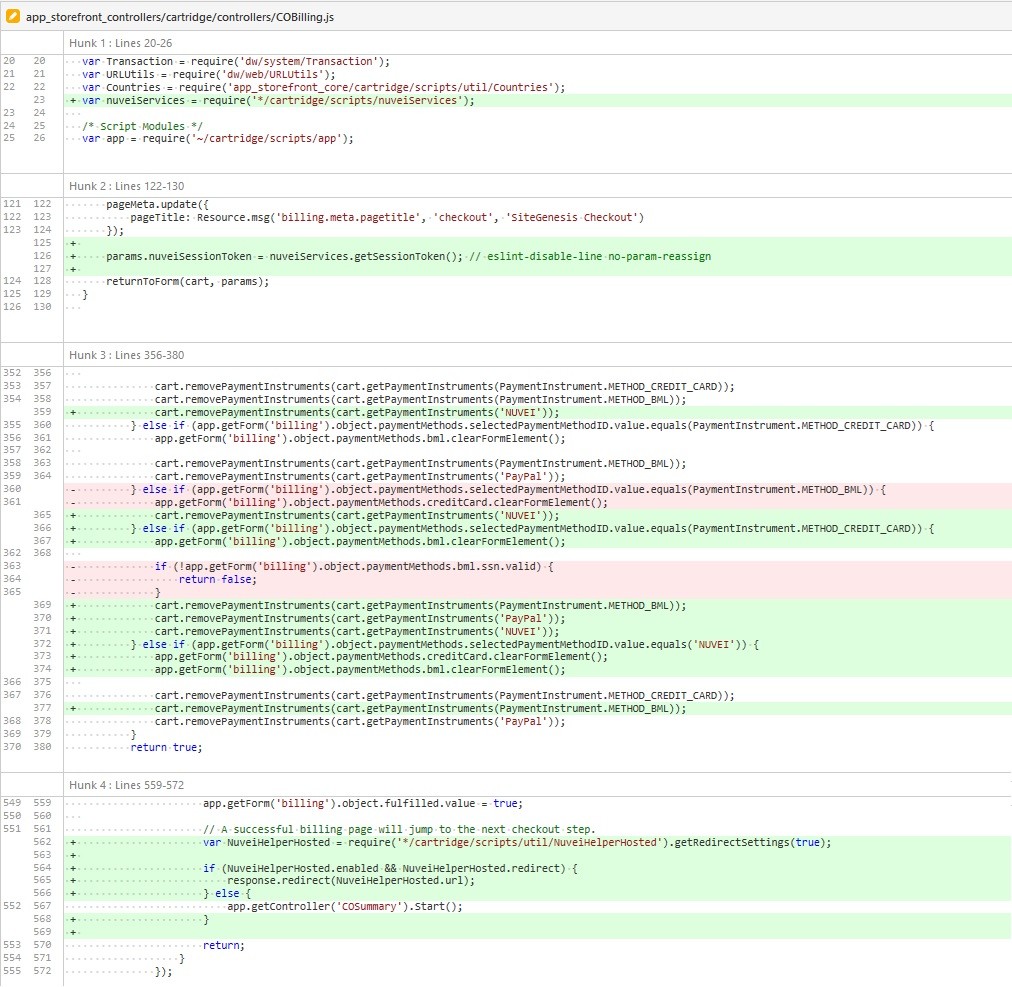
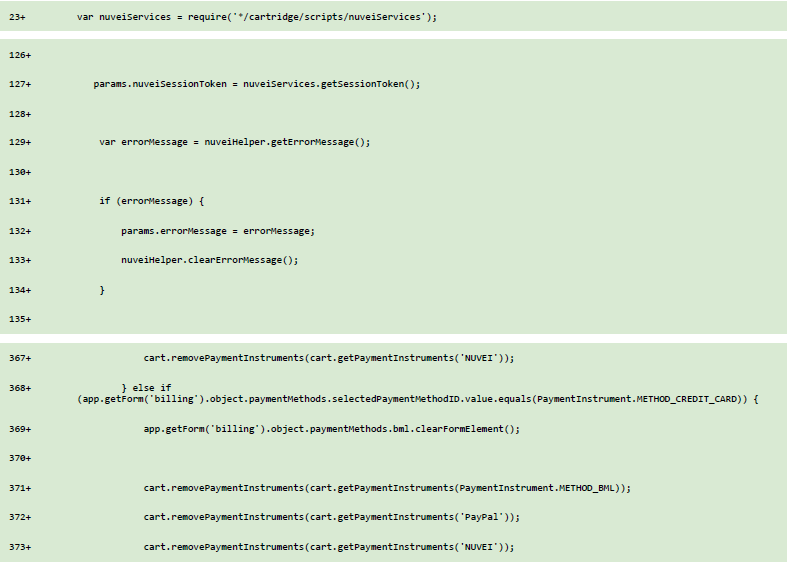
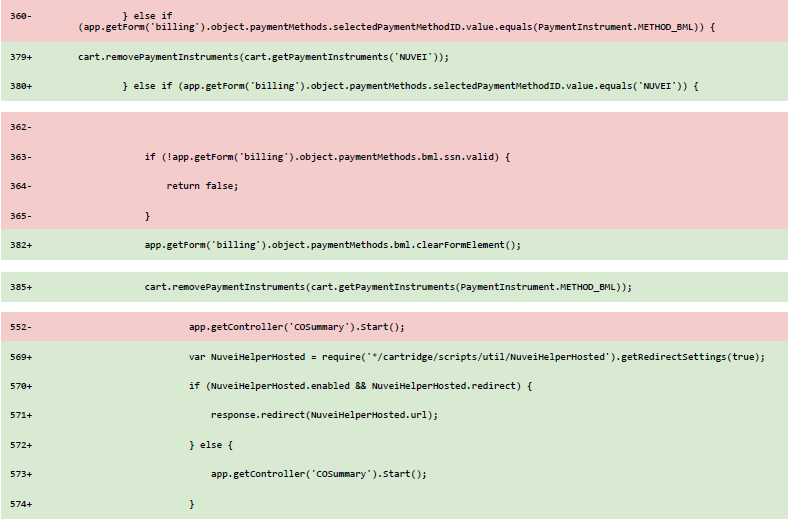
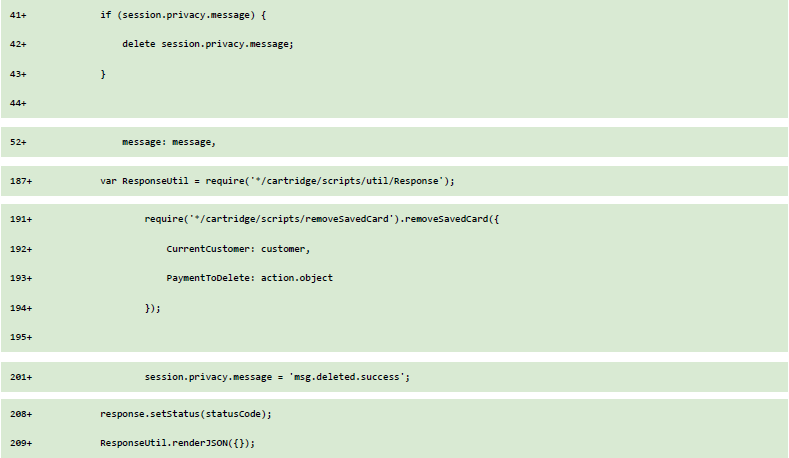
app_storefront_controllers/cartridge/controllers/controllers/COBilling.js: Modify
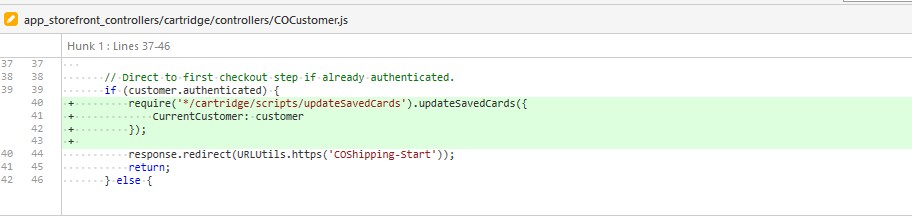
app_storefront_controllers/cartridge/controllers/controllers/COCustomers.js: Modify

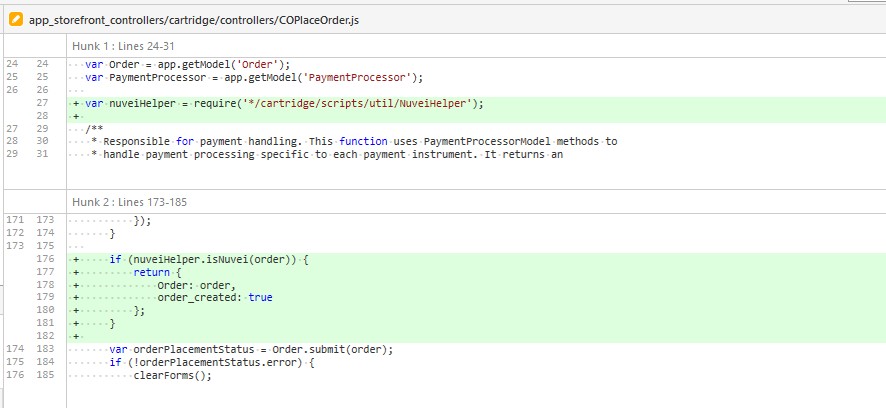
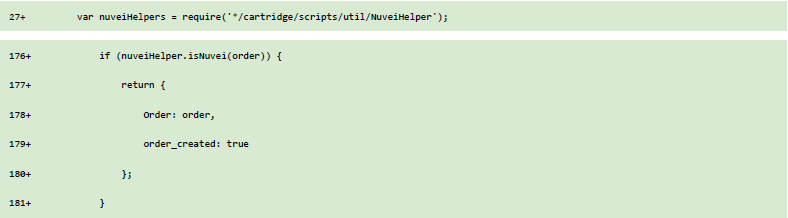
app_storefront_controllers/cartridge/controllers/COPlaceOrder.js: Modify
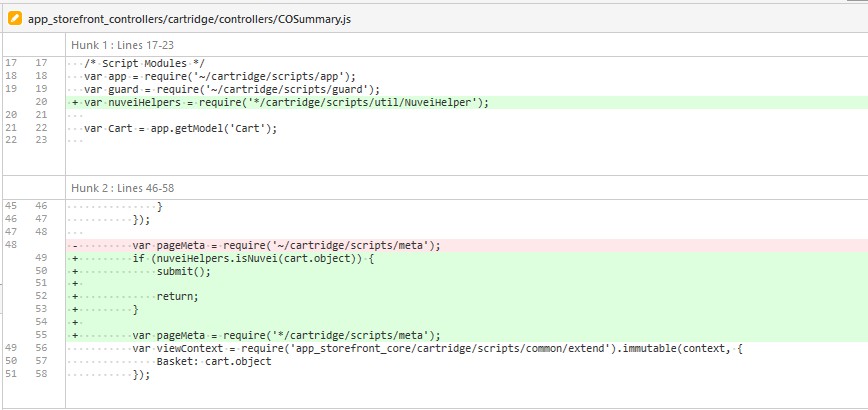
app_storefront_controllers/cartridge/controllers/COSummary.js: Modify

app_storefront_controllers/cartridge/controllers/PaymentInstruments.js: Modify


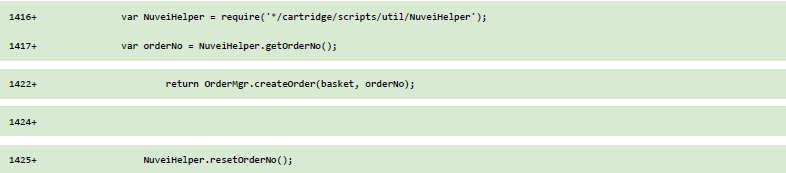
2. SiteGenesis Models
app_storefront_controllers/cartridge/scripts/models/CartModel.js: Modify

3. SiteGenesis Forms
app_storefront_core/cartridge/forms/default/billing.xml: Modify
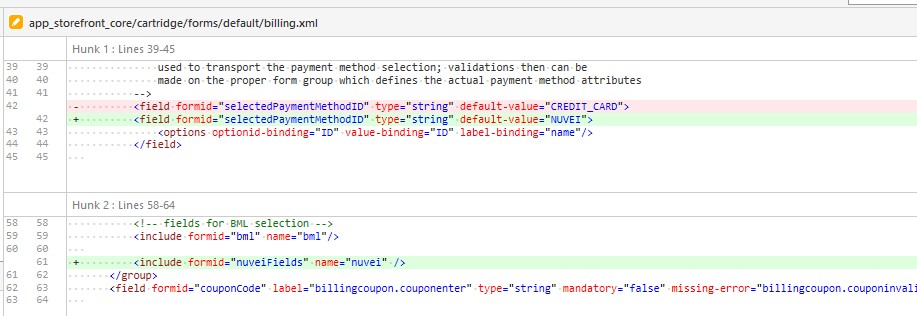
![]()
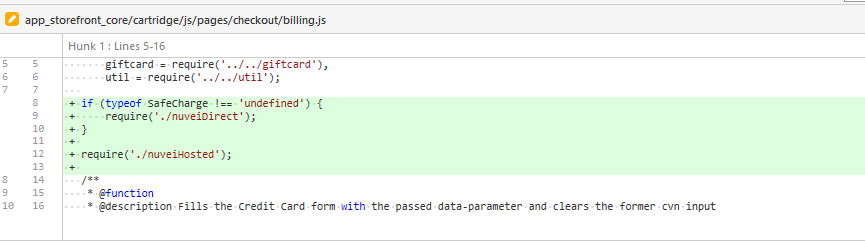
4. SiteGenesis Client JS
app_storefront_core/cartridge/js/pages/checkout/billing.js: Modify

app_storefront_core/cartridge/js/pages/checkout/nuveiHosted.js Add
app_storefront_core/cartridge/js/pages/checkout/nuveiDirect.js Add
5. SiteGenesis SCSS
app_storefront_core/cartridge/scss/default/nuvei.scss Add
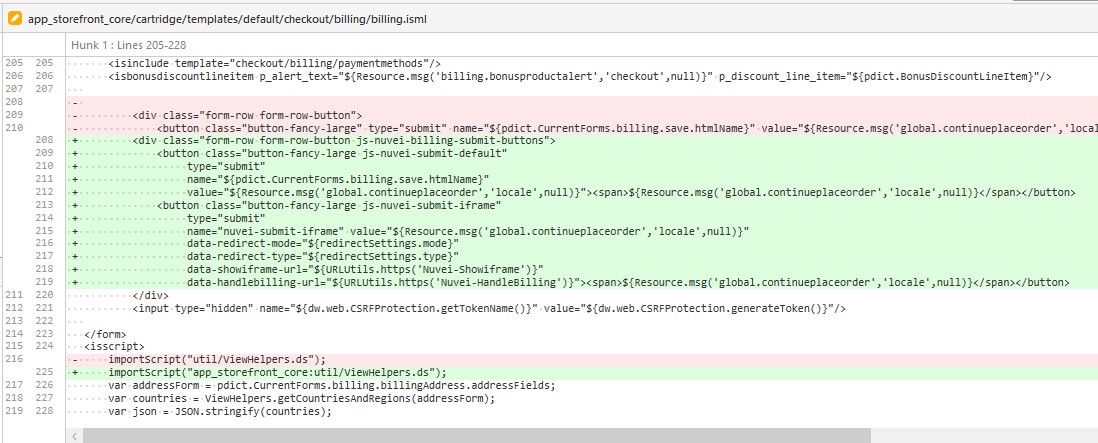
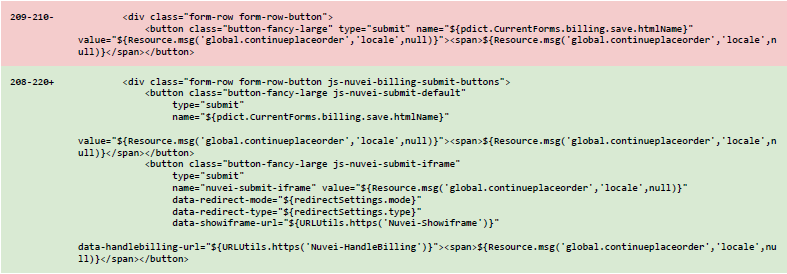
6. SiteGenesis ISML
app_storefront_core/cartridge/templates/default/checkout/billing/billing.isml
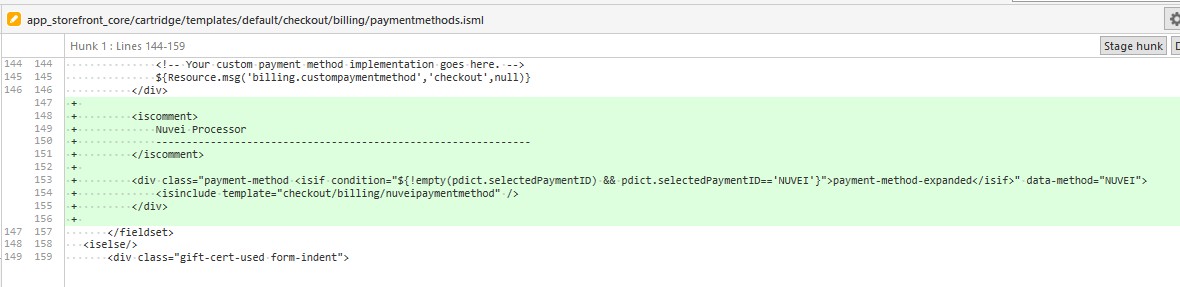
app_storefront_core/cartridge/templates/default/checkout/billing/paymentmethods.isml

 Last modified May 2025